Showing posts with label blueberry. Show all posts

July 20, 2024

Blueberry & Raspberry Muffin Skillet Cake ~ #TheCakeSliceBakers

This blueberry and raspberry skillet cake is a burst of fruity deliciousness, combining the sweet and tangy flavors of fresh berries with a golden, caramelized crust. Each bite is a perfect blend of juicy berries and moist, tender cake, making it an irresistible treat.


July 20, 2022

Blueberry Muffin Cake ~ #TheCakeSliceBakers

This Blueberry Muffin Cake tastes exactly like a cross between a blueberry 
muffin and a coffee cake, and you won't believe how easy it is to make.


February 17, 2022

Blueberry Citrus Thyme Bundt Cake ~ Bundt Bakers

We all know that blueberries and citrus play very nicely together in cakes,
but adding a little thyme elevates the flavor sensation even further.


August 20, 2020

Earl Grey & Blueberry Tea Cakes ~ TheCakeSliceBakers

 As horrible as this pandemic has been, one small bright point in it all is that people have
discovered their love of baking - bread, cakes, biscuits, pies, or a combination of them all.


June 25, 2017

Blueberry Sour Cream Crumb Cake

It is berry season, and this crumb cake definitely takes advantage of the beautiful blueberries that are making their appearance at farmers markets and supermarkets.  A soft crumb, juicy berries, and a sweet-tart drizzle all add up to an amazing cake.


June 06, 2017

Blueberry Jam Rose Buns

These beautiful Blueberry Jam Rolls are shaped like roses, and not only
are they delicious, but they are so easy to make!


June 17, 2014

Red, White & Blue Oatmeal Cookies ~ #CreativeCookie Exchange


It is #Creative Cookie Exchange time again and this month's theme is Red, White, and Blue.  A couple of different ideas went through my mind until I came to what I thought was a great idea. However, we all know about those best laid plans, don't we......

August 28, 2013

Blueberries & Cream Crumb Bars


Blueberries and cream is a match made in heaven.  Although it is now possible to get blueberries year-round, this is the time of year that they are the most affordable. Fresh blueberries make a great snack on their own but when you add them to baked goods the results are amazing.

Recently I used them when I made some scones, but this time I wanted a creamy layer for them to nestle in.  While looking for recipes I saw a lot of blueberry crumb bars and a few blueberry custard bars, but none that combined the custard and a crumb topping.  I decided to use the base and crumb topping from my recent post for Razzeleberry bars and a custard filling, and the combination was a great success.

Last night I had a compulsory parent meeting for my daughters JV volleyball team, and there was to be a potluck afterwards, so I thought these would be perfect.  I think they must have been because when the container I brought them in was returned to me there were a few crumbs and a lone blueberry in the bottom.  I was so glad that I had kept a few small pieces at home or I would not have gotten to try the bars at all.

I just love the base of these bars.  The almond meal gives it such a distinct nutty taste, and the hint of lemon complimented the blueberries perfectly, and it just seems to melt in your mouth once you bite into it. They were prefect on their own, but I think that a la mode may just put them over the top.


Blueberries & Cream Crumb Bars
(Printer Friendly Recipe)

Ingredients
Base/Topping ~
  • ½ cup white granulated sugar
  • ½ brown sugar
  • 1 teaspoon baking powder
  • 3 cups all-purpose flour, divided
  • ¾ cups almond meal
  • 1 cup cold butter, cut into small cubes
  • 1 egg
  • 1 teaspoon pure vanilla extract
  • ½ teaspoon salt
  • 1 tablespoon lemon zest
  • powdered sugar for sprinkling
Custard ~
  • 3 eggs
  • 1¼ cups sugar
  • ¾ cup sour cream
  • ½ cup all-purpose flour
  • 3 tablespoons cornstarch
  • ½ teaspoon salt
  • 1 teaspoon vanilla extract
  • 2 cups blueberries
Preparation
Crust ~
  1. Preheat the oven to 375℉. 
  2. Line a 9×13 inch pan with parchment paper and spray with nonstick cooking spray. 
  3. In a small bowl, whisk the egg and vanilla together until combined. 
  4. In the bowl of a food processor add ½ cup white sugar, ½ cup brown sugar, 2½ cups flour, salt, and baking powder; pulse to blend. 
  5. Add cold butter; pulse until small crumbs appear. 
  6. Remove half of the crumbs and set aside. 
  7. Add almond meal, remaining ½ cup of flour, lemon zest, and egg/vanilla mixture to the food processor; pulse until mix comes together. 
  8. Press the almond meal-flour mixture evenly into the bottom of prepared pan and bake in the oven for 10 minutes, remove and cool slightly.
  9. While the base is baking prepare the custard filling.
Custard ~
  1. Place eggs in a medium-sized bowl and whisk the eggs until combined.
  2. Add the sugar and continue to whisk until foamy.
  3. Add the sour cream, flour, cornstarch, vanilla, and salt and whisk until incorporated. 
  4. Fold in the blueberries. 
  5. Pour the custard mixture over the crust and smooth the top.
  6. Sprinkle the reserved crumb topping over the custard. 
  7. Bake until the center is set and the topping is golden, about 30-40 minutes.
  8. Let cool, then refrigerate.
  9. Once cold, sift powdered sugar over the top and cut into bars/squares/triangles.

Recipe by All That's Left Are The Crumbs©


July 27, 2013

Blueberry Cream Cheese Scones


There is a place quite close to Waikiki Beach that sells the most amazing scones.  Diamond Head Market & Grill is quite well-known to locals and tourists alike. They have a great variety of gourmet foods that are packaged in to-go containers, so it is the perfect place to stop and pick up a picnic lunch. They also have a great selection of baked goods including pies, cakes, cookies, and their famous scones.  Blueberry was the original flavor and is probably their most popular, but they have added a few new flavors over time including banana, apple crumb, and pineapple. Once you have had one of their scones you are hooked for life.

Since they sell hundreds of these scones every day, it is not surprising that the owner is keeping the recipe a secret.  Of course that has not stopped people from trying to copy it, including me.  In my quest to find a recipe for these scones I came across an article that had been written back in 2003 by Betty Shimabukuro (food writer & recipe guru in Hawaii) in the Honolulu Star Bulletin that seemed pretty close.  I decided to give it a try, with a few small tweaks.


Every time I that I have eaten these scones they seemed to have a very soft, pillowy crumb and I would always wonder how they got them so soft. I decided to replace some of the all-purpose flour with cake flour to achieve a softer and finer texture.  One of my favorite things about these scones was the glaze on top, so I omitted sprinkling the berries with sugar and added a glaze that was brushed on liberally with a pastry brush as soon as they came out of the oven. I also decided that I wanted to use fresh blueberries. I found that the easiest way to incorporate the berries and cream cheese pieces was to leave the dough in the bowl, poke a few berries and cream cheese pieces into it and then gently put my hand underneath the dough and fold it in half, repeating this until all were incorporated. Also, the recipe did call for cutting the cream cheese in pieces, which I have left in the recipe below, but I found it easier to just break off pieces by hand as I was incorporating it.

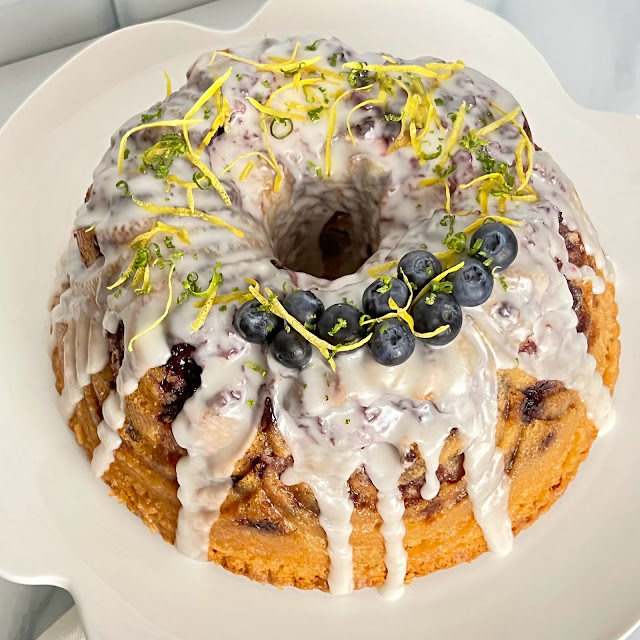
My scones were a little smaller than the ones you will find at Diamond Head Market, but I have to say that the taste was a perfect replica.  Warm from the oven, with a little glaze over the top, they were melt-in-the-mouth good.  I found myself breaking off just a piece here and there throughout the day, until I finally thought to myself this is ridiculous, so I made a cup of my favorite coffee and sat down to relax and enjoy one.  And I am so glad that I did.


Blueberry Cream Cheese Scones
(Printer Friendly Recipe)

Ingredients

  • ⅓ cup butter, cut into small pieces
  • 1½ cups all-purpose flour
  • 1 cup cake flour
  • ½ cup sugar
  • 2 teaspoons baking powder
  • ¼ teaspoon salt
  • ⅓ cup milk
  • 3 ounces cream cheese, softened
  • 1 egg, beaten
  • ½ cup blueberries
  • 2 ounces cream cheese, cut in 1/2-inch pieces (see note above)
  • 1 cup powdered sugar
  • ¼ cup hot water


Preparation

  1. Preheat oven to 400℉.
  2. Line a cookie sheet with parchment.
  3. Combine butter, flour, sugar, baking powder and salt in a bowl and cut with a pastry blender or two butter knives until crumbly (I like to use my hands for this).
  4. Whisk milk into softened cream cheese (3 oz), add egg and continue to whisk until well-combined. 
  5. Stir cream cheese mixture into flour mixture until dough forms a ball - if the dough is a little wet sprinkle some additional flour on top and gently knead).
  6. Gently push blueberries and cream cheese pieces (2 oz) into the dough to incorporate evenly. Be careful not to crush the berries or mash the cream cheese pieces.
  7. Using a large spoon or (ice cream scoop) drop mounds of dough onto a cookie sheet to make 8 scones. Tuck berries and cream cheese pieces into the dough as much as possible.
  8. Bake for 18 to 20 minutes, until golden. 
  9. While the scones are baking make the glaze; place the powdered sugar in a small bowl, gradually add the hot water, and whisk until smooth. Once the scones are removed from the oven glaze them generously with this mixture.
Recipe adapted from The Honolulu-Star Bulletin by ATLATC.


July 04, 2011

Red, White & Blue Waffles


Happy 4th of July!  Hope you all have a wonderful day that includes family, friends, fun, fireworks and lots of yummy food.

We decided to start our morning off with some patriotic red, white and blue waffles.  It was a little bit of a mad rush because I also needed to get the baked beans into the slow cooker (recipe to come a little later). In a very short amount of time I managed to use a good number of bowls, measuring spoons, pots, and utensils.  Usually I try to clean as I go but that wasn't an option this morning.  Luckily for me a magic genie appeared and washed up everything for me.  Well, really it was my wonderful husband, but it was magical.  In between doing this he also whipped up a White Sangria (another recipe to follow soon), and had it in the fridge to chill.

These waffles were inspired by ones that appeared on Kita's blog, Pass the Sushi.  Her post made me laugh because it was entitled "Blueberry Sour Cream Waffles for When Gerard Butler Visits".  The waffles sounded amazing, and who doesn't want an amazing recipe when someone like Gerard visits?  I mean you have to be ready don't you?

My refrigerator contained a plethora of berries - blackberries, blueberries, strawberries, and raspberries - but I decided to use blueberries and raspberries for my waffles.  I used only all-purpose flour, mainly because I did not have any whole wheat pastry flour, and I added some cinnamon to the mix.  A little dusting of powered sugar gave them the red, white, and blue look.  I do agree with Kita that a dollop of cream, or even sour cream, would make an excellent addition but these were gobbled up too quickly to do so today. All that accompanied them was some maple syrup.

I wanted to pass on a tip for transferring the batter to the waffle maker.  I have always used the little cup that came with the waffle maker.  It holds about one cup, but it is always difficult to get all of the batter out of it.  Previously I have resorted to using a mini spatula to scrape the sides as I pour the batter into the waffle maker.  This morning I decided to grab my largest ice cream scoop and measure how many scoops equaled the amount of batter in the cup.  It worked out to two full scoops.  I cannot tell you how much easier it is to use an ice cream scoop to transfer the batter, and the built in scraper means that all of the batter is transferred with a squeeze of the handle.


Red, White, & Blue Waffles
(Printer Friendly Recipe)

Ingredients
  • 2 cups all-purpose flour
  • 1½ teaspoons baking powder
  • 1 teaspoon baking soda
  • ½ cinnamon
  • ½ teaspoon salt
  • 1 cup sour cream
  • 1 cup whole milk
  • 3 eggs
  • 8 tablespoons butter, melted and cooled
  • ¾ cup blueberries
  • ¾ cup raspberries
Preparation
  1. Preheat your waffle iron on medium-high heat.
  2. In a large bowl, combine flour, baking powder, baking soda, and salt.
  3. In a smaller bowl, whisk together the milk and sour cream, and then whisk in the eggs. 
  4. Pour the wet ingredients into the dry, and stir just until combined. 
  5. Fold in the butter, and then the blueberries and raspberries, stirring minimally.
  6. Pour 1/4 cup of batter per waffle onto the iron and cook until the waffles are a light golden brown. Keep cooked waffles warm on a platter in the oven.
  7. Serve waffles with a dusting of powdered sugar and maple syrup (a dollop of whipped cream or sour cream would be great too). 
  8. Makes approximately 6 waffles.
Recipe adapted from Pass the Sushi.

June 23, 2011

To Try Tuesday - Fresh Blueberry Cake


Sometimes you just need a quick and easy cake.  Sometimes that cake will involve a box mix.  Sometimes it will turn out so delicious you will vow to make it again and again.  These three sentences pretty much sum up this cake.

I am not sure how I ended up with three Costco-size punnets of blueberries.  You could say that it was bad planning on my behalf, but I like to think of it as good planning because I decided to make a cake with the extra blueberries.  I didn't really have a recipe in mind but I knew that I had a few boxes of cake mix so I decided to look for a recipe that would "doctor" it up.  As soon as I saw this recipe for an Easy Fresh Blueberry Cake on About.com I knew that it was the one for me.


At first the suggestion on the site of using a lemon cake mix appealed to me but I only had a box of white cake mix, and I decided that I prefer the taste of real lemons.  I love lemon and blueberry together so I did add some extra zest and juice.

This baked up so well in a bundt pan and was delicious both warm from the oven, and after it has cooled.  I think that little mini bundts would be great too.


This post is also linked to Torview's Purple Food Series Palette. 


Fresh Blueberry Cake
Ingredients
  • 3 large eggs
  • ¼ cup granulated sugar
  • ⅓ cup vegetable oil
  • 1 cup sour cream
  • Juice and finely grated zest of 2 lemons (about 1/4 cup juice)
  • 1 box (18.25 ounces) yellow cake mix with pudding in the mix (I used white)
  • 2 cups fresh cleaned blueberries

Preparation
  1. Grease and flour a 10 to 12-cup Bundt cake pan or 10-inch tube pan. 
  2. Heat oven to 325°F for a dark pan or 350F° for a light-colored pan.
  3. Beat eggs with sugar until light. 
  4. Beat in the oil, sour cream, lemon juice, and lemon zest. Continue beating until smooth. 
  5. Slowly blend in the cake mix then beat until well blended. 
  6. Fold in the blueberries. 
  7. Spoon into the prepared baking pan; smooth the top. 
  8. Bake for 50 to 60 minutes, or until a toothpick comes out clean when inserted into the cake.
  9. Dust with powdered sugar or serve with a vanilla glaze or lemon sauce, if desired.
Recipe by Diana Rattray, About.com Guide

June 15, 2011

To Try Tuesday - Blueberry Zucchini Bread


Here it is To Try Tuesday and I feel a little behind the eight ball.  I had actually made a few things in advance knowing that I was heading to the Big Island to see my husband compete in a Half-Ironman triathlon, but I seem to have been playing catch up ever since and my blog has suffered which has made me a little sad.


The good news is that my husbands hard work paid off and he was first in his age group (and 12th overall!) and earned a spot to the Ford Ironman World Championships in Kailua-Kona this October.  The girls and I were really glad to be there to cheer him on to his win and take lots (I mean lots) of photos. I always love spending time on the Big Island, and this course is just beautiful, but it is even sweeter with his victory.


OK, back to your regularly scheduled post.  I was recently searching for a recipe for a blueberry quick bread when I came across this recipe by Jamie at My Baking Addiction.   Once you visit her blog you will have a baking addiction too.  Her recipes are amazing, her photos are stunning, and she has very cool giveaways.  A few of her recent posts include Key Lime Pie Ice Cream, Cherry Crisp in Jars, and Heath Bar Cupcakes.  Let me just say that 13,379 (and counting) people on her Facebook page can't be wrong.  If you haven't guessed already I do have a blogging crush on her blog. Where is that little embarrassed smiley when you need it?


Anyway, this quick bread was a big hit with my husband's Saturday training group.  They loved the fact that it had blueberries and zucchini, and a bit of whole wheat flour in it, so it didn't totally negate all of the hard work they had put in training before consuming it. I did sneak a piece the night before and I totally agree that this is a very tasty bread.  It will definitely be a repeater in my household.


Blueberry Zucchini Bread

Ingredients
  • 2 eggs, lightly beaten
  • ½ cup vegetable oil
  • 2 teaspoons vanilla extract
  • ½ cup white sugar
  • ½ cup brown sugar, lightly packed
  • 1 cup shredded zucchini
  • ¾ cup all purpose flour
  • ¾ cup whole wheat flour
  • ½ teaspoon kosher salt
  • ½ teaspoon baking powder
  • ⅛ teaspoon baking soda
  • 1½ teaspoons ground cinnamon
  • 1 cup fresh blueberries 
  • 2 tablespoons of coarse sugar

Preparation
  1. Preheat oven to 350°F.
  2. Lightly grease an 8.5 x 4.5 loaf pan.
  3. In a large bowl, beat together the eggs, oil, vanilla, and sugars.
  4. Fold in the zucchini.
  5. Beat in the flours, salt, baking powder, baking soda, and cinnamon.
  6. Gently fold in the blueberries.
  7. Transfer to the prepared loaf pan. 
  8. Sprinkle with the coarse sugar.
  9. Bake 55-65 minutes in the preheated oven, or until a knife inserted in the center of a loaf comes out clean.
  10. Cool 20 minutes in pan, then turn out onto wire racks to cool completely.
Recipe by Jamie at My Baking Addiction

May 31, 2011

To Try Tuesday - Mixed Berry Buckle


When I first saw the recipe for a Blueberry Buckle over at Tracey's Culinary Adventures I knew that I had to make it soon.  Like Tracey I had never made a buckle before, and her cake just looked so enticingly full of blueberries. In the fridge there was a punnet of blueberries, but I also had some raspberries so I decided to make a mixed berry buckle.  I am so glad I pushed it to the top of my To Try list.

A buckle is a is a type of rich, dense cake with a moist crumb which is sometimes compared to coffee cake.  It is made in a single layer with berries added to the batter and has a topping that is similar to a streusel, which gives it a buckled or crumpled appearance.


In a world where there is a huge emphasis on perfection there is something comforting about a cake that has a crumpled appearance.  It makes no apologies and is happy just the way it is, and so it should be.  Both warm from the oven, and cold the next day this cake was delicious.  The tartness of the berries played so well against the sweetness of the cake, that everyone kept going back for just another small piece.  

Growing up, coffee cakes were not very popular in my household.  We tended to have more loaf or pound cake, and sometimes, pie.  When I moved to the United States I was amazed that donuts, waffles, pancakes, and even coffee cake were also considered breakfast items.  My mind could hardly comprehend that the very things I had always though of as dessert could also be breakfast.  A whole new world opened up for me.  I am looking forward to making this buckle again soon, and maybe this time there will actually be some left for breakfast the next morning.


This buckle is not the only thing that I have enjoyed from Tracey's site.  She has so many good things going on over there - including her latest posts for Southwestern Black Bean Salad, Margarita Cupcakes, and Grilled Romaine with Blue Cheese-Bacon Vinaigrette.  If you aren't familiar with her site, Tracey's Culinary Adventures, I highly recommend that you check it out soon.


Mixed Berry Buckle
(Printer Friendly Recipe)

Ingredients
Streusel
  • ½ cup all-purpose flour
  • ½ cup packed light brown sugar
  • 2 tablespoons granulated sugar
  • ¼ teaspoon ground cinnamon
  • pinch salt
  • 4 tablespoons unsalted butter, cut into 8 pieces & softened
Cake
  • 1½ cups all-purpose flour
  • 1½ teaspoons baking powder
  • 10 tablespoons unsalted butter, softened
  • ⅔ cup granulated sugar
  • ½ teaspoon salt
  • ½ teaspoon lemon zest
  • 1½ teaspoons vanilla extract
  • 2 large eggs, at room temperature
  • 2 cups fresh blueberries 
  • 2 cups fresh raspberries

Preparation
Streusel
  1. In the bowl of a stand mixer fitted with the paddle attachment, beat the flour, both sugar, cinnamon and salt on low to combine and break up any brown sugar lumps.
  2. With the mixer still on low, add the butter and beat until it is completely incorporated into the dry ingredients, about 2-3 minutes - the mixture will resemble wet sand.
  3. Transfer the streusel to another bowl and set aside.
Cake
  1. Preheat oven to 350°F with a rack in the lower third of the oven.
  2. Line the bottom of a 9-inch round pan with a round of parchment, then spray the parchment and the pan with nonstick cooking spray with flour.
  3. In a small bowl, whisk the flour and baking powder together then set aside.
  4. In the bowl of a stand mixer fitted with the paddle attachment, beat the butter, sugar, salt and lemon zest at medium speed until light and fluffy, about 3-4 minutes, stopping to scrape down the sides of the bowl as necessary.
  5. Beat in the vanilla. 
  6. Add the eggs, on at a time, beating well after each addition.
  7. With the mixer on low, gradually add the flour mixture, beating until just about incorporated.
  8. Remove the bowl from the mixer and use a rubber spatula to finish stirring - the batter will be very thick. Gently fold in the blueberries and raspberries. 
  9. Transfer the batter to the prepared pan; spread in an even layer.
  10. To top with the streusel - pick up a handful of streusel and squeeze to form a clump. Break this large clump into smaller pieces and sprinkle over the batter. Continue until you've used all of the streusel.
  11. Bake for about 55 minutes, or until the streusel is golden brown and a toothpick inserted in the center comes out clean.
  12. Transfer pan to a wire rack and cool for 15-20 minutes.
  13. Run a thin knife around the edges of the cake then invert it onto the rack.
  14. Remove the parchment then turn the cake streusel side up and let cool on the wire rack. 
Recipe from Cook's Illustrated via Tracey's Culinary Adventures.


March 30, 2011

To Try Tuesday - Lemon-Blueberry Loaf Cake


I apologize that I am a little late with my To Try Tuesday post.  It seems that my To Try for today ended up being to "To Try" and fix my phone.  Here's a little tip for everyone, back up your phone before you do any upgrades.  I did manage to get my contacts back and my apps, but I did lose a lot of other data.

Anyway, I was determined to brighten my day by baking something.  Just the rhythm of creaming the butter and sugar, spooning it into the pan, and then the delicious smell that fills the kitchen as the goodies bake just puts me in a good mood.


I was really in the mood for something lemon-y, so I went through my files and found a recipe for a Lemon Blueberry Loaf Cake I had saved from Anna at Cookie Madness.  It looked quick and easy, and also delicious.  I wanted to make the lemon flavor more pronounced so I followed Anna's recommendation and added more zest, and it was just right.  I also added a whole cup of blueberries. Time was short so instead of making the glaze I just sprinkled some raw sugar over the top to give it some crunch.  Although I did like the crunchy sugar topping I think that next time I will make the glaze.


Lemon-Blueberry Loaf Cake
(Printer Friendly Recipe)

Ingredients
1 cup fresh blueberries
1 stick (4 oz) butter, cool room temperature
½ teaspoon salt
1 cup granulated sugar
3 large eggs, room temperature
1 teaspoon lemon extract
2 ½ teaspoons lemon zest (or more to taste)
1 tablespoon lemon juice
¼ teaspoon baking soda
1 ½ cups all purpose flour
½ cup sour cream, room temperature
2 tablespoons raw sugar (optional)

Glaze -
2 teaspoons butter
½ cup sifted powdered sugar
1-2 tablespoons lemon juice

Preparation
  1. Put the berries in the freezer for about 30 minutes to freeze – this will help keep them from staining the batter.
  2. Preheat oven at 325°F. 
  3. Spray a loaf pan with flour added cooking spray.
  4. In a stand mixer with the paddle attached, cream the butter and salt. 
  5. Slowly add the sugar and continue beating for another 3-4 minutes. 
  6. Add the eggs one at a time letting the mixer go for 30 seconds after each egg. Scrape sides of bowl often. 
  7. Add the lemon extract, lemon zest, and lemon juice. 
  8. Scrape sides of bowl and add baking soda. Stir well. 
  9. Add all but a couple of teaspoons of flour and sour cream alternately to batter, stirring until blended. Remove bowl from the stand, toss the frozen blueberries in the remaining two teaspoons of flour, then stir into the batter.
  10. Spoon the batter into the prepared loaf pan. 
  11. Sprinkle with sugar if desired.
  12. Bake the cake for 70 minutes or until a toothpick inserted into the center of the cake is clean.
  13. Set the cake on a rack to cool for about 10 minutes. 
  14. Turn the cake from the pan and let cool completely. 
  15.  Make the glaze. Melt the butter in a bowl, add the sugar and stir until it looks pasty and moist. Add one tablespoon of the lemon juice and stir until smooth. If you need more lemon juice then add the rest. 
  16. Drizzle over the cake.
Recipe by Cookie Madness 


March 15, 2011

To Try Tuesday - Bill's Berry Tart


Math never was my strong point so it is no big surprise that I missed Pi Day.  I had this great idea that I would make Bill Granger's Cherry Tart to celebrate Pi Day (even though it is, technically, a tart not a pie) but I ended up having 3.14159265 other things to do, so it became a To Try recipe instead.


I planned on using cherries but Costco did not have any and I didn't want to be stuck with a big bag of frozen cherries.  So I went with blueberries instead, using about 2 cups of whole berries to make a single layer in the tart shell.  It therefore became Bill's Berry Tart.


There is not one thing about this tart that I would change - it was amazing.  If you are looking for a easy-to-make dessert that will impress your family and friends then this is your dessert.  Cherries, blueberries, blackberries, raspberries, or even a mix of berries would be great in the filling.  I loved that the crust was a cinch to make and it did not have to be rolled out.  You know how the crust can shrink sometimes when you are pre-baking? Not with this one.  Also, those pie weights that you use to stop air pockets forming in the crust? Well, you will not need them for this crust. Simply make crust in less than 5 minutes, pre-bake, fill with fruit, pour custard over the top, and bake once more.  Mine baked for 35 minutes, so realistically you could have this pie ready in about an hour.  I sprinkled mine with a little powdered sugar after it cooled, but this is optional.  Ice cream or whipped cream would be a nice addition too.  Lastly, the original recipe was in metric, so if you prefer these measurements you can find the recipe here.


Bill’s Berry Tart
(Printer Friendly Version)

Ingredients

Pastry
  • ½ cup (1 stick) + 1 tablespoon unsalted butter, melted and cooled 
  • ⅓ cup sugar 
  • 1¼ cups all-purpose flour 
  • a pinch of salt 
  • 2 tablespoons of ground almonds 
Filling 
  • ⅔ cup cream 
  • 2 eggs, lightly beaten 
  • 2 teaspoons vanilla extract 
  • 3 tablespoons sugar 
  • 2 tablespoons all-purpose flour 
  • 16 oz cherries, halved and pitted 
 Preparation
  1. Preheat oven to 350°F.
  2. Grease a 9-inch round loose-bottomed tart tin. 

To make the pastry:
  1. Stir together the butter and sugar in a large mixing bowl.
  2. Add the flour and salt and stir to make a soft dough.
  3. Press dough evenly into base and side of tart tin with fingertips.
  4. Put the tin on a baking tray and bake for 12-15 mins, until pastry is slightly puffy.
  5. Remove from oven and sprinkle almond meal over base.

To make filling:
  1. Whisk together cream, eggs, vanilla, sugar. 
  2. Add flour and whisk until well mixed.
  3. Arrange cherries over pastry base and pour cream filling over cherries.
  4. Bake for 40-50 minutes until filling is firm.
  5. Leave to cool and serve with cream or ice-cream.

Serves 8-10.  Original recipe appears in Holiday by Bill Granger.


January 30, 2011

Oatmeal Blueberry Raisin Cookies


One of the cookbooks I received for Christmas was Flour by Joanne Chang.  Unfortunately I have never been to her bakery in Boston but I do know that she is one smart cookie!  Not only does Ms. Chang have a degree in applied mathematics and economics from Harvard University, but she also took down Bobby Flay in a Throwdown with her recipe for Flour's Famous Sticky Buns.


I have heard great things about this book so I was excited to be trying my first recipe from it.  I was really in the mood for Oatmeal Raisin Cookies, but wanted to make them a little bit different by adding some dried blueberries.  I love dried blueberries and use them not only in baking, but also as a topping on my oatmeal.


This recipe does call for the cookie dough to be chilled for at least 3 hours so plan accordingly.  I would suggest that you follow this recommendation because even after 3 hours in the refrigerator my dough was still very pliable.  I imagine that if you did not cool the dough they could spread a lot during baking.  Although mine did hold their shape quite well, next time I will make the dough in the afternoon  and chill it overnight.  Cookies for breakfast sounds good to me ;)


I thought that the cookies were delicious and I can't wait to try more recipes from this book. Next on my list are the Lemon Lust Bars.  If you like to see measurements in metric you will love this book - ingredients are listed in both imperial and metric.  Another fun thing is the book is the "same recipe, different flavors" note at the bottom of some of the recipes because of all of the additional options it gives you.


Oatmeal Blueberry Raisin Cookies
(Printer Friendly Recipe)

Ingredients
  • 1 cup (2 sticks) unsalted butter, at room temperature
  • 3/4 cup granulated sugar
  • 1 cup packed light brown sugar
  • 2 large eggs, at room temperature
  • 1 3/4 cup all-purpose flour
  • 1 3/4 cup old-fashioned rolled oats (not instant or quick-cooking)
  • 1 teaspoon baking soda
  • 1 teaspoon salt
  • 1 teaspoon Penzeys Baking Spice (or 1/2 teaspoon nutmeg & 1/2 teaspoon cinnamon)
  • 1 cup dried blueberries
  • 1/2 cup raisins

Preparation
  1. In the bowl of a stand mixer, beat the butter and sugars until very light and fluffy, about 5 minutes.
  2. Meanwhile in a separate bowl, whisk together the flour, baking soda, salt, nutmeg, and cinnamon, making sure there are no lumps of baking soda. Stir in the oats, blueberries, and  raisins.
  3. Add the eggs, one at a time, and beat until thoroughly combined. On low speed, or by hand, gradually add the flour and oat mixture to the creamed butter, mixing until completely incorporated.
  4. Chill the batter a few hours or overnight, covered. (This step is optional, although recommended by the author, and I second it.)
  5. To bake the cookies, preheat the oven to 350ĀŗF. Line a baking sheet with parchment paper or a silicone baking mat.
  6. Drop the dough in 1/4 cup balls evenly spaced on the baking sheet and flatten the tops slightly with your hand.
  7. Bake the cookies for 20 to 22 minutes, until they just start to turn brown across the top, but do not overbake.
  8. Remove from oven and cool completely.
  9. Once cool, the cookies can be stored in an airtight container for up to three days. The dough can be stored in the refrigerator for up to one week, or frozen for up to two months.
Recipe adapted from Flour by Joanne Chang

I also wanted to say a big thank you to Wendy at The Weekend Gourmet and Tungsten Toffee.  As the winner of Wendy's giveaway I was able to select one of the Tungsten toffees to try.  I decided upon the Espresso Dark Chocolate Toffee.  It was oh-so-good.  If you are looking for something delicious for yourself as a treat, or maybe something special for a friend, I would definitely recommend this toffee.