Showing posts with label icing. Show all posts

June 21, 2016

Coconut Apricot Slice ~ #CreativeCookieExchange


Summer is officially here. The #CreativeCookieExchange has the perfect theme this month for those who do not want to turn on the oven - No Bake Cookies!

December 06, 2013

Candy Cane Bundt Cake - #BundtaMonth


It is time for Bundtamonth!  The theme for this month was to bake a bundt that captures the holiday theme.  I immediately thought of candy canes and how I could incorporate them into a cake. Peppermint alone may have a little overwhelming so I decided to go with a ribbon of peppermint through the middle of the cake, and crushed candy canes on top.

It's always said that it is the most wonderful time of the year right now, but it is the also the busiest time of the year, so for my bundt this month I took a shortcut and used a boxed cake mix.  Don't get me wrong, I love to bake from scratch but there are those times where having a cake mix in the cupboard can be a life saver. This cake can be put together and in the oven in about 15 minutes, and while it is baking you can make the icing.  From start to finish this cake should take you no more than two hours, and you will have an impressive treat to share.  You could even make it as mini bundt and give them away to family and friends as holidays gifts.


August 21, 2013

Brandied Peach Crumble Bundt with a Spiced Glaze - #BundtAMonth


I am a little late to the BundtAMonth party, but better late than never. The good news is that I won't be late in the future because I have joined the group so you are guaranteed at least one bundt a month from me.  I am super excited to be bundting-along with the other members of the group and getting to know everyone.  Special thanks to Laura from The Spiced Life for introducing me to the group.

This months theme was peaches.  I really wish that I was able to say that I used fresh peaches just purchased at the Farmers' Market, but the truth is that every peach available here is imported from thousands of miles away.  Each time I go to the store I see the boxes of peaches with the slogan "I'm Ripe", but I know that they are just pretending to be ripe.  One gentle squeeze told me that the peaches were rock hard, and having been fooled once or twice before, I have found that most of the time they do get soft but they have a mealy texture.  I decided not to tempt fate and used canned peaches.  At least this way I knew what I was getting and I wasn't paying $10.99 for inedible peaches.


As soon as I saw the theme peaches I immediately thought of peach crumble.  It just seemed like a good combination to translate into a bundt.  I also knew that I wanted some sort of glaze to drizzle over the top of the bundt.  It seemed natural to use a combination of powdered sugar, the syrup left behind after the peaches had been mixed with the sugar, cinnamon, vanilla, and brandy, and a little of the peach juice from the can.  Yep, that definitely worked.  I may have used my fingers to scoop out what was left in the bowl after spooning the glaze over the bundt, but I'm not telling.  The cake itself was delicious too.  Do make sure that you drain the peaches well before you layer them in the cake, or you will have a problem with the cake splitting.  Mine was a little closer than I would have liked to this scenario.

There were so many great bundts this month featuring the wonderful peach, so please take a look at the list here.  I know I am going to be saving quite a few of the recipes to try out soon. The BundtAMonth group also has a Facebook page featuring all of the wonderful bundts made each month and a Pinterest page with so many amazing recipes (and gorgeous pictures).


Brandied Peach Crumble Bundt with a Spiced Glaze
(Printer Friendly Recipe)

Ingredients ~ 
Bundt
  • 3 cups flour
  • ½ teaspoon baking powder
  • ½ teaspoon baking soda
  • ½ teaspoon salt
  • 1 cup butter, room temperature
  • 1½ cups sugar
  • 4 large eggs, room temperature
  • 1 teaspoon vanilla bean paste (or 2 teaspoons vanilla extract)
  • 1 cup sour cream
Brandied Peaches 
  • 1 15 oz tin peaches, diced and drained (reserving the liquid), about 1cup
  • 1 tablespoon sugar
  • 1 teaspoon vanilla
  • 1 teaspoon cinnamon
  • 2 teaspoons brandy (optional)
Crumble
  • 3 tablespoons unsalted butter, cold and cubed
  • ½ cup flour
  • 2 tablespoons dark brown sugar, packed
  • 1 tablespoons sugar
  • 2 teaspoons cinnamon
  • ½ teaspoon nutmeg
Spiced Glaze
  • ¾ cup powdered sugar
  • reserved liquid from brandied peaches & drained peaches
Preparation ~ 
Brandied Peaches
  1. Dice the peaches and place in a medium bowl. 
  2. Toss with sugar, vanilla, cinnamon, and brandy. 
  3. Set aside until ready to use.
Crumble
  1. In a medium bowl, whisk together the flour, sugars, cinnamon and nutmeg.
  2. Using a fork, press the cold butter into the mixture until it's the consistency of a course meal.
  3. Set aside until ready to use.
Bundt
  1. Preheat oven to 350℉ degrees. 
  2. Generously grease and flour the inside of a bundt pan, shaking out any excess flour.
  3. In a large bowl, whisk together the flour, baking powder, baking soda and salt.
  4. In the bowl of a stand mixer, cream together the butter and sugar until light and fluffy.
  5. One at a time, add the eggs, mixing thoroughly after each addition and scraping down the sides of the bowl.
  6. Add the vanilla and combine.
  7. In three additions, add the flour alternating with sour cream.
  8. Fill the pan about ⅓ of the way with batter.
  9. Using a slotted spoon to drain the liquid, layer the peaches on top of the batter evenly (reserve the liquid from the peaches). 
  10. Sprinkle the crumble over the peaches.
  11. Scoop batter on top of the peaches and crumble and smooth out using an offset spatula. Make sure you leave about 1 inch of room from the top of the bundt pan.
  12. Bake for 60-80 minutes or until a toothpick comes out clean.
  13. Allow to cool for ONLY 5 minutes in pan before removing a a plate/rack to cool.
Spiced Glaze
  1. Place powdered sugar in a small bowl.
  2. Gradually whisk in the reserved brandied peach liquid, and if needed some of the drained peach liquid, until you reach the desired consistency.
  3. Drizzle glaze over the bundt so it covers the top and drizzles down the edges.

Recipe by ATLATC, adapted from Java Cupcake.


August 20, 2013

The Cake Slice Bakers August 2013 - Maple Pecan Chiffon Cake with Brown Butter Icing


Today is the 20th of the month so it must be the Cake Slice Baker's time.  This month's cake, winning by a narrow margin, was the Maple Pecan Chiffon Cake with Brown Butter Icing.  Such a big mouthful for such a light cake. It is hard to believe that we only have a couple of cakes to go before we reveal our next book.

I am notorious for leaving the baking of my cake for the group to the last minute each month.  It was all planned for me to have a relaxing baking day on Sunday, but that went out the window on Friday night when I found out that my youngest daughter had been asked to join a paddling crew on Sunday for the Duke's Ocean Fest.  What we thought was going to be a morning race turned into an all-day event.  And I may have been fried to a crisp in the process, which is so unlike me since I am usually so good about applying sunscreen. Regardless, it was a great day and her all-girl team certainly gave the boys and mixed teams a run for their money. And the cake did not get baked, only I did.


So Monday morning I got the girls off to school, went out for my usual five mile walk/run, and came back ready to get baking.  I don't know what made me grab my carton of cream out of the fridge to check if it was ok (the expiry date was Sept 7), but I did and it was definitely not going in this recipe.  So off I went to Costco again to replace it.  This seems to be a recurring theme with my Cake Slice Baker's cakes at the moment.  I really must try to kick that habit.

I have heard people say that chiffon cakes can be difficult and fussy, but I have never found this to be the case. This cake was very easy to put together and came out exactly as described.  The instructions to place parchment paper on the bottom seemed a little strange to me but I was determined to follow the recipe as stated.  I removed the middle tube, traced a circle and cut it out, then folded it in half and cut a semi-circle from the straight side to make it fit perfectly in the pan. The mixed cake seemed light and fluffy, and baked beautifully in the oven for exactly 50 minutes. Unfortunately my angel food cake pan  does not have feet so I could not flip it upside down in the traditional way.  Last time I made this type of cake I turned it upside down and stuck a wine bottle in the tube part to support it.  Naturally I thought this would work again but I guess I don't have the same wine now and the bottle was too big.  Now it was time to panic because I did not want the cake to sink.  It was quite comical to see me running around the kitchen pulling out every bottle I had to see if it would fit.  Thank goodness I finally found one.   So learn from my mistake and, if you do not have a pan with feet, find a suitable bottle to use before the cake is in the pan.


The cake itself was quite good, with a nutty flavor and a light texture.  The icing was another story. Whilst the flavor was quite good, the mixture kept looking like it was going to separate, especially when it was out on the counter. Nobody wants a cake that looks like it is melting off of the plate. Now in fairness it was a hot day here today, but I really wish I had just gone with a light glaze instead.  I did cut the measurements for the icing in half since with a few of the previous cakes I had left-over frosting, and I did use all of this one.  I am not sure if cutting it in half threw off the balance of ingredients, but the butter appeared to blend in and then once I iced the cake it look like it was separating.  It did not make for very attractive photos, so sorry about that.

I can't wait to see all of the cakes from my fellow bakers.  Please join me in visiting their blogs by clicking on the individual photos shown below.  Also, don't forget that the Cake Slice Baker's have a Facebook page, where you not only get to see each months' creations, but also great tips and other treats that we have been baking.


Maple Pecan Chiffon Cake with Brown Butter Icing

Ingredients ~ Cake
  • 2¼ cups cake flour
  • 2 teaspoons baking powder
  • 1 teaspoon fine sea salt
  • ¾ cup brown sugar, packed
  • 6 egg yolks
  • ½ cup canola oil
  • ½ cup pure maple syrup
  • ¼ cup water
  • 1 tablespoon pure vanilla extract
  • 8 egg whites, at room temperature
  • ½ teaspoon cream of tartar
  • ½ cup granulated sugar
  • ½ cup toasted finely chopped pecans

Ingredients ~ Brown Butter Icing
  • 4 cups confectioners’ sugar, sifted
  • 1 cup unsalted butter, cut into small cubes
  • ½ cup heavy cream (plus a little more to thin icing as required)
  • 1 tablespoon vanilla extract
  • pinch of fine sea salt

Preparation ~ Cake
  1. Prepare an angel food cake pan with feet by lining the bottom with parchment paper, ungreased.
  2. Adjust a rack to the bottom third of the oven and preheat the oven to 325℉. 
  3. In a large bowl, sift together the cake flour, baking powder, and salt. Add the brown sugar and whisk the mixture by hand to combine. 
  4. In a small bowl, whisk together the yolks, oil, maple syrup, water, and 1 tablespoon vanilla. 
  5. Add the liquid ingredients to the dry mixture and briskly stir with a rubber spatula until just smooth. Do not overmix. 
  6. In the clean bowl of a stand mixer fitted with the whisk attachment, whip the egg whites on medium speed until foamy. Add the cream of tartar and whip on high speed until soft peaks form. 
  7. Turn the mixer down to medium speed and gradually add the granulated sugar in a steady stream. Kick the mixer up to high speed and whip until the whites just hold firm (not stiff!) glossy peaks. 
  8. Fold a third of the whites into the batter using as few strokes as possible. Add the remaining whites, folding only until evenly incorporated. Lightly fold in the pecans during the last few strokes. 
  9. Gently pour the batter into the prepared pan and bake until the top springs back when touched or a toothpick inserted in the middle comes out with a few crumbs attached, 50 to 55 minutes. 
  10. Remove the cake from the oven and let it cool upside down by inverting the cake pan onto its legs. To remove the cooled cake from the pan, slide a long thin knife or spatula along the sides to loosen and knock the pan sharply on a hard surface until the cake drops out.
  11. Frost the top and sides with brown butter icing. To cut the cake, use an angel food cake cutter or a serrated knife and a sawing (rather than a slicing) motion. Store in an airtight container for up to 3 days.

Preparation ~ Brown Butter Icing
  1. Put the confectioners' sugar in a medium mixing bowl and set aside. 
  2. Melt the butter in a small saucepan over medium heat. Using a pan with a light-colored bottom will help you keep track of the color. Let the color of the butter darken from lemony to golden brown (swirl the pan occasionally to ensure even heating). Once the butter is dark brown and you begin to smell a nutty aroma, remove the pan from the heat. 
  3. You can either pour the butter off carefully to leave behind the milk solids that have collected on the bottom of the pan, or you can keep and use the butter solids. Either way, pour the butter into the bowl containing the confectioners’ sugar and add the cream, 1 tablespoon vanilla, and a pinch of salt. Whisk until smooth. 
  4. As the butter cools, the icing will become firmer. If using the icing as a glaze, use it immediately. If you plan to use the icing as a frosting, allow it to cool to a good spreading consistency. 

Recipe by Julie Richardson from Vintage Cakes.


May 04, 2013

Tate's Bake Shop Giveaway + Cinnamon Swirl Scones


Have a craving for a cinnamon rolls but not the time to make them?  Then I have the recipe for you - Cinnamon Swirl Scones.  These have all the cinnamon-y goodness of an actual cinnamon roll, and a yummy vanilla glaze, and can be made in a fraction of the time.

The recipe for these scones comes from Tate's Bake Shop Baking for Friend's, which was sent to me last October for review.  I have really been enjoying this book but had not had the chance to make these scones before.  Boy, had I been missing out. Even though there are three components - filling, dough, and icing - they are super quick to make.  I did make the mistake of not rolling the dough quite tight enough, so I put them in the fridge to firm up and all was well.  I also found that when I cut the dough it tended to flatten a little, and I baked the first batch like this.  With the second ones I kind of squished them a little so they were more rounded and found that they baked up much better this way.

Once again I found myself trying very hard not to nibble too much before I could get a decent photo. Warm out of the oven, with a little drizzle of vanilla icing these really hit the spot, perfectly mimicking a cinnamon roll.  They were a little crisp on the outside and then became softer as you got towards the middle of the scone. These did have raisins in them, which I liked, but you could certainly omit these if you wanted.  I made sure that I didn't put the vanilla icing on them all since I plan on warming them a little in the morning for breakfast. I think that they would make the perfect addition to your Mother's Day Celebration.

And speaking of Mother's Day, it is just around the corner and the wonderfully generous people at Tate’s Bake Shop are giving one reader of All That's Left Are The Crumbs a Mother's Day Brunch Basket. The basket includes their sinful sour cream coffee cake, a lemon pound cake loaf, two each of their heavenly raspberry bars and crumb cakes, plus a box of Tate's Bake Shop's famous chocolate chip cookies.  I still dream of their cookies, so I can only imagine how good the rest of the items in the basket are.  One lucky reader won't have to dream about it, they will win it!


Entering the giveaway is easy:


Main Entry
To enter the giveaway all you have to do is leave a comment telling me about your favorite Mother's Day memory.

Additional Entries
Even more chances to win - you can receive up to two additional entries by doing the following:
  1. Following All That's Left Are The Crumbs on Facebook - leave an additional comment to let me know that you are following.
  2. Follow Tate's Bake Shop on Facebook - leave an additional comment to let me know that you are following.
The Fine Print
  • Deadline for entry is May 11, 2013 at 6:00PM HST.
  • Sorry, this giveaway is open only to US addresses.
  • Please leave a valid email address where I can contact you if you choose to publish anonymously.
  • One winner will be chosen at random using Random.org.  I will announce the winner at the top of this post on Mother's Day - May 12, 2013 - and send them an email.  If I do not have a response within 48 hours, another winner will be selected.
  • The winner will receive a Tate's Bake Shop Mother's Day Brunch Basket (prize supplied directly to the winner by Tate's Bake Shop).
  • The prize for this giveaway to one of my readers is being provided by Tate's Bake Shop.  I was not compensated personally for this post.

    Good luck everyone!
Update: Happy Mother's Day and congratulations to Anne @Have a Cookie who is the lucky winner of the Tate's Bake Shop Giveaway.  Anne, please respond to my email with your details so that Tate's can mail you the prize.  Thank you to everyone who visited my blog and entered the giveaway.

Also, if you are still looking for that perfect Mother's Day gift Tate’s Bake Shop is the place to order something amazing for your mom, grandmother, mother-in-law, or that special person who is like a mom to you. There are basketstowerssquares, and cookies - seriously, you cannot go wrong with anything you order.  They are offering everyone a special 20% off discount code that can be redeemed until Mother's Day.  All you have to do us type in mom13 when you are checking out on their website.


Cinnamon Swirl Scones
(Printer Friendly Recipe)

Ingredients
Filling
  • 8 tablespoons (1 stick) salted butter, at room temperature
  • ½ cup firmly packed dark brown sugar
  • 1 tablespoon ground cinnamon
Dough
  • 4 cups unbleached all-purpose flour
  • ⅓ cup granulated sugar
  • 2 tablespoons baking powder
  • 1 tablespoon spiced vanilla sugar
  • ½ teaspoon salt
  • 8 tablespoons (1 stick) cold salted butter, cut into ½ -inch cubes
  • 1 cup dark raisins
  • 1¾ cups half-and-half
Icing
  • ½ cup confectioners' sugar
  • 1 tablespoon water
  • 1 teaspoon vanilla bean paste

Preparation
Filling
  1. In a small bowl, mix the butter, brown sugar, and cinnamon until smooth.
Dough
  1. Position the oven racks in the top third and center of the oven and preheat the oven to 375℉. Line 2 large rimmed baking sheets with parchment paper or silicone baking mats.
  2. In a large bowl, whisk together the flour, sugar, spiced vanilla, sugar, baking powder, and salt. Using a pastry blender or your fingertips, work in the butter until the mixture is crumbly with some pea-sized pieces of butter. Do not overmix. 
  3. Gently mix in the raisins, then add the half-and-half and mix stirring just until the dry ingredients are moistened.
  4. On a lightly floured work surface, roll out the dough into a 17-by-12-inch rectangle about 1/4-inch thick. Spread the cinnamon filling evenly over the top of dough, leaving a 1/2 -inch border on all four sides. 
  5. Starting at a long side, tightly roll the dough up into a log. Cut the dough into 2-inch slices and arrange them, cut sides up, 4 inches apart on the prepared baking sheets.
  6. Bake, switching the positions of the baking sheets from front to back and top to bottom halfway through baking, until the rolls are slightly golden, 20 to 25 minutes. Let cool on the pans for 10 minutes.
Icing
  1. To make the icing: In a small bowl, mix the confectioners' sugar, vanilla bean paste, and water with a fork until smooth. Drizzle over the buns. Serve warm, or let cool to room temperature. 

Makes 12.
Recipe from Tate's Bake Shop Baking for Friend's


March 27, 2011

Espresso and Cream Bars


To me, one of the most enjoyable past-times is drinking a great cup of coffee.  I am extremely partial to the coffee produced by Coffees of Hawaii, and in particular their Ka'u.  I didn't really become a coffee drinker until about ten years ago.  Growing up, tea was the drink of choice in my family, and if we did have coffee it was always instant.  That is probably why I didn't like coffee back then.  My taste has definitely changed now and our coffee is always freshly ground before we brew it, and then it is timed to perfection.

Of course I love coffee desserts too - tiramisu, affogato, Kahlua brownies, coffee ice cream are all favorites.  I really wanted to create some type of bar cookie and I thought the flavors of espresso and cream would be perfect.  I did a quick search but didn't find exactly what I was looking for so I used components from a few different recipes to come up with my bars.  I used the base from a berry tart that I recently made, the cheesecake filling is from Bakerella, and the ganache topping is from the LA Times.  The combination was delicious.


Once all of the steps were complete I put the tart in the refrigerator overnight so that the ganache could harden.  After a few photos I cut it into bars.  I have already put it into containers so that my girls can take it to school tomorrow and share with their friends.  Having these in the house is just too dangerous for me - before I knew it I would have eaten way too many.


Espresso and Cream Bars
(Printer Friendly Recipe)

Ingredients
Base -
  • 1 cup (2 sticks), melted and cooled
  • ⅔ cup sugar
  • 2½ cups all-purpose flour
  • 1 teaspoon of salt

Filling - 
  • 2 (8 oz.) packages cream cheese, softened
  • ½ cup sugar
  • 1 Tablespoons flour
  • 2 eggs
  • ¼ cup heavy whipping cream
  • ¼ sour cream
  • 2 teaspoons vanilla
  • 2 teaspoons espresso powder
  • 2 teaspoons hot water

Ganache Topping -  
  • 10 ounces premium-quality white chocolate, finely chopped 
  • 2/3 cup heavy cream
  • 1 1/2 tablespoons unsalted butter, at room temperature

Decoration -
  • 1 cup powdered sugar, sifted
  • 1 teaspoon espresso powder
  • 5 teaspoons hot water

Preparation
Base -
  1. Preheat oven to 350°F
  2. Grease a square tart tin that has a removable base.
  3. Stir together the butter and sugar in a large mixing bowl.
  4. Add the flour and salt and stir to make a soft dough.
  5. Press dough evenly into base and side of square tart tin with fingertips.
  6. Put the tin on a baking tray and bake for 12-15 minutes, until pastry is slightly puffy.
Filling - 
  1. Preheat oven to 325°F.
  2. Cream the sugar, cream cheese, and flour with an electric mixer on medium until light and fluffy.
  3. On medium low, add eggs one at a time, mixing well with each addition.
  4. Add sour cream and vanilla and mix until just combined.
  5. Mix espresso powder and hot water to dissolve, then add to cheesecake mixture, mixing well.
  6. Pour on prepared crust and bake for about 40 minutes.
  7. Remove and cool.

Ganache Topping -   
  1. Put the chopped chocolate in a heatproof bowl.
  2. Bring the heavy cream to a boil, then pour it over the chocolate. Working with a whisk or spatula, gently stir the chocolate and cream together.
  3. When the ganache is smooth, stir in the butter.
  4. Cool the ganache slightly and then pour over the top of the tart.
  5. Place in the refrigerator to harden.

Decoration - 
  1. Place sifted powdered sugar in a bowl.
  2. Place espresso powder in a small cup and add hot water, stirring to dissolve.
  3. Add espresso liquid to powdered sugar and stir until completely smooth.  Add more hot water if needed.  Do not make icing too thin.
  4. Place icing mixture into a piping bag and pipe lines across the top of the tart.
  5. Take a skewer or a toothpick and drag it from one end of the pan to the other. Then go to the other end of the pan and drag back the other way.  Continue doing this until you have completed the design.

Recipe inspired by Bill GrangerBakerella, and the LA Times.


January 02, 2011

Hawaiian Gingerbread Village

I know, I know, I am so late posting this kind of thing but I wanted to show everyone a gingerbread house made with aloha.  I have been meaning to visit the gingerbread village at Sheraton Princess Kailuani in Waikiki for the past two weeks.  It just didn't happen.  I was determined to get there before January 3 when they took down the display,  so off we went last night.  I wasn't disappointed. I just stood there in awe of the work it took to make this village happen.


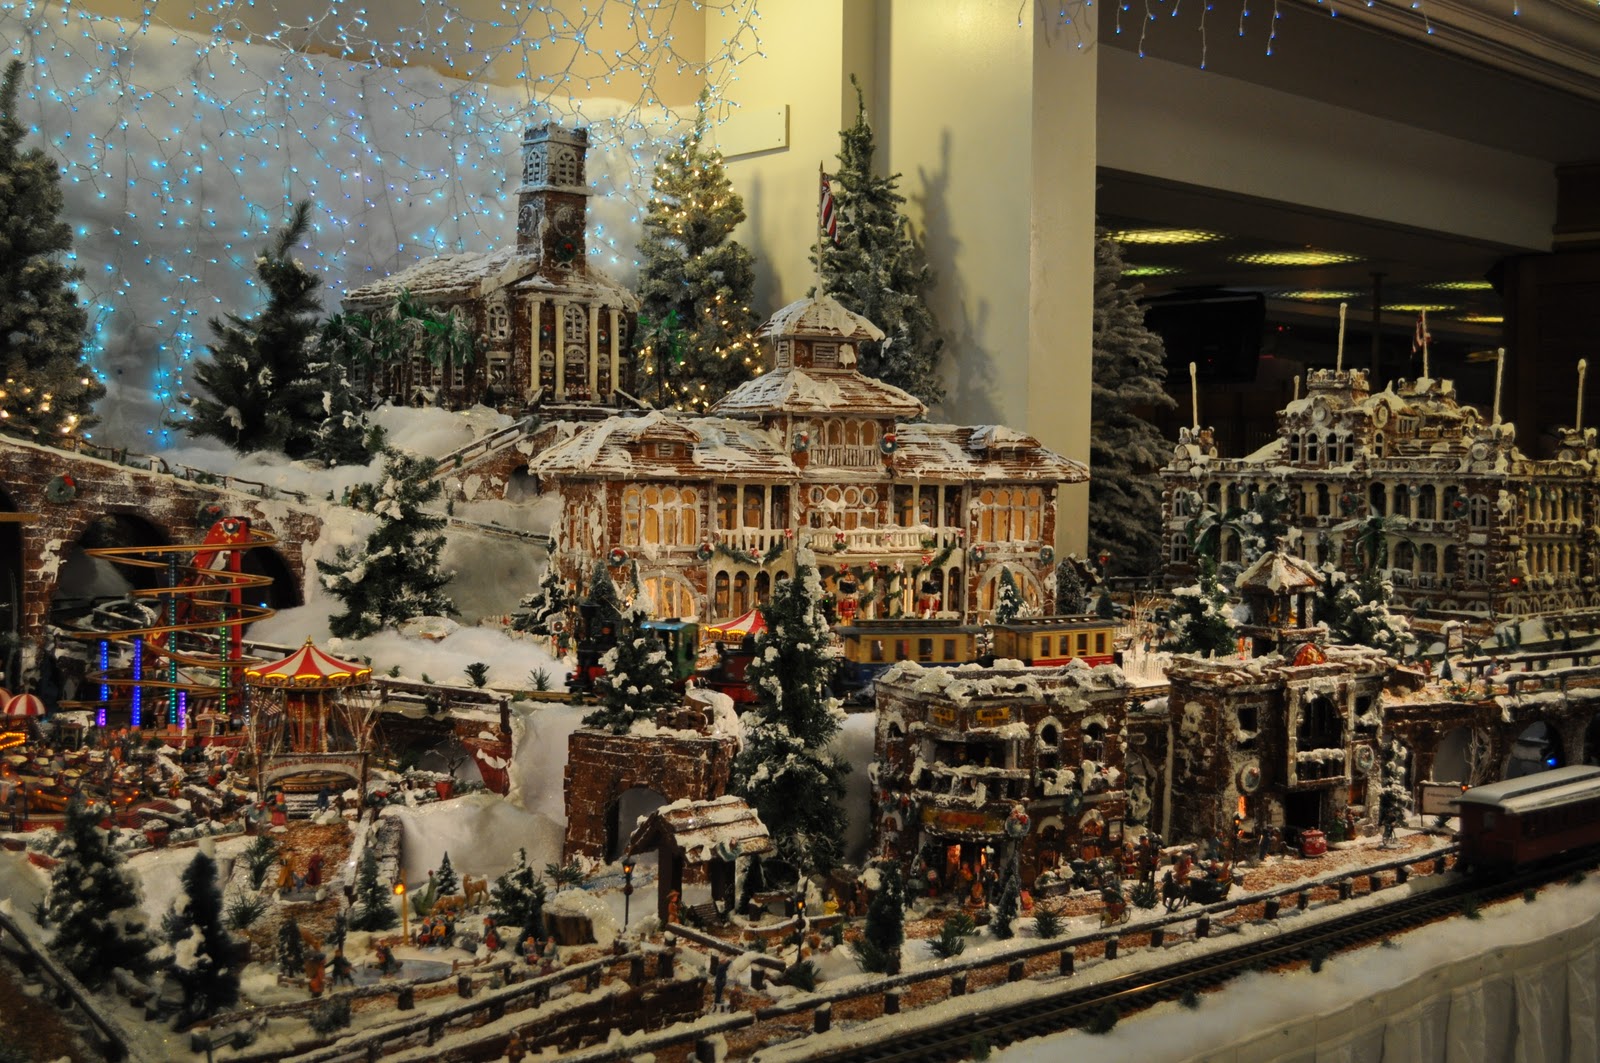
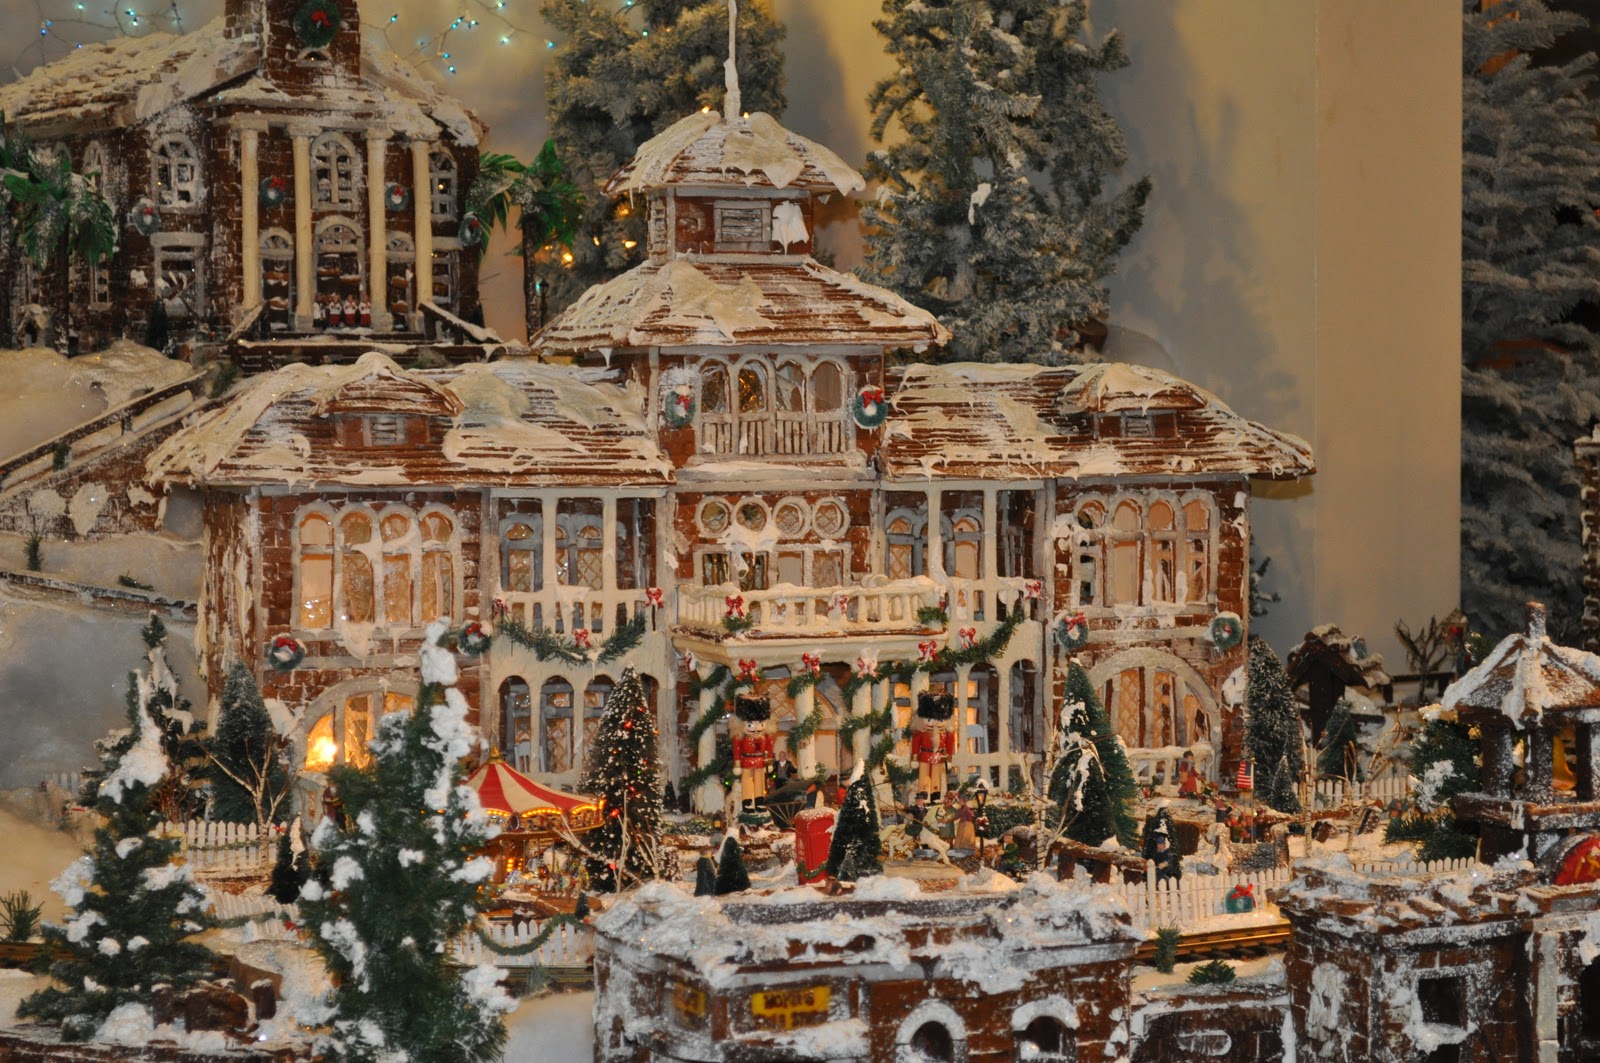
This gingerbread village depicts various buildings right here in Hawaii - Iolani Palace, the Moana Surfrider (complete with rocking chairs on the veranda), and the historic Kawaiahao Church.

The Sheraton Moana Surfrider, with the Kawaiahao Church in the background

The village is not made with pre-fabricated sheets, they are gingerbread bricks. According to Chef Ralf Bauer, the architect of this wonder "it’s what keeps the village special.”  He and his team begin making the components for the village in September.  Although the base of the buildings is actually Styrofoam, each one is then painted with melted chocolate and covered with small gingerbread bricks that are approximately an inch-and-a-quarter long.

'Iolani Palace

Each of the gingerbread villages are interlinked by ski lifts, ice-skating ponds, working carousels, and a train station all made from icing, spun sugar, gelatin, chocolate, and of course gingerbread.

Waikiki Station

Here are some of the stats that go into making this happen:
  • 100 pounds of dark chocolate
  • 30 pounds of white chocolate
  • 60 sheets of gingerbread bricks
  • 200 gallons of icing
  • And tons of Aloha!


It certainly was a spectacular sight and I can't wait to see what they come up with in 2011.  My only wish is that they move the display back to the Sheraton Moana Surfrider because it is such a classic hotel.


The Christmas tree in the lobby of the Sheraton Moana Surfrider