
Showing posts with label coffee. Show all posts
Showing posts with label coffee. Show all posts
September 20, 2024
Mocha Latte Coffee Cake with Pecan Streusel ~ #TheCakeSliceBakers
This moist, flavorful cake features a swirl of coffee-infused batter and cocoa, creating a perfect balance of sweetness and depth. Topped with a crunchy streusel, it’s a decadent treat that pairs beautifully with your morning coffee or afternoon tea. Ideal for brunch gatherings or a cozy dessert, this cake is a must-try for coffee lovers!

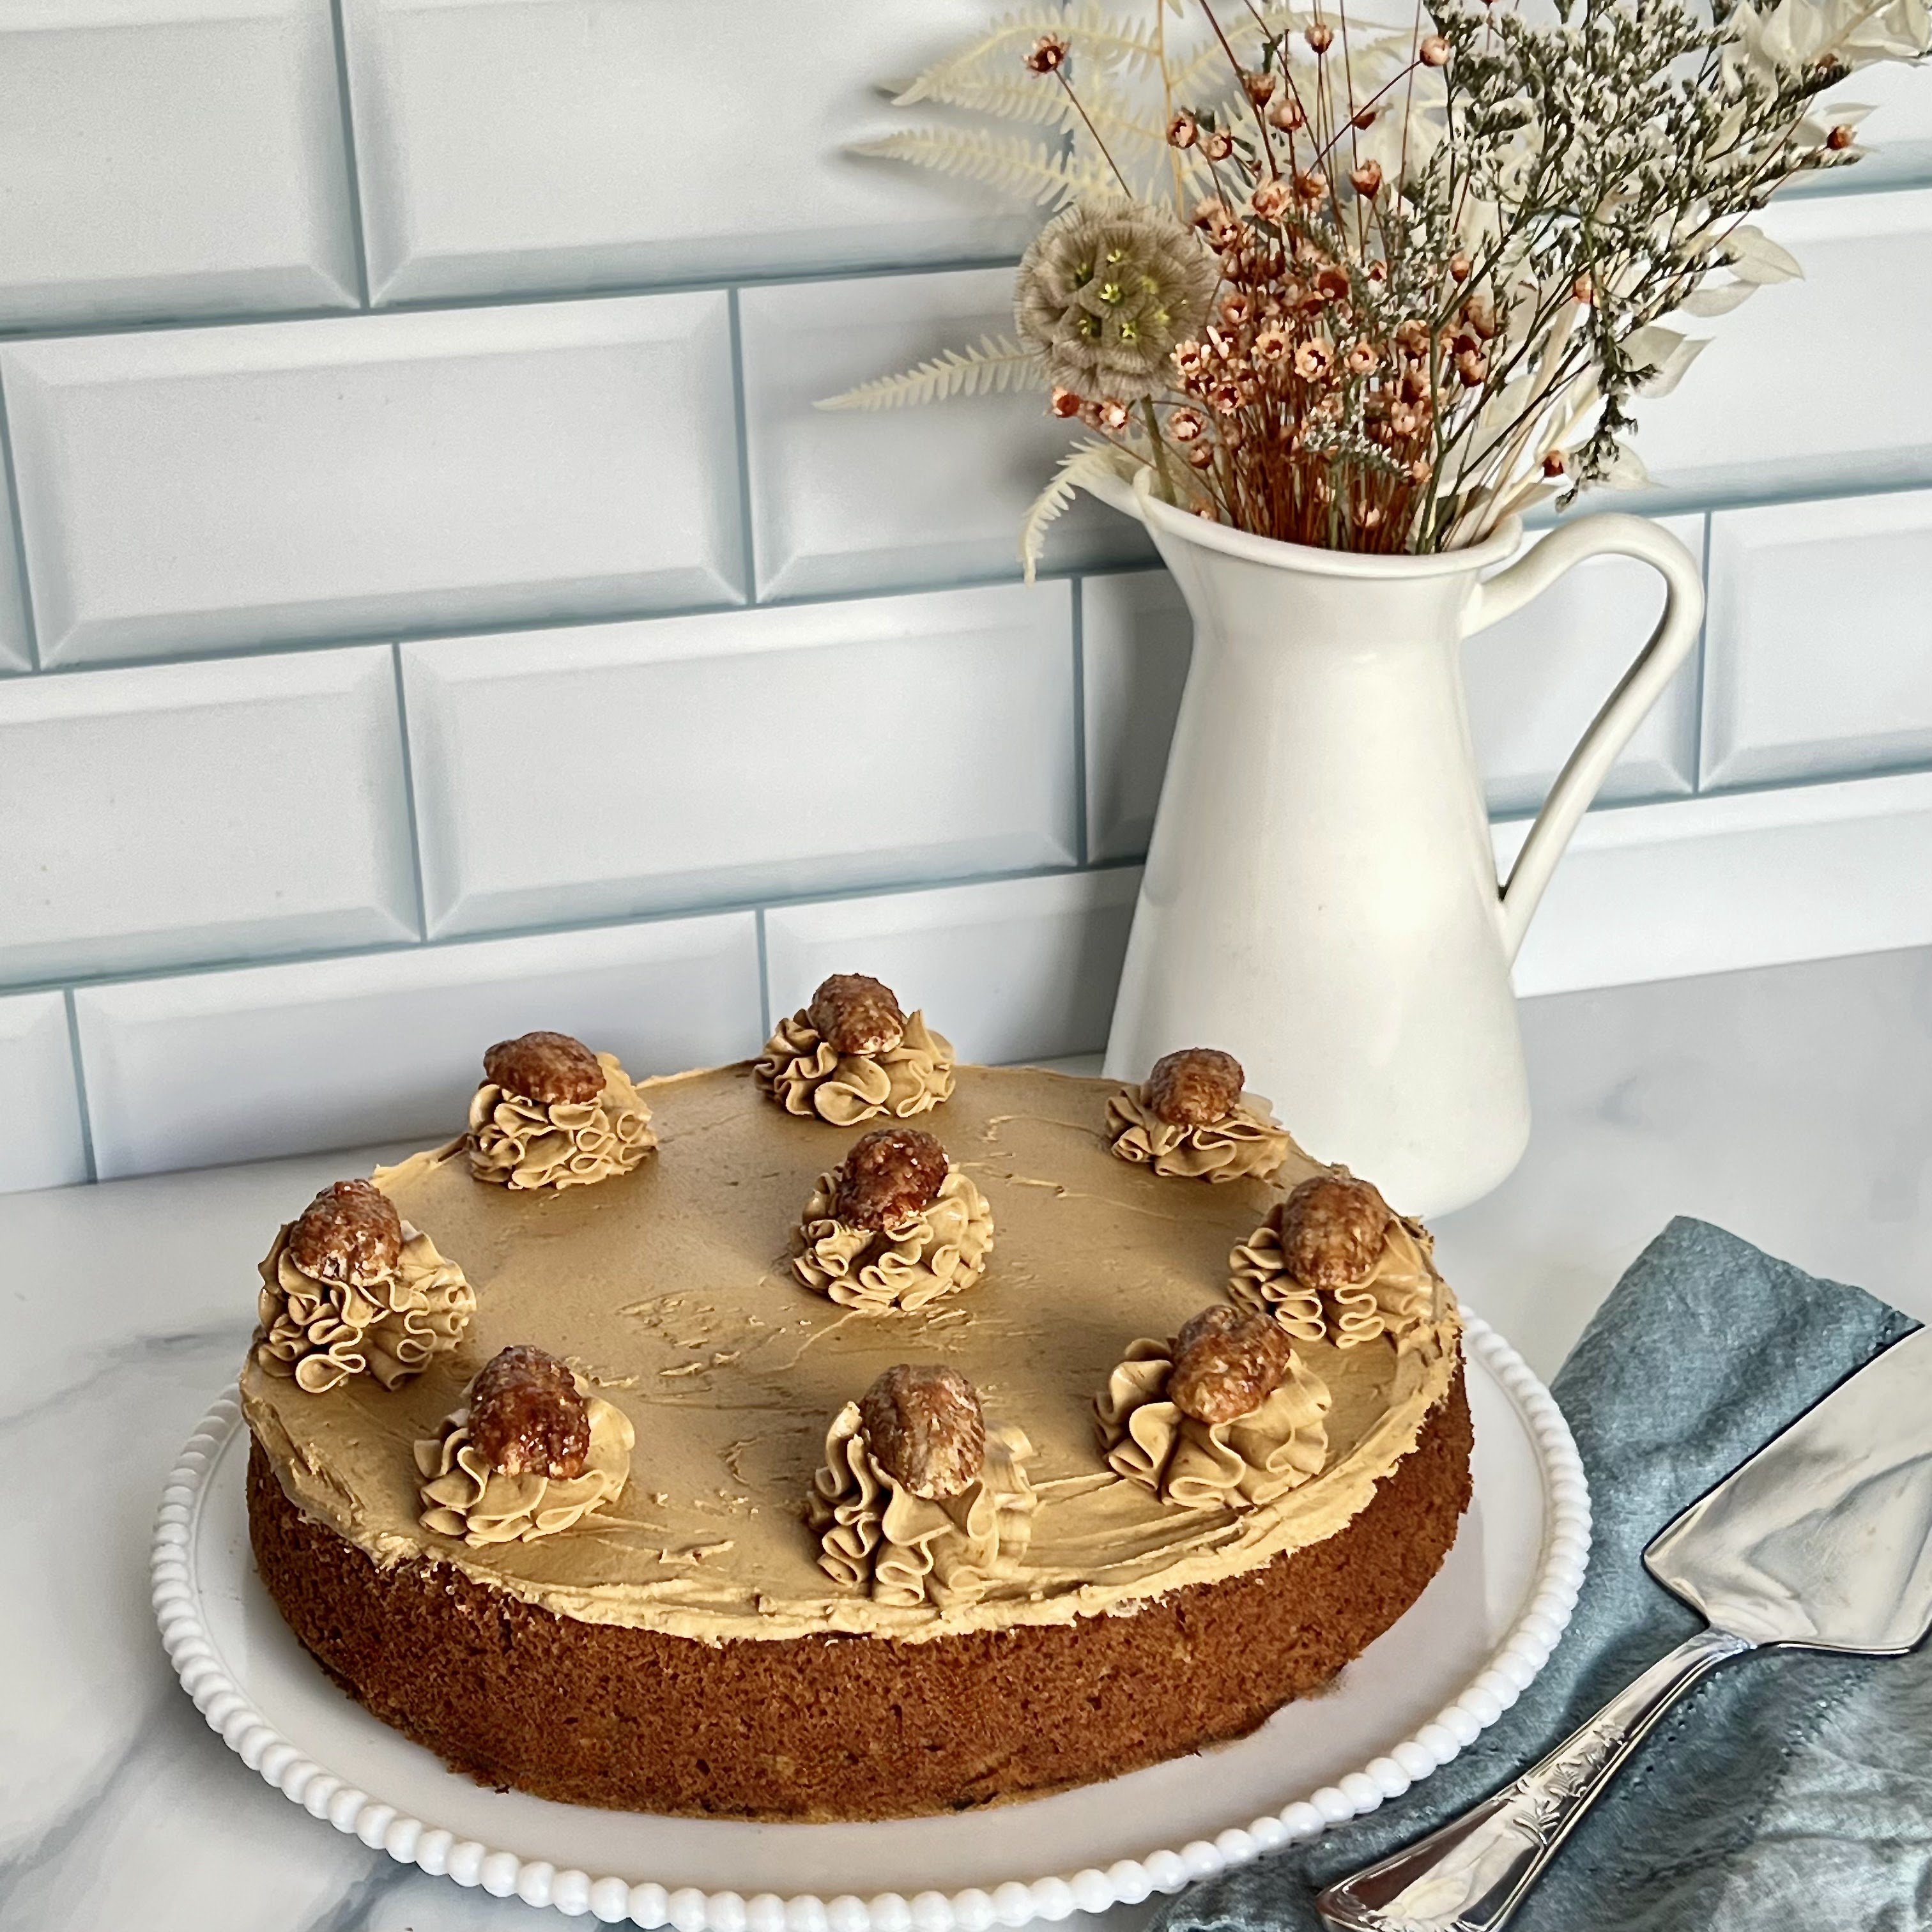
June 20, 2023
Walnut Espresso Cake ~#TheCakeSliceBakers
This rich butter cake, flavored with espresso powder, has a decadent
whipped espresso and rum buttercream frosting. The candied praline pecans
on the top add just the right crunch to complement the cake.
March 19, 2023
Chocolate Corks ~#TheCakeSliceBakers
These Chocolate Corks are also know as Bouchon au Chocolat. These little cakes have a brownie-like exterior
and a molten chocolate interior, making them a perfect little mouthful of deliciousness.

March 18, 2021
Vietnamese Coffee Bundt Cake ~ #BundtBakers
This Vietnamese Coffee Bundt Cake is the coffee and cream cake of your dreams. Vanilla and coffee batter
perfectly swirled, with an out of this world tender, moist, and flavorful crumb.

June 20, 2019

June 11, 2019
Espresso Banana Quick Bread with Espresso Streusel ~ #BreadBakers
Cakes have such a terrible habit of turning out bad just when you especially want them to be good.

April 18, 2019

February 21, 2019
Banana Nutella Swirl Bundt Cake with Coffee Crumble ~ #BundtBakers
You can't make everyone happy - you aren't a jar of Nutella. However, you can take that jar of
Nutella and swirl it into a banana cake and that would pretty much make everyone happy.
Nutella and swirl it into a banana cake and that would pretty much make everyone happy.

October 18, 2018
Coffee and Cream Marbled Bundt Cake ~ #BundtBakers
"I believe humans get a lot done, not because we're smart, but because we have thumbs so we can make coffee". Those thumbs also help us make delicious cakes like this coffee and cream bundt.


December 21, 2017

December 20, 2016
Coffee and Walnut Cake ~ #CakeSliceBakers
#Cake Slice Bakers are one month into baking from their new book - World Class Cakes by Roger Pizey. I can't wait to see which cake everyone chose to bake this month.


December 15, 2016
Chile Hot Chocolate Bundt Cake ~ #BundtBakers

February 18, 2016
Cinnamon Dolce Coffee Bundt Cake - #BundtBakers

Cinnamon invokes such a warm and comforting feeling. Sitting in front of the fire, drinking hot chocolate, eating a piece of Cinnamon Dolce Coffee Bundt Cake while the snow gently falls outside......well that is not going to happen here, except the eating cake part. I was still excited when I found out that the theme for this months #BundtBakers was cinnamon.
July 23, 2013
The Cake Slice Bakers June 2013 - Black and White Cake

I am extremely late with last month's cake. I just seemed to lose my baking mojo, and each time I thought about getting ready to bake this cake something else seemed to need my time and energy.
The cake that was chosen by the Cake Slice Baker's for June was the Black and White Cake which is described in Vintage Cakes as "the reverse of the classic white cake with chocolate frosting: two thick layers of the darkest chocolate cake, slathered with bittersweet ganache and then covered with vanilla bean buttercream". Sounds pretty decadent doesn't it?
Although there are a lot of components to the cake, breaking it up over a couple of days makes the task seem less daunting. I ended up baking the cake and making the ganache and buttercream, and assembling part of the cake one day and then completing the frosting and adding a ganache topping the following day. Really, it is not a difficult cake to make at all, you just need to work out the timing.
This cake got rave reviews from all who tried it. It had something for everyone - a deep, dark chocolate flavor for the chocoholics, and a lovely sweet vanilla flavor for the vanilla lovers. Also, it really does develop a great flavor if left for a couple of days in the refrigerator, but make sure you allow it to come to room temperature before serving.

Please visit The Cake Slice Bakers blogroll page for links to all of my fellow baker's cakes. I am about to head over there myself since I make it a rule not to peek at the other cakes before I get mine up on my blog. I can't wait to see all of their delicious creations. Oh, and don't forget that we have a Facebook page too and would love for you to visit - there you will see not only our monthly group baking project, but also all of the other goodies we bake and some great tips.
Black and White Cake
(Printer Friendly Recipe)
Ingredients ~ Cake
- ¾ cup Hershey's Special Dark Cocoa
- ⅔ cup hot coffee
- ½ cup sour cream
- 1 tablespoon pure vanilla extract
- 1½ cups all-purpose flour
- ¾ teaspoon baking soda
- ½ teaspoon salt
- 10 tablespoons unsalted butter, room temperature
- 1¼ cups dark brown sugar
- 1/3 cup granulated sugar
- 2 eggs, room temperature
- 2 egg yolks, room temperature
- 2 tablespoons hot coffee (optional)
- 2 tablespoons Kahlua (optional)
Ingredients ~ Ganache
- 1 cup heavy cream
- 8 oz. semisweet or bittersweet chocolate, chopped or chips
Ingredients ~ Buttercream
- 6 egg whites
- 1¼ cups sugar
- ¼ teaspoon cream of tartar
- 2 cups unsalted butter (1 pound), room temperature and cut into cubes
- 2 teaspoons pure vanilla extract
- Pinch of salt
- Center an oven rack and preheat the oven to 350℉.
- Line two 8-inch round baking pans with parchment paper. Grease each pan with cooking spray.
- In a small bowl, combine the cocoa powder and hot coffee, add the sour cream and vanilla and stir until well mixed.
- In a medium bowl, sift together the flour, baking soda, and salt and whisk to combine.
- In the bowl of an electric mixer fitted with the paddle attachment, cream the butter and sugar on medium-high speed until light and fluffy, about 5 minutes. Scrape the sides of the bowl as needed. Add the eggs and egg yolks one at a time, adding the next one just as the previous one has been incorporated.
- Turn the mixer speed down to low and add the flour mixture in three parts, alternating with the chocolate mixture in two parts, beginning and ending with the flour, making sure to scrape the sides of the bowl as you go to fully incorporate the ingredients.
- Divide the batter evenly between the two prepared pans. Smooth the tops and tap each pan on the counter a few times to allow air bubbles to escape.
- Bake in the middle of the oven for 35-40 minutes - cakes are ready when the center spring back lightly when touched.
- Cool the cakes in the pan for 30 minutes before inverting them and placing them top side up on a cooling rack to cool completely before assembling.
- Combine the hot coffee and Kahlua.
- To assemble the cake, lay one of the cakes, top side up, on a serving plate (see my note above for my variation). Using a pastry brush, gently brush the cake with the combined coffee-Kahlua mixture. Using a metal spatula frost the top with about ½ cup of ganache, spreading it just a little inside the edge of the cake. Refrigerate for about 5 minutes to allow the ganache to firm up. Remove the cake from the refrigerator and spread about 1 cup of the buttercream, covering the ganache, and taking it all the way to the edge of the cake. Align the second cake on top of the buttercream, top side up (see note above), gently brush the cake with the combined coffee-Kahlua mixture, and frost it with another ½ cup cup of ganache and chill it in the fridge for another 5 minutes. Once chilled, spread a thin layer of buttercream all around the cake, creating a crumb coat. Place in the fridge for about 10 minutes to firm up the thin layer of frosting. Frost the cake with the remaining buttercream. Decorate the top of cake with the remaining ganache in desired.
- Place the chocolate into a medium heat-proof bowl.
- Heat cream in a medium saucepan set over medium low heat. Stir occasionally until the cream starts to simmer.
- Remove the cream from heat and pour over chocolate. Swirl the bowl to ensure all the chocolate is coated.
- Cover the bowl with a lid and let the cream and chocolate sit together for 5 minutes.
- Remove the lid and stir the cream and chocolate together. First start with small circles in the center and gradually increase until all the chocolate has melted and the mixture is smooth. Allow to sit up to a couple hours to become creamy.
Makes about 1 ½ cups
Preparation ~ Vanilla Buttercream
- Using a hand whisk, whisk together the egg whites, sugar, and cream of tartar in the bowl of a stand mixer.
- Place the bowl over (not touching the water) a saucepan of simmering water. The mixture will be thick at first but will become more fluid-like as it heats.
- Continue to gently whisk the mixture until very hot to the touch (130℉ on a candy thermometer).
- Move the bowl to the stand mixer and, using the whisk attachment, whip the whites and sugar mixture together on medium-high speed until it has tripped in volume and it is is thick and glossy, and holds stiff peaks, about 4 minutes.
- Turn the mixer down to medium-low speed until the bowl is cool to touch.
- Turn the speed back up and add the butter, one cube at a time, adding the next just as the previous one has been incorporated. During the mixing the frosting will, at one stage, look as though it has curdled, but it will come back together.
- Once all the butter has been added, and the frosting is fluffy and creamy, add the vanilla and salt until combined.
Makes about 5 cups. This buttercream, covered with plastic wrap will last for 2 days at room temperature or 7 days in the refrigerator. If refrigerated it needs to come to room temperature before use. Also the buttercream will need to be re-whipped before use.

January 20, 2013
The Cake Slice Bakers January 2013 - Banana Cake with Coffee Walnut Buttercream
I can't believe how quickly the time has gone by. It seems like only yesterday that December's cake was being voted upon and baked. Here we are in a new year and we actually had a tie in the voting between The Classic and Banana Cake with Coffee Walnut Buttercream so we were able to chose which one we wanted to bake. Since I am a huge fan of banana cake it was an easy choice for me, although I will probably bake The Classic at a later time.

We always seems to have an abundance of bananas in our house, so it was easy to grab a few extra-ripe ones for my cake. I decided to bake the cake on one day and refrigerated the layers overnight, and then make the buttercream and assemble the cake next day, which worked out really well.
Since my girls aren't huge fans of walnuts I decided to change the frosting a little bit. I saw that Vintage Cakes also had a recipe for Coffee Buttercream (1 tablespoon instant espresso and 2 teaspoons of water to make a paste and add to basic buttercream) so I went with that and also added ⅓ cup of melted dark chocolate so I ended up with a Mocha Buttercream. I also decorated the top of the cake with chocolate covered coffee beans, well I decorated the top with what I had left because I seriously can't stop eating them once I start. I used the basic buttercream recipe from the book which is slightly different to the coffee walnut buttercream.
At first I found it difficult to find a saucepan that I could put the metal bowl of my mixer into without it touching the water. My solution was to get out my pasta pot that has a metal insert to drain the pasta. I filled it just until the water reached the insert, I turned the insert handles in towards each other, and then I balanced my mixer bowl on the top of the insert handles, slightly tilting the bowl. By doing this the water could simmer away without the bowl touching the water.

This type of buttercream is known as a Swiss Meringue Buttercream, and I was looking forward to trying it since I had only made a regular buttercream previously. It is funny when you shy away from attempting something because you think it sounds too difficult, and then when you try it you wonder what all of the fuss was about. That is what happened to me with this buttercream. I am such a baking nerd that I was even excited when it curdled (just as the author said it would) and then came back together again. The end result was a deliciously fluffy mocha-flavored buttercream.

As I was assembling the cake I realized that I should have trimmed it a little as the layers had baked up a little uneven, but I had already topped it with the last layer so I pressed on. In the end the cake was a little lopsided but I think it gave it character. Well, that is what I told myself and I knew that it wasn't going to affect the taste of the cake. And a few chocolate-covered coffee beans on top sealed the deal.
This cake was definitely a winner. The cake had a deep banana flavor and the mocha buttercream was a nice accompaniment to it. It is the sort of cake that you could top with so many different flavors and it would still be great.

Click here to check out the blogs of my fellow Cake Slice Baker's to see which cake they chose to bake - was it The Classic or the Banana Cake with Coffee Buttercream?
Banana Cake with Coffee Walnut Buttercream
(Printer Friendly Recipe)
Ingredients
Cake
Coffee Walnut Buttercream
Preparation
Cake
Buttercream
Walnut-Espresso paste
Basic buttercream:


We always seems to have an abundance of bananas in our house, so it was easy to grab a few extra-ripe ones for my cake. I decided to bake the cake on one day and refrigerated the layers overnight, and then make the buttercream and assemble the cake next day, which worked out really well.
Since my girls aren't huge fans of walnuts I decided to change the frosting a little bit. I saw that Vintage Cakes also had a recipe for Coffee Buttercream (1 tablespoon instant espresso and 2 teaspoons of water to make a paste and add to basic buttercream) so I went with that and also added ⅓ cup of melted dark chocolate so I ended up with a Mocha Buttercream. I also decorated the top of the cake with chocolate covered coffee beans, well I decorated the top with what I had left because I seriously can't stop eating them once I start. I used the basic buttercream recipe from the book which is slightly different to the coffee walnut buttercream.
At first I found it difficult to find a saucepan that I could put the metal bowl of my mixer into without it touching the water. My solution was to get out my pasta pot that has a metal insert to drain the pasta. I filled it just until the water reached the insert, I turned the insert handles in towards each other, and then I balanced my mixer bowl on the top of the insert handles, slightly tilting the bowl. By doing this the water could simmer away without the bowl touching the water.

This type of buttercream is known as a Swiss Meringue Buttercream, and I was looking forward to trying it since I had only made a regular buttercream previously. It is funny when you shy away from attempting something because you think it sounds too difficult, and then when you try it you wonder what all of the fuss was about. That is what happened to me with this buttercream. I am such a baking nerd that I was even excited when it curdled (just as the author said it would) and then came back together again. The end result was a deliciously fluffy mocha-flavored buttercream.

As I was assembling the cake I realized that I should have trimmed it a little as the layers had baked up a little uneven, but I had already topped it with the last layer so I pressed on. In the end the cake was a little lopsided but I think it gave it character. Well, that is what I told myself and I knew that it wasn't going to affect the taste of the cake. And a few chocolate-covered coffee beans on top sealed the deal.
This cake was definitely a winner. The cake had a deep banana flavor and the mocha buttercream was a nice accompaniment to it. It is the sort of cake that you could top with so many different flavors and it would still be great.

Click here to check out the blogs of my fellow Cake Slice Baker's to see which cake they chose to bake - was it The Classic or the Banana Cake with Coffee Buttercream?
Banana Cake with Coffee Walnut Buttercream
(Printer Friendly Recipe)
Ingredients
Cake
- 2½ cups all-purpose flour
- 1½ teaspoons baking powder
- ¼ teaspoon baking soda
- 1½ cups mashed ripe bananas (about 3)
- ¾ cup buttermilk, at room temperature
- 1 cup unsalted butter, at room temperature
- 2 cups sugar
- 1 tablespoon pure vanilla extract
- 4 eggs, at room temperature
Coffee Walnut Buttercream
- 1 cup toasted chopped walnuts
- ¼ cup corn syrup
- ¼ cup bourbon
- 2 tablespoons instant espresso powder
- 5 egg whites
- 1¼ cups sugar
- ¼ teaspoon cream of tartar
- 1½ cups unsalted butter, at room temperature
- ¼ teaspoon of fine sea salt
Preparation
Cake
- Center an oven rack and preheat the oven to 350℉.
- Grease three 8 by 2-inch round cake pans, and line the bottom of the pans with parchment paper circles.
- In a large bowl sift together the flour, baking powder, salt, and baking soda, then whisk the ingredients with a hand whisk.
- In a small bowl combine the banana with the buttermilk.
- In the bowl of a stand mixer fitted with a paddle attachment cream the butter, sugar, and vanilla together on high speed until fluffy, about 5 minutes, stopping the mixer frequently to scrape the sides and the paddle with a rubber spatula.
- Blend in the eggs one at a time.
- With the mixer on low add the flour mixture in three parts, alternating with the banana mixture in two parts, beginning and ending with the four. After each addition scrape the bowl well. Stop the mixer before the last of the flour has been incorporated and complete the blending by hand with a rubber spatula.
- Divide the thick batter equally among the prepared pans, and tap the pans on the counter to settle.
- Bake until the centers spring back when lightly touched, 28 - 30 minutes.
- Cool the cakes in their pans on a wire rack for 30 minutes. Flip them out and let them continue to cool on the rack, top side up, until they reach room temperature. Leave the parchment paper on until you assemble the cake.
- To assemble the cake lay one of the cakes top side up on a cake plate. Using a metal spatula frost the top with ¾ cup of buttercream out to the edge of the cake (filling will be about ¼ inch thick). Stack the second cake top side up on top of the frosted cake and spread another ¾ cup of buttercream on top of it. Stack the last layer of cake top side up on top. Look for any frosting that may have oozed out the sides and spread it along the sides of the cake. Apply a thin layer of frosting all over the cake to create a "crumb coat". Place the cake in the refrigerator until the frosting is firm, about 10 minutes. Take it out and frost the cake with the remaining buttercream, using your spatula to make decorative swirls.
Buttercream
Walnut-Espresso paste
- Puree toasted, chopped walnuts in a food processor until they just begin to form a paste.
- Add corn syrup, bourbon, and espresso powder and blend until combined. Set aside.
Basic buttercream:
- Using a hand whisk, whisk together the egg whites, sugar, and cream of tartar in the bowl of a stand mixer.
- Place the bowl over (not in - do not let the bowl touch the water) a saucepan of simmering water. The egg mixture will be gloppy and thick, but as the mixture begins to warm, it will become more fluid.
- Continue to gently whisk the mixture until it is very hot to touch (130℉ on a candy thermometer).
- Move the bowl to the stand mixer and, using the whisk attachment, whip the whites on medium-high speed until they have tripled in volume and are thick and glossy and hold stiff peaks (like meringue). Turn the mixture down to medium-low speed until the mixing bowl is just cool to touch, 1 to 2 minutes.
- Kick the mixer back up to medium-high speed and and add the butter one piece at a time, adding the next piece just as the previous one has been incorporated.Stop the mixer every every now and again to scrape down the sides. At some point the buttercream will appear curdled, but this is normal, so keep mixing until it all comes together again.
- Once all of the butter has been incorporated and the frosting is fluffy and creamy, add the vanilla and salt and mix until fully combined.
- Covered with plastic wrap this frosting will last 2 days at room temperature or 7 days in the refrigerator. If refrigerated, the frosting will need to come to room temperature before use, and will need to be re-whipped (by hand if at room temperature, or machine if refrigerated), before frosting a cake.

January 02, 2013
The Cake Slice Bakers November 2012 - Shoo-Fly Cake

The good news is that I re-joined the Cake Slice Bakers. The bad news is that everything seemed to conspire against me to get my baking done. In all honesty 2012 hasn't been my favorite year, so I am really looking forward to 2013.
For those who may be unfamiliar, The Cake Slice consists of a dedicated group of bakers from all over the
world. Every year we bake from a different cake book. In 2012 - 2013
we are baking from Vintage Cakes by Julie Richardson. Each month a selection of cakes are presented and
we vote on which cake to bake next from our current book. We then have a
month to bake it in secret before we all blog about it on the same day
each month – the 20th – never before. We never reveal to anyone outside of the group which cake it is until this date. There are a few rules that we follow but the most important one is to
have fun and enjoy eating cake! We have a blogroll which is open to
anyone to view and it lists all the members. We link to this at the end
of our cake reveal posts each month and it can be also be found at The Cake Slice Blogroll.
I was a little apprehensive about making this cake as molasses is not one of my favorite ingredients. There is just something about the taste that makes me shudder. Still, I was curious to see how it would turn out and committed to being faithful to the recipe for my first cake back in the group.

The general consensus in my family was that this recipe would not be repeated. Lets just say that there were a lot more than just the crumbs left on the plate.

Click here to check out the blogs of my fellow Cake Slice Baker's and see their cakes.
(Printer Friendly Recipe)
Ingredients:
Crumb Topping
Preparation
Crumb Topping
- ⅓ cup firmly-packed brown sugar
- ¾ cup all-purpose flour
- ¼ cup unsalted butter, at room temperature, cut into small cubes
- 1 cup sugar
- ¾ cup unsalted butter, melted
- ¾ cup unsulfured blackstrap molasses
- 2 teaspoon pure vanilla extract
- 2 eggs
- 2½ cups all-purpose flour
- 2 teaspoons ground ginger
- 1 teaspoon ground cinnamon
- 1 teaspoon baking soda
- 1/2 teaspoon fine sea salt
- 1 cup warm coffee
Preparation
- Preheat oven to 350℉ and grease a 9x2-inch round cake pan with butter.
- To make crumb topping: combine the brown sugar and flour in a small bowl. Toss in the butter cubes and using your fingertips pinch it into dry mixture to form crumbs. Place the bowl in the freezer while you make the cake.
- To make the cake: in a large bowl with an electric hand mixer, beat the sugar, butter, molasses, and vanilla in a large bowl until smooth. Blend in each egg one at a time.
- In a separate bowl, sift together the flour, ginger, cinnamon, baking soda, and salt; then whisk to ensure they are well blended.
- Using a rubber spatula, stir the flour mixture into the batter in three additions, alternating with the coffee in two additions beginning and ending with the flour mixture.
- Pour the thin batter into the prepared cake pan and sprinkle with your crumb topping.
- Bake in the center of the oven until the top is firm, about 45 minutes.
- Cool on a wire rack for about 30 minutes before serving warm from the pan.
Recipe from Vintage Cakes
July 06, 2011
Cup O'Joe Baked Beans

I have to say hats off to people like Bush's, Heinz, Van Camp, etc - not because of their beans, but because they can get an appetizing photo of said beans. Ok, they have a professional staff for things like this but I was really struggling to get something decent. Don't let this dissuade you from trying these beans as they are so easy to make and pack a wallop of flavor in each mouthful.
It has been a few years since I last made baked beans. I remember that I wasn't thrilled with the results last time, and was determined this time to get the flavor I wanted in the beans. I searched for a few days for the perfect recipe before I decided that it did not exist, well not for me anyway. Instead I chose to take the flavor profiles I liked from three recipes and reinvent the beans to suit my family's tastes. I did have a couple of considerations - I wanted the beans to be vegetarian, I wanted to use my slow cooker, and I wanted a sweet BBQ flavor. The three recipes I chose were Vegetarian Baked Beans (Squawkfox), Crockpot Vegetarian Baked Beans (Blade & Cauldron), and Barbecued Beans (Slow Cooker Revolution via Cooking Light), and then I went to work choosing what I liked from each recipe.
I decided to soak my beans over night even though I was using the slow cooker. Remember to sort through them to pull out any rocks or clumps of dirt that may be hiding, and give them a good rinse. I covered them with water and then left them until the next morning. Apparently you don't have to soak the beans if you are using a slow cooker but I didn't want to take any chances of them not being ready in time, and it really isn't that much work to soak them.
A few recipes I found mentioned adding barbecue sauce, but I really wanted to add my own ingredients to achieve the flavor of a sweet barbecue sauce. I went with molasses, honey, tomato paste, apple cider vinegar, brown sugar, ketchup and a good dose of my favorite Coffee's of Hawaii coffee that had been brewed fresh that morning. Two of my daughters are vegetarians so I did not want to add bacon, and I found that adding the coffee provided that roasted flavor. Honestly I did not miss the bacon because the ingredients I added managed to be sweet and smokey by themselves. Don't get me wrong, I love bacon as much as the next non-vegetarian so add it if you would like too, I just didn't want anyone to wonder if these would still be good without the smokey flavor that bacon can impart to a dish.
Once they had finished cooking and I was happy with the texture of the beans I found that they were still a little "soupy". Some people prefer their beans to have a bit of liquid, but I added a corn starch mixture to thicken them up a little. For those making these beans the day before don't add too much corn starch because they will thicken overnight. We had some leftovers the next day and I will definitely make them a day or so before next time. The flavors really developed overnight and they tasted amazing after being gently reheated.
Cup O'Joe Baked Beans
Ingredients
- 1 onion, finely chopped
- 3 garlic cloves, minced
- 1 tablespoon vegetable oil
- 2½ cups dried navy beans, picked over and soaked overnight
- 3 cups vegetable stock
- 1 cup strongly brewed coffee
- ¼ cup molasses
- ¼ cup honey
- ½ cup packed dark brown sugar
- 1 6oz tin tomato paste
- ¼ cup apple cider vinegar
- ¼ cup ketchup
- Salt and pepper to taste
- 2 tablespoons corn starch dissolved in water, if required
Preparation
- Heat oil in pan.
- Add onion and cook for two minutes, add garlic and continue cooking until both are soft and golden.
- Drain pre-soaked beans and add to the slow cooker insert.
- Add cooked onion and garlic to slow cooker insert.
- In a separate bowl whisk together the vegetable stock, coffee, molasses, honey, dark brown sugar, tomato paste, apple cider vinegar, and ketchup - add to slow cooker insert and stir to combine.
- Set slow cooker to high and cook for approximately 6 hours.
- Add salt and pepper to taste.
- If there is too much liquid in your bean mixture dissolve 2 tablespoons corn starch in water. Add to bean mixture and stir until thickened.
Recipe by All That's Left Are The Crumbs©
March 27, 2011
Espresso and Cream Bars

To me, one of the most enjoyable past-times is drinking a great cup of coffee. I am extremely partial to the coffee produced by Coffees of Hawaii, and in particular their Ka'u. I didn't really become a coffee drinker until about ten years ago. Growing up, tea was the drink of choice in my family, and if we did have coffee it was always instant. That is probably why I didn't like coffee back then. My taste has definitely changed now and our coffee is always freshly ground before we brew it, and then it is timed to perfection.
Of course I love coffee desserts too - tiramisu, affogato, Kahlua brownies, coffee ice cream are all favorites. I really wanted to create some type of bar cookie and I thought the flavors of espresso and cream would be perfect. I did a quick search but didn't find exactly what I was looking for so I used components from a few different recipes to come up with my bars. I used the base from a berry tart that I recently made, the cheesecake filling is from Bakerella, and the ganache topping is from the LA Times. The combination was delicious.
 |  |
 |  |
Once all of the steps were complete I put the tart in the refrigerator overnight so that the ganache could harden. After a few photos I cut it into bars. I have already put it into containers so that my girls can take it to school tomorrow and share with their friends. Having these in the house is just too dangerous for me - before I knew it I would have eaten way too many.

Espresso and Cream Bars
(Printer Friendly Recipe)Ingredients
Base - - 1 cup (2 sticks), melted and cooled
- ⅔ cup sugar
- 2½ cups all-purpose flour
- 1 teaspoon of salt
Filling -
- 2 (8 oz.) packages cream cheese, softened
- ½ cup sugar
- 1 Tablespoons flour
- 2 eggs
- ¼ cup heavy whipping cream
- ¼ sour cream
- 2 teaspoons vanilla
- 2 teaspoons espresso powder
- 2 teaspoons hot water
Ganache Topping -
- 10 ounces premium-quality white chocolate, finely chopped
- 2/3 cup heavy cream
- 1 1/2 tablespoons unsalted butter, at room temperature
Decoration -
- 1 cup powdered sugar, sifted
- 1 teaspoon espresso powder
- 5 teaspoons hot water
Preparation
Base - - Preheat oven to 350°F
- Grease a square tart tin that has a removable base.
- Stir together the butter and sugar in a large mixing bowl.
- Add the flour and salt and stir to make a soft dough.
- Press dough evenly into base and side of square tart tin with fingertips.
- Put the tin on a baking tray and bake for 12-15 minutes, until pastry is slightly puffy.
- Preheat oven to 325°F.
- Cream the sugar, cream cheese, and flour with an electric mixer on medium until light and fluffy.
- On medium low, add eggs one at a time, mixing well with each addition.
- Add sour cream and vanilla and mix until just combined.
- Mix espresso powder and hot water to dissolve, then add to cheesecake mixture, mixing well.
- Pour on prepared crust and bake for about 40 minutes.
- Remove and cool.
Ganache Topping -
- Put the chopped chocolate in a heatproof bowl.
- Bring the heavy cream to a boil, then pour it over the chocolate. Working with a whisk or spatula, gently stir the chocolate and cream together.
- When the ganache is smooth, stir in the butter.
- Cool the ganache slightly and then pour over the top of the tart.
- Place in the refrigerator to harden.
Decoration -
- Place sifted powdered sugar in a bowl.
- Place espresso powder in a small cup and add hot water, stirring to dissolve.
- Add espresso liquid to powdered sugar and stir until completely smooth. Add more hot water if needed. Do not make icing too thin.
- Place icing mixture into a piping bag and pipe lines across the top of the tart.
- Take a skewer or a toothpick and drag it from one end of the pan to the other. Then go to the other end of the pan and drag back the other way. Continue doing this until you have completed the design.
Recipe inspired by Bill Granger, Bakerella, and the LA Times.

Subscribe to:
Posts (Atom)