June 25, 2011

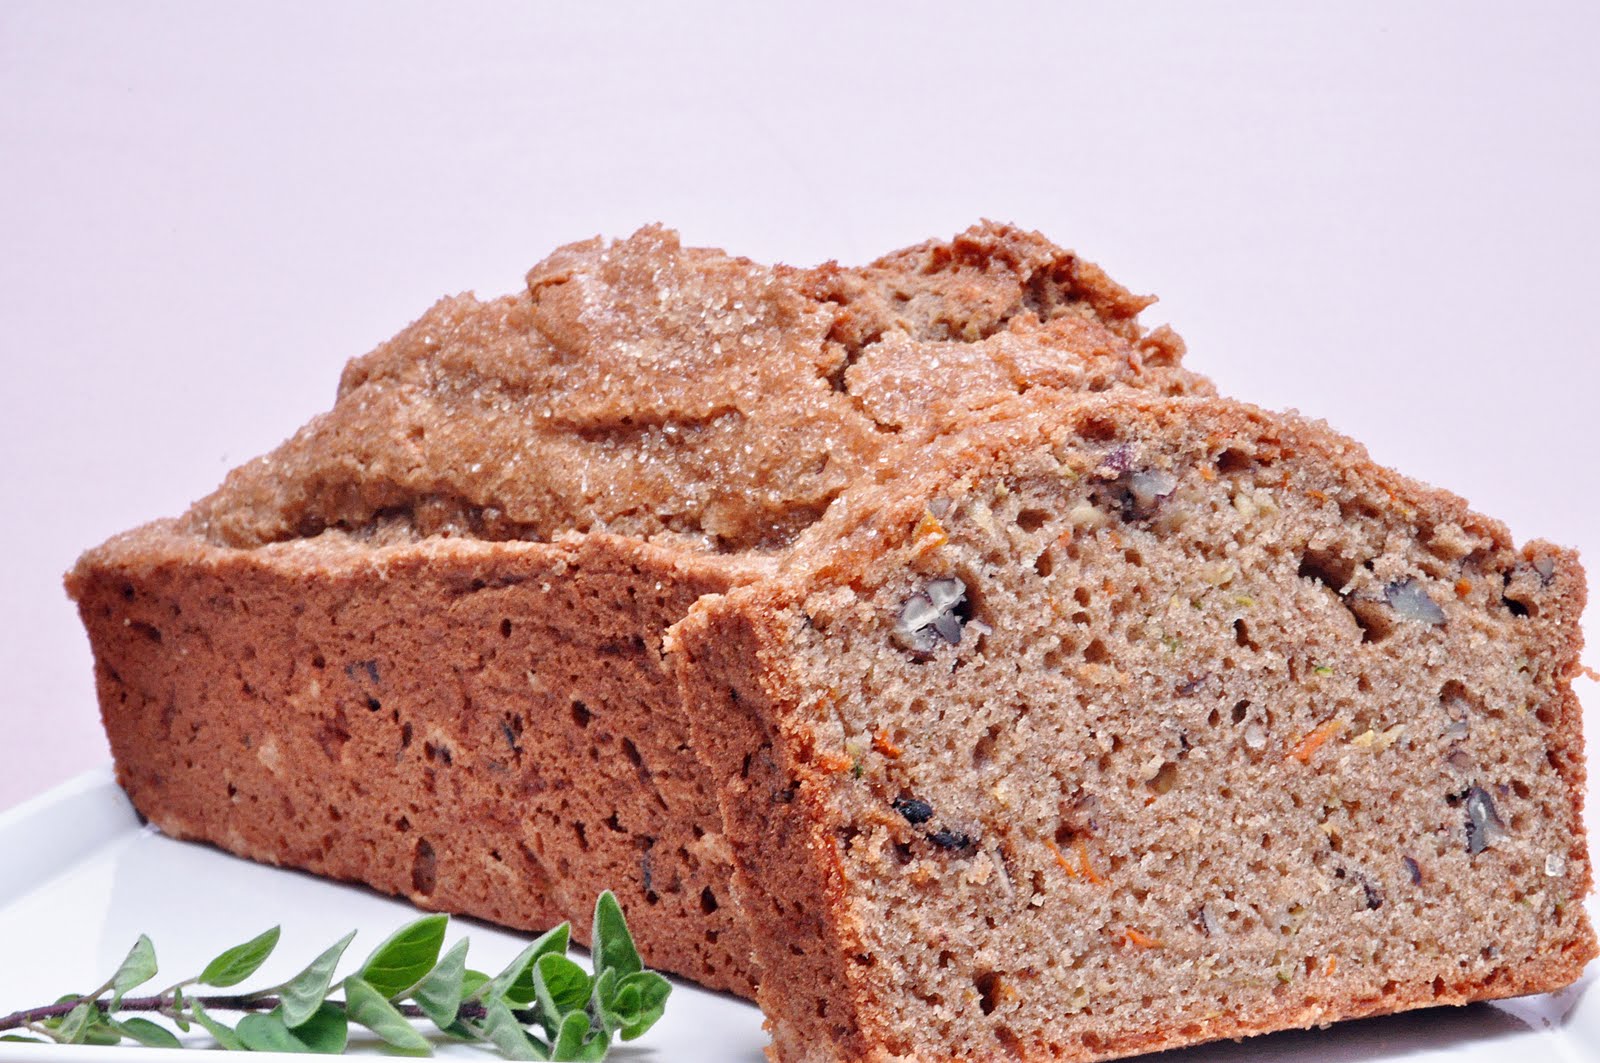
Zucchini-Carrot-Pecan Bread


Every Friday I try to bake something for my husband to take with him the following day.  Early Saturday mornings you will find him out with his training team - a group of dedicated triathletes who find it fun to ride their bikes anywhere from 60-105 miles and then run between 5 and 9 miles (they swim on Friday mornings).  I bake because after all of this hard work they all deserve a treat.

In an effort not to sabotage their training I have been trying to incorporate some healthy elements into my baking - use less sugar, use lot fruits and/or vegetables, cut back on oil.  It is still a work in progress because I have always used lots of butter, cream, sugar, and eggs without even a second thought. One ingredient I haven't experimented with very much is flour.  That is until I was reading Kim's blog, Liv Life, a few days ago and she featured a recipe for chocolate chip cookies (made by her daughter) using spelt flour. 

Following Kim's lead on researching spelt flour I found that it is considered to have a somewhat nuttier and slightly sweeter flavor than whole-wheat flour.  Spelt is by nature a wholefood, and unlike wheat where much of the nutritional bran and germ are often removed during milling, the vital substances of spelt are found in the inner kernel of the grain. Spelt contains more protein, minerals, and amino acids than regular wheat and this superior nutrition makes it an ideal training and endurance food. Although spelt does contain gluten, studies have shown that it can be tolerated by many people who are normally gluten-intolerant.

I do make a lot of quick breads because not only are they tasty but they travel well, which is always handy when it is being thrown in a pick up truck.  Well, maybe "thrown" is not the best description but lets just say that a quick bread is a lot safer than a sponge cake.   With experience I have found that cookies, quick breads, and bar cookies/slices are the way to go when the goodies have to make a trip.


One quick bread recipe that caught my eye recently was a Zucchini-Carrot Bread that appeared on Monica's blog Lick The Bowl Good.  Actually the first thing that grabs my attention each time I visit her blog is that beautiful photo of a Meyer Lemon-Lime Bar in her banner (I can see why the post is entitled "The Best I've Ever Had").  She reached into her archives for this recipe, and it was adapted from a recipe found on Baking with Lisa, who adapted it from Sur la Table’s “Eating Local”.  I adapted it a little further by substituting some spelt flour for the all-purpose flour, adding the toasted pecans, decreasing the sugar and oil, and adding a sprinkle of raw sugar on top.  My last change was to bake one large loaf because my loaf tin is 10 inches x 5 inches.  I really wanted to use candied ginger as described in the recipe but I couldn't find it in my pantry.

Using a single pan will result in a beautiful, high-rising loaf which is just the way I like my quick bread.  I thought the flavor was great, although I may add a little apple sauce next time to add some moisture and compensate for the oil I omitted.  The spelt flour worked out great and I may even do a 50-50 split next time with the all-purpose flour.


Carrot-Zucchini-Pecan Bread
(Printer Friendly Recipe)

Ingredients
  • 2 cups all-purpose flour
  • 1 cup Spelt flour
  • 1½ teaspoons ground ginger
  • 1½ teaspoons ground cinnamon
  • 1 teaspoon baking soda
  • ¼ teaspoon baking powder
  • 1 teaspoon kosher or sea salt
  • ½ cup minced candied ginger (optional)
  • 3 large eggs
  • ¾ cup canola oil
  • ½ cup sugar
  • 2 teaspoons vanilla extract
  • 1 cup coarsely grated carrots
  • 1 cup coarsely grated zucchini
  • 1 cup pecans, toasted and coarsely chopped
  • 2 tablespoons raw sugar, optional

Preparation
  1. Preheat the oven to 325°F. 
  2. Grease two 8.5×4.5 inch loaf pans, or line them with foil or parchment paper (I used one pan that was 10x5 inches).
  3. In a medium bowl, whisk together the flour, ginger, cinnamon, baking powder, baking soda. 
  4. Whisk in the salt and candied ginger, optional.
  5. In a large bowl, whisk the eggs until light and foamy. 
  6. Add the canola oil, sugar, and vanilla, whisking hard until well combined. 
  7. Stir in the carrots and zucchini.
  8. Add the dry ingredients to the egg mixture and stir/fold until just blended.
  9. Divide evenly between the loaf pans (or add to a single pan like I did).
  10. Sprinkle with raw sugar, if desired.
  11. Bake for about 1 hour, until the loaves are firm to the touch and a toothpick inserted in the center comes out clean (mine baked for approximately 75 minutes).
  12. Cool in the pan(s) for 10 minutes, then unmold onto a cooling rack to cool completely.

Recipe by Lick the Bowl Good and Baking with Lisa.

June 23, 2011

To Try Tuesday - Fresh Blueberry Cake


Sometimes you just need a quick and easy cake.  Sometimes that cake will involve a box mix.  Sometimes it will turn out so delicious you will vow to make it again and again.  These three sentences pretty much sum up this cake.

I am not sure how I ended up with three Costco-size punnets of blueberries.  You could say that it was bad planning on my behalf, but I like to think of it as good planning because I decided to make a cake with the extra blueberries.  I didn't really have a recipe in mind but I knew that I had a few boxes of cake mix so I decided to look for a recipe that would "doctor" it up.  As soon as I saw this recipe for an Easy Fresh Blueberry Cake on About.com I knew that it was the one for me.


At first the suggestion on the site of using a lemon cake mix appealed to me but I only had a box of white cake mix, and I decided that I prefer the taste of real lemons.  I love lemon and blueberry together so I did add some extra zest and juice.

This baked up so well in a bundt pan and was delicious both warm from the oven, and after it has cooled.  I think that little mini bundts would be great too.


This post is also linked to Torview's Purple Food Series Palette. 


Fresh Blueberry Cake
Ingredients
  • 3 large eggs
  • ¼ cup granulated sugar
  • ⅓ cup vegetable oil
  • 1 cup sour cream
  • Juice and finely grated zest of 2 lemons (about 1/4 cup juice)
  • 1 box (18.25 ounces) yellow cake mix with pudding in the mix (I used white)
  • 2 cups fresh cleaned blueberries

Preparation
  1. Grease and flour a 10 to 12-cup Bundt cake pan or 10-inch tube pan. 
  2. Heat oven to 325°F for a dark pan or 350F° for a light-colored pan.
  3. Beat eggs with sugar until light. 
  4. Beat in the oil, sour cream, lemon juice, and lemon zest. Continue beating until smooth. 
  5. Slowly blend in the cake mix then beat until well blended. 
  6. Fold in the blueberries. 
  7. Spoon into the prepared baking pan; smooth the top. 
  8. Bake for 50 to 60 minutes, or until a toothpick comes out clean when inserted into the cake.
  9. Dust with powdered sugar or serve with a vanilla glaze or lemon sauce, if desired.
Recipe by Diana Rattray, About.com Guide

June 21, 2011

The Cake Slice June 2011 (Part 2) - Lime Chiffon Cake


Today's post is Part 2 of the Cake Slice Bakers monthly roundup.  We were lucky enough to have a tie in the voting this month, giving us a choice of baking either of the winning cakes or both.  I decided to do both.  Our group is baking from a wonderful cookbook, Cake Keeper Cakes by Lauren Chattman.  

The first cake I made was a Fresh Strawberry Cake with White Chocolate Chips.   The second cake chosen was a Lime Chiffon Cake.  I must admit that I was immediately drawn to the sound of this cake.  I haven't ever made a chiffon or Angel food cake, so I was really looking forward to trying this recipe.

Of course when I went to make it I discovered that I am the proud owner of many different bundt pans, but not a tube pan - maybe that is why I have never made this type of cake before.  A quick trip to Ross remedied this situation, and I was back on track again or so I thought.  I then realized that I did not have any cream of tartar, but I wasn't about to go out again and the the cake worked out fine without this ingredient.


The scary part for me came to when the instructions told me to invert the pan so that the cake could cool and would not deflate.  I thought that the cake was going to slide right out of the pan and I wondered how I would explain a bottle of wine in the middle of my cake?  Really, I should have had more faith because it worked out just as the instructions said that it would.


This is my cake cooling upside down over a wine bottle.

I really did enjoy this cake.  I loved the hint of lime, and maybe I will even increase it a bit more next time, or add a glaze.  It has definitely made me a fan of the chiffon cake.

Click here to check out all the other Cake Slice Bakers' cakes.


Lime Chiffon Cake
(Printer Friendly Recipe)

Ingredients
  • 1⅓ cups cake flour
  • ½ teaspoon baking soda
  • ½ teaspoon salt
  • 7 large eggs – 5 separated and 2 left whole
  • 1½ cups sugar
  • ½ cup vegetable oil
  • ⅓ cup fresh lime juice
  • ⅓ cup water
  • 2 teaspoons grated lime zest
  • 1 teaspoon vanilla extract
  • ⅓ teaspoon cream of tartar

Preparation
  1. Preheat the oven to 325°F. 
  2. Have ready a 9 inch ungreased angel food tube pan with a removable bottom.
  3. Combine the flour, baking soda and salt in a medium bowl and whisk thoroughly to break up any lumps. Set aside.
  4. Place the egg yolks and 2 whole eggs in a large mixing bowl and beat on medium high speed until lightened in color, about 3 minutes. 
  5. With the mixer running, add 1 cup sugar in a slow steady stream and continue to beat until the mixture is light and increased in volume, about 5 minutes. 
  6. With the mixer still running, slowly pour in the oil and continue to beat for 1 minute longer.
  7. Combine the lime juice and water in a measuring cup. 
  8. With the mixer on low speed add ⅓ of the flour, then ½ the lime mixture, another ⅓ flour, the rest of the lime and then the remaining flour, scraping down the bowl when necessary. 
  9. Stir in the lime zest and vanilla.
  10. With clean beaters, whip the egg whites on medium speed until frothy. 
  11. Add the cream of tartar and continue to beat on medium speed until the egg whites begin to turn white. 
  12. With the mixer still on medium speed, pour in the remaining ½ cup sugar in a slow stream, and whip until the whites hold stiff peaks.
  13. Fold ¼ of the yolk mixture into the whites to lighten. 
  14. Then fold the remaining whites into the yolk mixture, gently but thoroughly. 
  15. Pour the batter into the tube pan and smooth the top. 
  16. Bake the cake until golden brown and the top springs back when touched, about 55minutes to 1hour.
  17. If your pan has feet, invert the pan onto a heatproof surface and allow to cool. 
  18. If your pan doesn’t have feet, invert 4 heatproof drinking glasses on the counter and rest the inverted pan on top of the glasses to allow air to circulate around the cake while it cools. 
  19. Let the cake cool completely in the pan, about 2 hours.
  20. To remove the cake from the pan, run a sharp knife around the edge, being careful to leave the golden crust intact. 
  21. Remove the sides of the pan and invert the cake onto a serving platter. 
  22. Run the knife under the removable bottom and lift it off the cake. 
  23. Slice and serve.
  24. Store uneaten cake wrapped in plastic and kept at room temperature for up to 3 days.

Makes one 9 inch angle food pan cake.

Recipe from Cake Keeper Cakes by Lauren Chattman.

June 20, 2011

The Cake Slice June 2011 (Part 1) - Fresh Strawberry Cake with White Chocolate Chips


The 20th of the month has arrived and that means that it is Cake Slice Bakers time again.  For the first time ever there was a tie in the voting.  Everyone in the group was given the choice to bake either of the cakes, or both.  Naturally I choose to make both cakes, because the more the merrier!  They are both very different cakes so I thought it would be fun to be able to do some comparisons between them.  Before starting I immediately had in mind the one that I would prefer but only time would tell if I was right.

We are continuing to bake from Cake Keeper Cakes by Lauren Chattman.  The first cake is a Fresh Strawberry Cake with White Chocolate Chips.  I admit that I may not have made this cake had it not been one of our choices.  It just seemed so sweet with the strawberries and the white chocolate chips.  However, that is what I love about being part of this group, it makes you try things that you may have otherwise overlooked.


This is another snacking cake and it is very easy to put together.  My daughter had some friends sleep over so they were quite anxious for it to come out of the oven.  I managed to let it cool for the required five minutes and then I got it straight onto the cake plate for some photos.  It probably was not the best idea to photograph a hot cake, especially when I tried to slice it, but the girls were hovering and looking at me with pleading eyes.  I sliced the end off and cut it into pieces for them which bought me a little more photo time, but not long.  Within 15 minutes half of the cake was already gone so they certainly enjoyed it.  Mr. ATLATC headed out to a bike path clean up and took the remaining cake with him to be enjoyed after their hard work.  He said that it didn't last long at all.


I felt a little different about it.  I'm not saying that I didn't like it but I would certainly make a few changes before making it again.  It was extremely sweet so I would cut down the amount of sugar and white chocolate chips.  Part of the cake may look a little undercooked in the photos but this is just the warm melted chocolate chips.  Also, my strawberries were quite large so I sliced them and then cut them in half.  In future I think I would chop them a little bit smaller because I thought the pieces were still a little bit too big. 


I am looking forward to seeing everyone's reaction to both of these cakes.  Click here to see a list of all of the members blogs.

Please check back tomorrow for Part 2 of The Cake Slice and to see which cake was also chosen for this months' baking adventure.


Fresh Strawberry Cake with White Chocolate Chips
(Printer Friendly Recipe)

Ingredients
  • 1 egg
  • 1 egg yolk
  • ½ cup sour cream
  • ½ teaspoon grated lemon zest
  • 2 teaspoons vanilla extract
  • 1½ cups all purpose flour
  • 1½ teaspoons baking powder
  • ¾ teaspoon baking soda
  • ¼ teaspoon salt
  • 6 tablespoons (¼ stick) unsalted butter, softened
  • 1 cup sugar
  • 8 ounces strawberries, stemmed and sliced
  • 1 cup white chocolate chips or chunks
 

Preparation
  1. Heat the oven to 350°F. 
  2. Grease an 8 inch square baking pan and dust it with flour, knocking out the excess.
  3. Combine the egg, egg yolk, sour cream, lemon zest and vanilla in a large measuring jug and beat lightly.
  4. Combined 1¼ cups of flour, baking powder, baking soda and salt in a medium bowl.
  5. Combine the butter and sugar in a large mixing bowl and cream with an electric whisk on medium high speed until fluffy, about 3 minutes. Scrape down the sides when necessary.
  6. With the mixer on medium low speed, pour the egg mixture into the bowl in a slow stream, stopping the mixer once or twice to scrape down the bowl.
  7. Turn the mixer to low speed and add the flour mixture, ½ cup at a time. After the last addition mix for 30 seconds on medium speed.
  8. Combine the strawberries and remaining ¼ cup flour in a medium bowl and toss to coat. 
  9. Fold the flour covered berries along with the chocolate chips into the batter using a spatula.
  10. Scrape the batter into the prepared pan and smooth the top with a spatula. 
  11. Bake the cake until golden and a toothpick inserted in the center comes out clean, 45-50 minutes. 
  12. Let the cake cool ion the pan for about 5 minutes, invert it onto a wire rack and then turn it right side up to cool completely.
  13. Cut into squares and serve.

Makes one 8 inch square cake.

Recipe from Cake Keeper Cakes by Lauren Chattman

June 17, 2011

Banana Cream Cheesecake


Although we don't have them all, we do have our fair share of chain restaurants - the good, the bad, and the ugly.  If I am going to visit one my choice is The Cheesecake Factory, even though the wait can sometimes be 1 to 1½ hours.  Of course it isn't for the faint-hearted as their meals can be enough to feed a small army.  I usually try to stick to a salad (the Seared Tuna Tataki Salad is very good) but not because I am being particularly "good".  I really do this so that I have room to have a piece of cheesecake.  Of course these servings are huge too, so we share.  There is usually some discussion before we settle on the Fresh Banana Cream Cheesecake (we always do).

When my daughters' 18th birthday was coming up I asked her what kind of cake she would like and she really wanted a cheesecake.  She usually picks a Chocolate Chip Cheesecake so I was surprised that she changed her mind and decided upon a Banana Cream Cheesecake.  I thought it would be a good time to try a clone recipe of the one from The Cheesecake Factory.  After a quick search I found one that looked really good at Epicurious.


I made a couple of minor changes to the recipe.  Out went the margarine and in came butter for the crust.  Also, instead of using vanilla sandwich cookies I decided to use chocolate sandwich cookies because I like chocolate and banana together.  For the filling I used regular Cavendish bananas but for the decoration on top I used Apple bananas because I love their firmness and color.  As I always do with cheesecakes I wrapped the removable bottom of the spring-form pan with non-stick aluminum foil as this makes plating the cheesecake a breeze.

This was definitely a winner.  It was like eating a banana cream pie in cheesecake form.  The birthday girl was super happy and the cheesecake didn't last long.  Just the way I like it.


The Cheesecake Factory Banana Cream Cheesecake
Ingredients
  • 20 chocolate sandwich cookies
  • ¼ cup butter, melted
  • 24 oz cream cheese, softened
  • ⅔ cup granulated sugar
  • 2 tbsp cornstarch
  • 3 eggs
  • ¾ cup mashed bananas (about 2)
  • ½ cup whipping cream
  • 2 teaspoons vanilla extract
  • additional bananas and whipped cream for decoration, if desired

Preparation
  1. Preheat oven to 350°F.
  2. Place cookies in a blender; process with on/off pulse until finely crushed.
  3. Add butter and continue to process with pulses until blended. 
  4. Press crumb mixture onto bottom of 10" springform pan and refrigerate.
  5. Beat cream cheese in large bowl with electric mixer at medium speed until creamy. 
  6. Add sugar and cornstarch and beat until blended. 
  7. Add eggs, one at a time, beating well after each addition. 
  8. Beat in bananas, whipping cream, and vanilla. 
  9. Pour cream cheese mixture into prepared crust. 
  10. Place pan on cookie sheet and bake 15 minutes.
  11. Reduce oven temperature to 200°F (DO NOT forget to reduce temperature - very important) and continue baking 75 minutes or until center is almost set.
  12. Loosen edge of cheesecake; cool completely on wire rack before removing rim of pan.
  13. Refrigerate cheesecake, uncovered, 6 hours or overnight.
  14. Allow cheesecake to stand at room temperature 15 minutes before serving.
  15. Decorate top with sliced bananas and whipped cream, if desired.

Recipe submitted to Epicurious by janewayne31.