July 24, 2011

Chocolate Mint Pots de Crème


Sometimes I do things backwards.  Instead of seeing a recipe I like and then wondering what I could make it in, I see a beautiful baking tin, pie plate, or in this case ramekin, and then I go looking for a recipe to suit it.

In this case I came across a recipe for these beautiful Pots de Crème in Sunset magazine.  I just loved the sound of chocolate mint and the pretty pale green color of the custard.  Who wouldn't like the idea of a custard that tastes like a peppermint patty?

I had never heard of chocolate mint before but I was lucky enough to find a plant at my local farmers' market.  This amazing herb comes from the spearmint family and has a purple stem with green leaves. You can use it like any mint plant in drinks, salads, desserts, sauces or as a garnish. I have it growing in a big pot and it has taken off like crazy.  I think this is the beginning of a wonderful relationship.

You need to start this recipe earlier in the day if you plan on serving it on the same day since it needs to steep for two hours to infuse the mint flavor, and then it requires chilling after you have made the custard.  Other than that it is a very simple dessert that will impress everyone after the first bite.


Chocolate Mint Pots de Crème 
(Printer Friendly Recipe)
 
Ingredients

  • 2 cups heavy cream
  • 2 cups milk
  • 3 ounces (3 big handfuls) chocolate mint sprigs, plus leaves for garnish
  • 1 cup sugar
  • 8 large egg yolks
  • Sweetened whipped cream
  • 1/2 cup chocolate shavings

Preparation   
  1. Heat together cream, milk, and mint in a medium pot over medium heat until mixture starts to simmer. 
  2. Remove from heat, cover, and let steep about 2 hours.  
  3. Preheat oven to 300°F. 
  4. Set 8 ramekins (4 oz. each) in a large roasting pan or baking dish.  
  5. Reheat cream mixture to a simmer; strain into a medium bowl. 
  6. Whisk together sugar and yolks in a large bowl, slowly add cream to yolk mixture, whisking constantly.  
  7. Pour mixture into ramekins, dividing evenly. 
  8. Fill pan with hot water until it reaches halfway up sides of ramekins.  
  9. Cover pan with foil and bake until custards are set and jiggle only slightly in the center, about 30 minutes. 
  10. Remove from oven and let sit in hot water 30 minutes. 
  11. Transfer ramekins to a baking sheet, cover, and chill at least 2 hours and up to 3 days.  
  12. Serve with whipped cream, fresh mint leaves, and chocolate shavings, if desired.
 
Recipe by Sunset magazine


    July 20, 2011

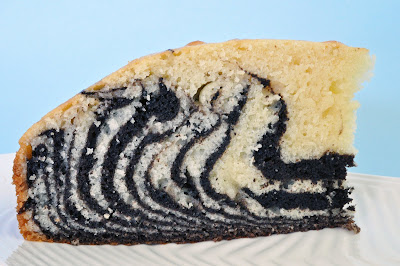
    The Cake Slice July 2011 - Zebra Cake


    It is Cake Slice Baker's time and this month we are baking a Zebra Cake from Cake Keeper Cakes by Lauren Chattman. We have been baking from this book since October of 2010 and I have to say that I have had so much fun and each of the cakes has been something special, and I have yet to need a cake keeper since they are gone in no time.

    When I heard that this cake had been chosen I was a little nervous.  It is one of those cakes that I have seen in magazines and wondered how did they do that? As the time got closer to making the cake I asked myself if I was up to the challenge? After reading through the recipe I kept thinking can it be that simple?  And before I embarrass myself more by telling you about more of the conversations I have with myself, let me say that this cake could not be any easier and you will wow people with it.


    This cake gets its flavor from a vanilla and a chocolate batter that is intertwined.  To make the chocolate even more intense I used one tablespoon of  Black Cocoa that I purchased from King Arthur Flour, along with one tablespoon of the regular Dutch-process cocoa.  My chocolate batter seemed a little thick so I had to add a little more of the vanilla batter to it because it was not spreading out as it should in the cake pan.

    Once again the Cake Keeper Cake got an excellent rating from my family.  Everyone loved that the cake had both vanilla and chocolate flavors, and it was nice and moist.  I could really see this cake working well with other flavors too.

    Please join me in checking out all of the other Cake Slice Bakers blogs by clicking on this link.


    Zebra Cake
    (Printer Friendly Recipe)

    Ingredients
    • 2 cups unbleached all-purpose flour
    • 1 tablespoon baking powder
    • 1/4 teaspoon salt
    • 4 large eggs
    • 1 cup sugar
    • 1 cup milk, whole or 2%
    • 1/2 cup butter, melted and cooled
    • 1/2 cup vegetable oil
    • 2 teaspoons vanilla extract
    • 2 tablespoons unsweetened Dutch-process cocoa powder

    Preparation
    1. Preheat the oven to 350°F. 
    2. Grease a 9 inch pan, line with a circle of parchment paper, grease the parchment and dust with flour. Combine the flour, baking powder and salt in a medium bowl. 
    3. Combine the eggs and sugar in a large mixing bowl and beat with an electric mixer on high speed until thick and pale, about 5 minutes. 
    4. With the mixer on low speed, stir in the milk, butter, oil and vanilla, scraping down the sides of the bowl once or twice as necessary. 
    5. Stir in the flour mixture, ½ cup at a time.  
    6. Transfer a third of the batter into another bowl and whisk in the cocoa powder.  
    7. Place a quarter cup of the vanilla batter into the centre of the pan and let it stand for a few seconds so it spreads out slightly. 
    8. Place 2 tablespoons of the chocolate batter right on top of then vanilla and wait another few seconds until it spreads. 
    9. Continue alternating vanilla and chocolate until you have used up all the batter and it has spread to the edges of the pan.  
    10. Bake until the cake is set and a toothpick comes out clean, about 40 minutes. 
    11. Cool in the pan for 10 minutes. 
    12. Run a sharp knife around the edge of the pan and invert the cake onto a cutting board. Peel away the parchment paper and re-invert onto a wire rack and cool completely. Slice and serve. 
    13. Store uneaten cake in a cake keeper or wrap in plastic and store at room temperature for 3 days.
    Cake from Cake Keeper Cakes by Lauren Chattman.

    July 14, 2011

    To Try Tuesday - Roasted Banana Bread with Browned Butter and Toffee Topping


    Sometimes I think I want to give up my blog.  I love the cooking part but I just get so frustrated with taking photos.  They just never seem to turn out the way that I would like them to.  I have these beautiful visions in my head but what I see is not what I get.  I really have no one to blame but myself.  I should learn the ins and outs of my camera, I should take a class in photography, I should read more books on food photography, I should buy some proper lighting.  Lots of "shoulds" but not enough time or finances to do so at the moment.  One day.

    Anyway, back to the task at hand.  I had lots of bananas quickly ripening in the fruit basket and I wanted something new to try rather than my go-to recipe for banana bread.  I went through my trusty "To Try" list hoping to find something.  Sure enough there was a great-sounding recipe for Roasted Banana Nut Bread with Browned Butter & Toffee Topping on Karissa's site Baking For Her Soul.

    The only changes I made were to omit the nuts and I did not lay the slices of banana on the sides like she did.  The roasting of the bananas brings out the sweetness and adds such a wonderful flavor to the bread.  The crunchy topping was also good, and I can imagine a few different directions to go in if you did want a different topping - a sprinkle of coconut, a cream cheese and passionfruit frosting, even something with peanut butter would be yummy.  And should the bread last long enough to be re-purposed I think it would make an awesome base for a bread pudding.


    Roasted Banana Bread with Browned Butter and Toffee Topping

    Ingredients
    • 3 medium bananas
    • ⅔ cup brown sugar, separated
    • 4 tablespoons butter, separated
    • 2 tablespoons canola oil
    • ½ teaspoon salt
    • 1 teaspoon cinnamon
    • 1 teaspoon vanilla extract
    • ¼ cup low-fat plain yogurt
    • 2 large eggs, room temperature
    • 1¾ cups all-purpose flour
    • ¾ teaspoon baking soda
    • ⅓ cup toffee pieces for sprinkling on top, optional
    • 2 teaspoons granulated sugar for sprinkling on top, optional

    Preparation
    1. Preheat oven to 400°F.
    2. Grease and flour a 9×5 loaf pan.
    3. Peel and slice the bananas into ½-inch pieces and toss them with 1/3 cup brown sugar and 1 tablespoon butter in a foil-lined baking dish.
    4. Bake for 40 minutes, stirring once during baking, until the bananas are browned and cooked through.
    5. Remove from oven and allow to cool.
    6. Reduce oven heat to 350°F.
    7. Whisk together flour, baking soda, and cinnamon in a medium bowl, and set aside. 
    8. On medium heat, brown 3 tablespoons of unsalted butter, swirling the pan several times for about 5 minutes until the butter has started to brown.
    9. Remove from heat and add 1/3 cup brown sugar and salt.
    10. Add the bananas to the browned butter and mash into mixture, until just combined.
    11. Add eggs, vanilla extract, oil, and the yogurt to the butter, sugar and bananas, mix until combined.
    12. Add the wet mixture into the dry mixture, and mix to incorporate fully, but don’t mix past the point where it’s just combined.
    13. Pour into prepared pan.
    14. Sprinkle the toffee bits on top, and then sprinkled the entire top with sugar.
    15. Bake at 350°F degrees on center rack for about 40-50 minutes, until toothpick comes out clean and top is browned.
    16. Remove from oven and allow to cool in loaf pan for about 10-15 minutes before removing the loaf.
    17. Place on a wire rack to cool completely.
    Recipe adapted from Baking For Her Soul.

    July 09, 2011

    Tropical White Sangria


    Sangria is a fruit-based wine punch predominately from Spain and Portugal, and it is just the thing on a hot summer's day.  Not only is it very refreshing but there are so many different ways to make it.  Both white and red versions are very popular.

    We decided to go with a white version, or sangria blanca, for our July 4th celebration.  We love sangria because it is not too heavy and you can adapt it to any fruit you may have on hand. You can also add as much, or as little alcohol as you want, and you can vary the soda to make a completely different taste.  We used seltzer water but you could also try club soda, lemon-lime soda, ginger ale, a flavored mineral water, or even an orange-based soda.  Like I said, the possibilities are endless.

    After mixing up the basics we placed it in the refrigerator overnight.  You can serve it straight away over ice, but I prefer to let the flavors muddle a little.  Once we were ready to serve we added the additional fruit and the soda.


    Tropical White Sangria

    Ingredients
    • 1 x 1.5 liter bottle of white wine - I used a moscato 
    • ½ cup white sugar, dissolved in a little hot water
    • 1 cup orange juice
    • 1 cup pineapple
    • 3 oranges, sliced  
    • 2 lemons, sliced into wedges
    • 2 limes, sliced into wedges
    • 10 strawberries, cut in half
    • 6 lychee, peeled, seeded, and cut in half
    • 3 x 355 ml cans club soda or spritzer water

    Preparation
    1. Pour wine in the pitcher.
    2. Lightly squeeze the juice from the lemon and lime wedges by hand into the pitcher.
    3. Toss in the fruit wedges (leaving out seeds if possible) and orange slices and add sugar.
    4. Add the orange juice and pineapple juice - stir.
    5. Chill overnight.
    6. Add strawberries and lychee.
    7. Add club soda or seltzer just before serving. 
    8. If you'd like to serve right away, use chilled white wine and serve over lots of ice.  
    9. Addition ideas - peaches, handful of fresh blueberries, raspberries, kiwi, a shot of cointreau, brandy or rum, a cup of citrus-flavored soda.

    Recipe adapted from a sangria recipe on About.com

    July 06, 2011

    Cup O'Joe Baked Beans


    I have to say hats off to people like Bush's, Heinz, Van Camp, etc - not because of their beans, but because they can get an appetizing photo of said beans.  Ok, they have a professional staff for things like this but I was really struggling to get something decent.  Don't let this dissuade you from trying these beans as they are so easy to make and pack a wallop of flavor in each mouthful.

    It has been a few years since I last made baked beans.  I remember that I wasn't thrilled with the results last time, and was determined this time to get the flavor I wanted in the beans.  I searched for a few days for the perfect recipe before I decided that it did not exist, well not for me anyway.  Instead I chose to take the flavor profiles I liked from three recipes and reinvent the beans to suit my family's tastes.  I did have a couple of considerations - I wanted the beans to be vegetarian, I wanted to use my slow cooker, and I wanted a sweet BBQ flavor.  The three recipes I chose were Vegetarian Baked Beans (Squawkfox), Crockpot Vegetarian Baked Beans (Blade & Cauldron),  and Barbecued Beans (Slow Cooker Revolution via Cooking Light), and then I went to work choosing what I liked from each recipe.

    I decided to soak my beans over night even though I was using the slow cooker.  Remember to sort through them to pull out any rocks or clumps of dirt that may be hiding, and give them a good rinse.  I covered them with water and then left them until the next morning.  Apparently you don't have to soak the beans if you are using a slow cooker but I didn't want to take any chances of them not being ready in time, and it really isn't that much work to soak them. 

    A few recipes I found mentioned adding barbecue sauce, but I really wanted to add my own ingredients to achieve the flavor of a sweet barbecue sauce.  I went with molasses, honey, tomato paste, apple cider vinegar, brown sugar, ketchup and a good dose of my favorite Coffee's of Hawaii coffee that had been brewed fresh that morning.  Two of my daughters are vegetarians so I did not want to add bacon, and I found that adding the coffee provided that roasted flavor.  Honestly I did not miss the bacon because the ingredients I added managed to be sweet and smokey by themselves.  Don't get me wrong, I love bacon as much as the next non-vegetarian so add it if you would like too, I just didn't want anyone to wonder if these would still be good without the smokey flavor that bacon can impart to a dish.

    Once they had finished cooking and I was happy with the texture of the beans I found that they were still a little "soupy".  Some people prefer their beans to have a bit of liquid, but I added a corn starch mixture to thicken them up a little.  For those making these beans the day before don't add too much corn starch because they will thicken overnight.  We had some leftovers the next day and I will definitely make them a day or so before next time. The flavors really developed overnight and they tasted amazing after being gently reheated.


    Cup O'Joe Baked Beans

    Ingredients
    • 1 onion, finely chopped
    • 3 garlic cloves, minced
    • 1 tablespoon vegetable oil
    • 2½ cups dried navy beans, picked over and soaked overnight 
    • 3 cups vegetable stock
    • 1 cup strongly brewed coffee
    • ¼ cup molasses
    • ¼ cup honey
    • ½ cup packed dark brown sugar
    • 1 6oz tin tomato paste
    • ¼ cup apple cider vinegar
    • ¼ cup ketchup
    • Salt and pepper to taste
    • 2 tablespoons corn starch dissolved in water, if required
    Preparation
    1. Heat oil in pan.
    2. Add onion and cook for two minutes, add garlic and continue cooking until both are soft and golden.
    3. Drain pre-soaked beans and add to the slow cooker insert.
    4. Add cooked onion and garlic to slow cooker insert.
    5. In a separate bowl whisk together the vegetable stock, coffee, molasses, honey, dark brown sugar, tomato paste, apple cider vinegar, and ketchup - add to slow cooker insert and stir to combine.
    6. Set slow cooker to high and cook for approximately 6 hours.
    7. Add salt and pepper to taste.
    8. If there is too much liquid in your bean mixture dissolve 2 tablespoons corn starch in water.  Add to bean mixture and stir until thickened.

    Recipe by All That's Left Are The Crumbs©

    July 04, 2011

    Red, White & Blue Waffles


    Happy 4th of July!  Hope you all have a wonderful day that includes family, friends, fun, fireworks and lots of yummy food.

    We decided to start our morning off with some patriotic red, white and blue waffles.  It was a little bit of a mad rush because I also needed to get the baked beans into the slow cooker (recipe to come a little later). In a very short amount of time I managed to use a good number of bowls, measuring spoons, pots, and utensils.  Usually I try to clean as I go but that wasn't an option this morning.  Luckily for me a magic genie appeared and washed up everything for me.  Well, really it was my wonderful husband, but it was magical.  In between doing this he also whipped up a White Sangria (another recipe to follow soon), and had it in the fridge to chill.

    These waffles were inspired by ones that appeared on Kita's blog, Pass the Sushi.  Her post made me laugh because it was entitled "Blueberry Sour Cream Waffles for When Gerard Butler Visits".  The waffles sounded amazing, and who doesn't want an amazing recipe when someone like Gerard visits?  I mean you have to be ready don't you?

    My refrigerator contained a plethora of berries - blackberries, blueberries, strawberries, and raspberries - but I decided to use blueberries and raspberries for my waffles.  I used only all-purpose flour, mainly because I did not have any whole wheat pastry flour, and I added some cinnamon to the mix.  A little dusting of powered sugar gave them the red, white, and blue look.  I do agree with Kita that a dollop of cream, or even sour cream, would make an excellent addition but these were gobbled up too quickly to do so today. All that accompanied them was some maple syrup.

    I wanted to pass on a tip for transferring the batter to the waffle maker.  I have always used the little cup that came with the waffle maker.  It holds about one cup, but it is always difficult to get all of the batter out of it.  Previously I have resorted to using a mini spatula to scrape the sides as I pour the batter into the waffle maker.  This morning I decided to grab my largest ice cream scoop and measure how many scoops equaled the amount of batter in the cup.  It worked out to two full scoops.  I cannot tell you how much easier it is to use an ice cream scoop to transfer the batter, and the built in scraper means that all of the batter is transferred with a squeeze of the handle.


    Red, White, & Blue Waffles
    (Printer Friendly Recipe)

    Ingredients
    • 2 cups all-purpose flour
    • 1½ teaspoons baking powder
    • 1 teaspoon baking soda
    • ½ cinnamon
    • ½ teaspoon salt
    • 1 cup sour cream
    • 1 cup whole milk
    • 3 eggs
    • 8 tablespoons butter, melted and cooled
    • ¾ cup blueberries
    • ¾ cup raspberries
    Preparation
    1. Preheat your waffle iron on medium-high heat.
    2. In a large bowl, combine flour, baking powder, baking soda, and salt.
    3. In a smaller bowl, whisk together the milk and sour cream, and then whisk in the eggs. 
    4. Pour the wet ingredients into the dry, and stir just until combined. 
    5. Fold in the butter, and then the blueberries and raspberries, stirring minimally.
    6. Pour 1/4 cup of batter per waffle onto the iron and cook until the waffles are a light golden brown. Keep cooked waffles warm on a platter in the oven.
    7. Serve waffles with a dusting of powdered sugar and maple syrup (a dollop of whipped cream or sour cream would be great too). 
    8. Makes approximately 6 waffles.
    Recipe adapted from Pass the Sushi.

    July 03, 2011

    Roasted Bananas Foster Ice Cream


    Growing up in Australia it was perfectly normal for us to throw whole bananas on the BBQ, and once they were ready we would split them open and enjoy the contents - sometimes with a little ice cream, but mostly just plain.  Roasting them like this brought out all of their sugary goodness and when we BBQ today, I still add some bananas to the grill.

    I always try to have bananas in the house.  They are one of my favorite fruits and I love them in baked goods too.  They are even great in a curry.  Thank goodness they are relatively inexpensive here as I tend to buy the big bag of them from Costco.  My eldest daughter tells me that in Australia they are currently $14.00 per kilo, that is about $7.00 per pound!  This is due to a cyclone which ravaged the trees up north.

    When a recipe for Roasted Banana Ice Cream appeared on Michelle's blog, Brown Eyed Baker, I knew my family would go crazy for it.  I really should have known to double the batch because there were some very sad faces when it was all gone in a few hours.  This is such an easy ice cream to make because it is not custard-based.  The hardest thing you will have to do is roast the bananas and lift your blender and ice cream maker out of the cupboard - if you keep these items on your kitchen counter then you just halved your workload.

    As usual I had trouble sticking to the original recipe.  I wanted to make it a little more like Bananas Foster so I added some Malibu rum to the bananas prior to baking, I used orange juice rather than lemon juice, and I substituted 1/2 a cup of whipping cream for some of the milk.  I think that next time a little toasted coconut would make a nice textural addition too.  The flavor of the blended roasted bananas and the milk/cream base is amazing.  I think that I could have eaten it with a spoon before it was even churned.  I did restrain myself and the reward was definitely worth it.  This ice cream is swoon-worthy.


    Roasted Bananas Foster Ice Cream

    Ingredients
    • 4 medium-sized ripe bananas, peeled
    • ⅓ cup brown sugar
    • 1 tablespoon butter, cut into small pieces
    • 2 tablespoons Malibu rum
    • 1 cup whole milk
    • ½ cup whipping cream
    • 2 tablespoons granulated sugar
    • ½ teaspoon vanilla extract
    • 1½ teaspoons orange juice
    • ¼ teaspoon coarse salt
    • prepared caramel sauce, optional 

    Preparation 
    • Preheat oven to 400°F.
    • Slice the bananas into ½-inch pieces and toss them with the brown sugar, butter, and Malibu in a 2-quart baking dish.
    • Bake for 40 minutes, stirring once during baking, until the bananas are browned and cooked through.
    • Scrape the bananas and the thick syrup in the baking dish into a blender or food processor.
    • Add the milk, cream, granulated sugar, vanilla, orange juice and salt, and purée until smooth.
    • Chill the mixture for at least 8 hours (preferably overnight) in the refrigerator.
    • Freeze it in your ice cream maker according to the manufacturer’s instructions (if the chilled mixture is too thick to pour into your machine, whisk it to thin it out).
    • Serve with a drizzle of caramel sauce, optional.

    Recipe by Brown Eyed Baker and adapted from The Perfect Scoop.

    July 02, 2011

    Fruit and Seed Tri Bars


    I just love a recipe that not only tastes great but is good for you too.  I knew as soon as I saw these bars on Roxana's blog, A little bit of Everything, I would have to make them as my Friday treat.

    These bars are so adaptable - follow the basic recipe and add whatever fruits, nuts, and seeds you prefer.   My dried fruit came from a bag of Sunsweet Antioxidant Blend - blueberries, cherries, cranberries, and plums - as well as some raisins that I added to the mix.  My other changes were to add some flax seeds and spelt flour to the mix, and I slightly increased the apple sauce to accommodate this.  I used 2 whole eggs but you can also use 4 eggs whites instead if you want to lower the cholesterol.  Other dried fruits such as apricots, apples, or dates would also make a great addition. After cooling they can be cut into bars, but I decided to cut them into triangles, mainly because I liked the shape.  I didn't think of it any further until my husband said that it made sense because they were for a tri group.  It turned out to be a great play on the shape of the bars and the sport - each side represented a leg - swim, bike, run.

    The bars were super easy to make and everyone in the training group loved them.


    Fruit and Seed Tri Bars

    Ingredients
    • 1½ cups unsweetened applesauce
    • 1¼ cup dried fruits, chopped
    • ⅓ cup sunflower seeds
    • ⅓ cup pumpkin seeds
    • 3 tablespoons flax seeds
    • 4 tablespoons chia seeds
    • 1 cup rolled oats (regular-not quick cooking) 
    • ⅔ cup unsweetened coconut 
    • ⅔ cup self-rising flour
    • ½ cup spelt flour
    • 2 eggs, lightly beaten

    Preparation
    1. Preheat oven to 400°F.
    2. Line a 11x9 inch pan with non-stick foil.
    3. In a large bowl add apple sauce and dried fruit and mix to combine.
    4. Add sunflower seeds, pumpkin seeds, flax seeds, chia seeds, rolled oats, coconut, self-rising and spelt flours, and eggs and stir until well combined.
    5. Transfer mixture to prepared pan and spread out evenly with a spatula.
    6. Bake for approximately 30 minutes until golden brown.
    7. Cool in the pan.
    8. Remove from pan onto a cutting board and slice into triangles or bars.
    9. Makes approximately 24.
    Recipe from A little bit of Everything

    June 25, 2011

    Zucchini-Carrot-Pecan Bread


    Every Friday I try to bake something for my husband to take with him the following day.  Early Saturday mornings you will find him out with his training team - a group of dedicated triathletes who find it fun to ride their bikes anywhere from 60-105 miles and then run between 5 and 9 miles (they swim on Friday mornings).  I bake because after all of this hard work they all deserve a treat.

    In an effort not to sabotage their training I have been trying to incorporate some healthy elements into my baking - use less sugar, use lot fruits and/or vegetables, cut back on oil.  It is still a work in progress because I have always used lots of butter, cream, sugar, and eggs without even a second thought. One ingredient I haven't experimented with very much is flour.  That is until I was reading Kim's blog, Liv Life, a few days ago and she featured a recipe for chocolate chip cookies (made by her daughter) using spelt flour. 

    Following Kim's lead on researching spelt flour I found that it is considered to have a somewhat nuttier and slightly sweeter flavor than whole-wheat flour.  Spelt is by nature a wholefood, and unlike wheat where much of the nutritional bran and germ are often removed during milling, the vital substances of spelt are found in the inner kernel of the grain. Spelt contains more protein, minerals, and amino acids than regular wheat and this superior nutrition makes it an ideal training and endurance food. Although spelt does contain gluten, studies have shown that it can be tolerated by many people who are normally gluten-intolerant.

    I do make a lot of quick breads because not only are they tasty but they travel well, which is always handy when it is being thrown in a pick up truck.  Well, maybe "thrown" is not the best description but lets just say that a quick bread is a lot safer than a sponge cake.   With experience I have found that cookies, quick breads, and bar cookies/slices are the way to go when the goodies have to make a trip.


    One quick bread recipe that caught my eye recently was a Zucchini-Carrot Bread that appeared on Monica's blog Lick The Bowl Good.  Actually the first thing that grabs my attention each time I visit her blog is that beautiful photo of a Meyer Lemon-Lime Bar in her banner (I can see why the post is entitled "The Best I've Ever Had").  She reached into her archives for this recipe, and it was adapted from a recipe found on Baking with Lisa, who adapted it from Sur la Table’s “Eating Local”.  I adapted it a little further by substituting some spelt flour for the all-purpose flour, adding the toasted pecans, decreasing the sugar and oil, and adding a sprinkle of raw sugar on top.  My last change was to bake one large loaf because my loaf tin is 10 inches x 5 inches.  I really wanted to use candied ginger as described in the recipe but I couldn't find it in my pantry.

    Using a single pan will result in a beautiful, high-rising loaf which is just the way I like my quick bread.  I thought the flavor was great, although I may add a little apple sauce next time to add some moisture and compensate for the oil I omitted.  The spelt flour worked out great and I may even do a 50-50 split next time with the all-purpose flour.


    Carrot-Zucchini-Pecan Bread
    (Printer Friendly Recipe)

    Ingredients
    • 2 cups all-purpose flour
    • 1 cup Spelt flour
    • 1½ teaspoons ground ginger
    • 1½ teaspoons ground cinnamon
    • 1 teaspoon baking soda
    • ¼ teaspoon baking powder
    • 1 teaspoon kosher or sea salt
    • ½ cup minced candied ginger (optional)
    • 3 large eggs
    • ¾ cup canola oil
    • ½ cup sugar
    • 2 teaspoons vanilla extract
    • 1 cup coarsely grated carrots
    • 1 cup coarsely grated zucchini
    • 1 cup pecans, toasted and coarsely chopped
    • 2 tablespoons raw sugar, optional

    Preparation
    1. Preheat the oven to 325°F. 
    2. Grease two 8.5×4.5 inch loaf pans, or line them with foil or parchment paper (I used one pan that was 10x5 inches).
    3. In a medium bowl, whisk together the flour, ginger, cinnamon, baking powder, baking soda. 
    4. Whisk in the salt and candied ginger, optional.
    5. In a large bowl, whisk the eggs until light and foamy. 
    6. Add the canola oil, sugar, and vanilla, whisking hard until well combined. 
    7. Stir in the carrots and zucchini.
    8. Add the dry ingredients to the egg mixture and stir/fold until just blended.
    9. Divide evenly between the loaf pans (or add to a single pan like I did).
    10. Sprinkle with raw sugar, if desired.
    11. Bake for about 1 hour, until the loaves are firm to the touch and a toothpick inserted in the center comes out clean (mine baked for approximately 75 minutes).
    12. Cool in the pan(s) for 10 minutes, then unmold onto a cooling rack to cool completely.

    Recipe by Lick the Bowl Good and Baking with Lisa.

    June 23, 2011

    To Try Tuesday - Fresh Blueberry Cake


    Sometimes you just need a quick and easy cake.  Sometimes that cake will involve a box mix.  Sometimes it will turn out so delicious you will vow to make it again and again.  These three sentences pretty much sum up this cake.

    I am not sure how I ended up with three Costco-size punnets of blueberries.  You could say that it was bad planning on my behalf, but I like to think of it as good planning because I decided to make a cake with the extra blueberries.  I didn't really have a recipe in mind but I knew that I had a few boxes of cake mix so I decided to look for a recipe that would "doctor" it up.  As soon as I saw this recipe for an Easy Fresh Blueberry Cake on About.com I knew that it was the one for me.


    At first the suggestion on the site of using a lemon cake mix appealed to me but I only had a box of white cake mix, and I decided that I prefer the taste of real lemons.  I love lemon and blueberry together so I did add some extra zest and juice.

    This baked up so well in a bundt pan and was delicious both warm from the oven, and after it has cooled.  I think that little mini bundts would be great too.


    This post is also linked to Torview's Purple Food Series Palette. 


    Fresh Blueberry Cake
    Ingredients
    • 3 large eggs
    • ¼ cup granulated sugar
    • ⅓ cup vegetable oil
    • 1 cup sour cream
    • Juice and finely grated zest of 2 lemons (about 1/4 cup juice)
    • 1 box (18.25 ounces) yellow cake mix with pudding in the mix (I used white)
    • 2 cups fresh cleaned blueberries

    Preparation
    1. Grease and flour a 10 to 12-cup Bundt cake pan or 10-inch tube pan. 
    2. Heat oven to 325°F for a dark pan or 350F° for a light-colored pan.
    3. Beat eggs with sugar until light. 
    4. Beat in the oil, sour cream, lemon juice, and lemon zest. Continue beating until smooth. 
    5. Slowly blend in the cake mix then beat until well blended. 
    6. Fold in the blueberries. 
    7. Spoon into the prepared baking pan; smooth the top. 
    8. Bake for 50 to 60 minutes, or until a toothpick comes out clean when inserted into the cake.
    9. Dust with powdered sugar or serve with a vanilla glaze or lemon sauce, if desired.
    Recipe by Diana Rattray, About.com Guide

    June 21, 2011

    The Cake Slice June 2011 (Part 2) - Lime Chiffon Cake


    Today's post is Part 2 of the Cake Slice Bakers monthly roundup.  We were lucky enough to have a tie in the voting this month, giving us a choice of baking either of the winning cakes or both.  I decided to do both.  Our group is baking from a wonderful cookbook, Cake Keeper Cakes by Lauren Chattman.  

    The first cake I made was a Fresh Strawberry Cake with White Chocolate Chips.   The second cake chosen was a Lime Chiffon Cake.  I must admit that I was immediately drawn to the sound of this cake.  I haven't ever made a chiffon or Angel food cake, so I was really looking forward to trying this recipe.

    Of course when I went to make it I discovered that I am the proud owner of many different bundt pans, but not a tube pan - maybe that is why I have never made this type of cake before.  A quick trip to Ross remedied this situation, and I was back on track again or so I thought.  I then realized that I did not have any cream of tartar, but I wasn't about to go out again and the the cake worked out fine without this ingredient.


    The scary part for me came to when the instructions told me to invert the pan so that the cake could cool and would not deflate.  I thought that the cake was going to slide right out of the pan and I wondered how I would explain a bottle of wine in the middle of my cake?  Really, I should have had more faith because it worked out just as the instructions said that it would.


    This is my cake cooling upside down over a wine bottle.

    I really did enjoy this cake.  I loved the hint of lime, and maybe I will even increase it a bit more next time, or add a glaze.  It has definitely made me a fan of the chiffon cake.

    Click here to check out all the other Cake Slice Bakers' cakes.


    Lime Chiffon Cake
    (Printer Friendly Recipe)

    Ingredients
    • 1⅓ cups cake flour
    • ½ teaspoon baking soda
    • ½ teaspoon salt
    • 7 large eggs – 5 separated and 2 left whole
    • 1½ cups sugar
    • ½ cup vegetable oil
    • ⅓ cup fresh lime juice
    • ⅓ cup water
    • 2 teaspoons grated lime zest
    • 1 teaspoon vanilla extract
    • ⅓ teaspoon cream of tartar

    Preparation
    1. Preheat the oven to 325°F. 
    2. Have ready a 9 inch ungreased angel food tube pan with a removable bottom.
    3. Combine the flour, baking soda and salt in a medium bowl and whisk thoroughly to break up any lumps. Set aside.
    4. Place the egg yolks and 2 whole eggs in a large mixing bowl and beat on medium high speed until lightened in color, about 3 minutes. 
    5. With the mixer running, add 1 cup sugar in a slow steady stream and continue to beat until the mixture is light and increased in volume, about 5 minutes. 
    6. With the mixer still running, slowly pour in the oil and continue to beat for 1 minute longer.
    7. Combine the lime juice and water in a measuring cup. 
    8. With the mixer on low speed add ⅓ of the flour, then ½ the lime mixture, another ⅓ flour, the rest of the lime and then the remaining flour, scraping down the bowl when necessary. 
    9. Stir in the lime zest and vanilla.
    10. With clean beaters, whip the egg whites on medium speed until frothy. 
    11. Add the cream of tartar and continue to beat on medium speed until the egg whites begin to turn white. 
    12. With the mixer still on medium speed, pour in the remaining ½ cup sugar in a slow stream, and whip until the whites hold stiff peaks.
    13. Fold ¼ of the yolk mixture into the whites to lighten. 
    14. Then fold the remaining whites into the yolk mixture, gently but thoroughly. 
    15. Pour the batter into the tube pan and smooth the top. 
    16. Bake the cake until golden brown and the top springs back when touched, about 55minutes to 1hour.
    17. If your pan has feet, invert the pan onto a heatproof surface and allow to cool. 
    18. If your pan doesn’t have feet, invert 4 heatproof drinking glasses on the counter and rest the inverted pan on top of the glasses to allow air to circulate around the cake while it cools. 
    19. Let the cake cool completely in the pan, about 2 hours.
    20. To remove the cake from the pan, run a sharp knife around the edge, being careful to leave the golden crust intact. 
    21. Remove the sides of the pan and invert the cake onto a serving platter. 
    22. Run the knife under the removable bottom and lift it off the cake. 
    23. Slice and serve.
    24. Store uneaten cake wrapped in plastic and kept at room temperature for up to 3 days.

    Makes one 9 inch angle food pan cake.

    Recipe from Cake Keeper Cakes by Lauren Chattman.

    June 20, 2011

    The Cake Slice June 2011 (Part 1) - Fresh Strawberry Cake with White Chocolate Chips


    The 20th of the month has arrived and that means that it is Cake Slice Bakers time again.  For the first time ever there was a tie in the voting.  Everyone in the group was given the choice to bake either of the cakes, or both.  Naturally I choose to make both cakes, because the more the merrier!  They are both very different cakes so I thought it would be fun to be able to do some comparisons between them.  Before starting I immediately had in mind the one that I would prefer but only time would tell if I was right.

    We are continuing to bake from Cake Keeper Cakes by Lauren Chattman.  The first cake is a Fresh Strawberry Cake with White Chocolate Chips.  I admit that I may not have made this cake had it not been one of our choices.  It just seemed so sweet with the strawberries and the white chocolate chips.  However, that is what I love about being part of this group, it makes you try things that you may have otherwise overlooked.


    This is another snacking cake and it is very easy to put together.  My daughter had some friends sleep over so they were quite anxious for it to come out of the oven.  I managed to let it cool for the required five minutes and then I got it straight onto the cake plate for some photos.  It probably was not the best idea to photograph a hot cake, especially when I tried to slice it, but the girls were hovering and looking at me with pleading eyes.  I sliced the end off and cut it into pieces for them which bought me a little more photo time, but not long.  Within 15 minutes half of the cake was already gone so they certainly enjoyed it.  Mr. ATLATC headed out to a bike path clean up and took the remaining cake with him to be enjoyed after their hard work.  He said that it didn't last long at all.


    I felt a little different about it.  I'm not saying that I didn't like it but I would certainly make a few changes before making it again.  It was extremely sweet so I would cut down the amount of sugar and white chocolate chips.  Part of the cake may look a little undercooked in the photos but this is just the warm melted chocolate chips.  Also, my strawberries were quite large so I sliced them and then cut them in half.  In future I think I would chop them a little bit smaller because I thought the pieces were still a little bit too big. 


    I am looking forward to seeing everyone's reaction to both of these cakes.  Click here to see a list of all of the members blogs.

    Please check back tomorrow for Part 2 of The Cake Slice and to see which cake was also chosen for this months' baking adventure.


    Fresh Strawberry Cake with White Chocolate Chips
    (Printer Friendly Recipe)

    Ingredients
    • 1 egg
    • 1 egg yolk
    • ½ cup sour cream
    • ½ teaspoon grated lemon zest
    • 2 teaspoons vanilla extract
    • 1½ cups all purpose flour
    • 1½ teaspoons baking powder
    • ¾ teaspoon baking soda
    • ¼ teaspoon salt
    • 6 tablespoons (¼ stick) unsalted butter, softened
    • 1 cup sugar
    • 8 ounces strawberries, stemmed and sliced
    • 1 cup white chocolate chips or chunks
     

    Preparation
    1. Heat the oven to 350°F. 
    2. Grease an 8 inch square baking pan and dust it with flour, knocking out the excess.
    3. Combine the egg, egg yolk, sour cream, lemon zest and vanilla in a large measuring jug and beat lightly.
    4. Combined 1¼ cups of flour, baking powder, baking soda and salt in a medium bowl.
    5. Combine the butter and sugar in a large mixing bowl and cream with an electric whisk on medium high speed until fluffy, about 3 minutes. Scrape down the sides when necessary.
    6. With the mixer on medium low speed, pour the egg mixture into the bowl in a slow stream, stopping the mixer once or twice to scrape down the bowl.
    7. Turn the mixer to low speed and add the flour mixture, ½ cup at a time. After the last addition mix for 30 seconds on medium speed.
    8. Combine the strawberries and remaining ¼ cup flour in a medium bowl and toss to coat. 
    9. Fold the flour covered berries along with the chocolate chips into the batter using a spatula.
    10. Scrape the batter into the prepared pan and smooth the top with a spatula. 
    11. Bake the cake until golden and a toothpick inserted in the center comes out clean, 45-50 minutes. 
    12. Let the cake cool ion the pan for about 5 minutes, invert it onto a wire rack and then turn it right side up to cool completely.
    13. Cut into squares and serve.

    Makes one 8 inch square cake.

    Recipe from Cake Keeper Cakes by Lauren Chattman