May 25, 2013

Piña Colada Blondies with Toasted Coconut Glaze


A beautiful sunset, toes in the sand and a Piña Colada in your hand. Sounds like paradise doesn't it? Unfortunately it doesn't happen all that often, even though I live in Hawaii.  So I came up with the next best thing - Piña Colada Blondies with Toasted Coconut Glaze.

What is a blondie you may ask?  Well, I used to think that they were supposed to be like brownies without the chocolate, but they really are more cake-like and not dense at all.  There are many recipes for blondies but I loosely based mine on a recipe by Martha Stewart, and then gave it a pineapple and coconut twist.

As the song says, "If you like piña colada's", then you will love these blondies. Well, that is not quite the lyrics but after one bite you will want to change them just like I did. I loved the crushed pineapple in them because it kind of melted into the cake, and the glaze on top is pure coconut goodness. This recipe will make 9 large blondies, and can be stored in an airtight container at room temperature up to 3 days.


Piña Colada Blondies with Toasted Coconut Glaze
(Printer Friendly Recipe)

Ingredients
Blondies ~
  • 2 cups all-purpose flour
  • 1½ teaspoons baking powder
  • 3/4 teaspoon coarse salt
  • 10 tablespoons unsalted butter, softened
  • 1 cup packed light-brown sugar
  • 2 large eggs
  • 1½ cups crushed pineapple, well drained (reserve the liquid)
  • 1 cup sweetened flaked coconut
  • 2 tablespoons Malibu® coconut rum or coconut essence 
  • ¼ cup pineapple juice (from reserved liquid)
Glaze ~
  • 1 cup powdered sugar, sifted
  • 3 tablespoons cream of coconut (I used Coco Lopez)
  • 2 tablespoons Malibu® coconut rum or coconut essence
  • 1 teaspoon hot water
  • ½ cup sweetened flaked coconut, toasted

Preparation
Blondies ~
  1. Preheat oven to 350℉.
  2. Line a buttered 8-inch square baking pan with foil or parchment paper, allowing a 2-inch overhang, and butter lining (excluding overhang).
  3. Whisk together flour, baking powder, and salt in a medium bowl.
  4. Put butter and sugar in the bowl of an electric mixer fitted with the paddle attachment, and mix on medium speed until pale and fluffy, about 3 minutes.
  5. Add eggs, Malibu, coconut, and pineapple juice, and mix until combined.
  6. Reduce speed to low and add flour mixture, mix for 1 minute then stop the mixer and scrape the paddle and sides of the bowl with a spatula.  Continue to mix for another minute, or until well combined.
  7. Pour batter into prepared pan spreading evenly with a spatula.
  8. Bake until golden brown and a cake tester inserted into blondies comes out with a few crumbs but is not wet, about 40 to 45 minutes.
  9. Cool slightly in pan for about 15 minutes, and then lift out onto a wire rack and let cool completely.
  10. Whilst blondies are cooling toast coconut  - preheat oven to 350℉, place coconut on a tray lined with parchment and put in the oven, stirring every 5 minutes until golden brown - keep an eye on it as it can burn quickly.
Glaze ~
  1. Place sifted powdered sugar in a bowl, add cream of coconut, Malibu, and water and stir until smooth.
  2. Once blondies are cool, gently spoon glaze over the top allowing it to run over the sides.
  3. Sprinkle blondies with toasted coconut and cut into bars.

Recipe by All That's Left Are The Crumbs©

May 22, 2013

Snickers and Milk Chocolate Chip Cookies


One of the pitfalls of living in a warm climate year-round is when you leave your butter out to soften to room temperature, you can sometimes come back to a puddle of oil.  Such is life and you just throw it in the mixer and keep your fingers crossed.  Cookies don't last long in my household anyway, so a little melted butter is not going to affect that in any way.

I first saw these cookies last week on The Spiced Life and I knew as soon as I saw the title that I would have to bake them since Snickers is one of my favorite candies.  Unfortunately, I was not able to find Snickers Bites, so I had to compromise with Snickers bars that I put in the refrigerator and then cut into small pieces.  The bars worked out well but I will still try and find the bites because they seem like something that would be fun to bake with. Sweet and salty is one of my favorite combinations and I really liked the sprinkle of sea salt on top of the cookies.  They reminded me a little of shortbread.

Other than the Snickers bars the only other change I made was to use only all-purpose flour for the cookies.  This happened to be the flour that I hand on hand, and it worked out fine.  If you are planning on making them I'll give you a heads up that the dough needs to be refrigerated before baking, preferably overnight.


A little love heart of caramel on one of the cookies


Snickers and Milk Chocolate Chip Cookies
(Printer Friendly Recipe)

Ingredients
  • 4 cups all-purpose flour 
  • 1¼ teaspoon baking soda 
  • 1½ teaspoon baking powder 
  • 1½ teaspoon coarse salt 
  • 2½ sticks unsalted butter 
  • 1¼ cups light brown sugar 
  • 1 cup granulated sugar 
  • 2 large eggs 
  • 1 tablespoon natural vanilla extract 
  • 1 cup milk chocolate chips 
  • 2 King Size (3.56oz) Snickers Peanut Butter Squared cut into small pieces
  • Coarse sea salt for sprinkling 

Preparation
  1. Whisk together flours, baking soda, baking powder and salt in a bowl, and set aside. 
  2. Using a mixer fitted with paddle attachment, cream butter and sugars together until very light, about 5 minutes. 
  3. Add eggs, one at a time, mixing well after each addition. 
  4. Stir in the vanilla. 
  5. With speed on low, add the dry ingredients and mix until just combined, 5 to 10 seconds. 
  6. Mix in the chocolate chips and Snickers pieces. Cover the dough with something airtight and refrigerate at least overnight.
  7. When ready to bake, preheat the oven to 350 F, and line a baking sheet with parchment paper or a silicone mat. 
  8. Using a cookie dough scoop or an ice cream scoop of medium size, scoop the cookies onto the prepared tray, 6 per sheet. 
  9. Sprinkle the cookies with sea salt and bake until golden brown but still a little soft, about 11-13 minutes. 
  10. Transfer the baking sheet to a wire rack for 10 minutes, then remove the cookies individually to a cooling rack.

Recipe by Laura from The Spiced Life


May 20, 2013

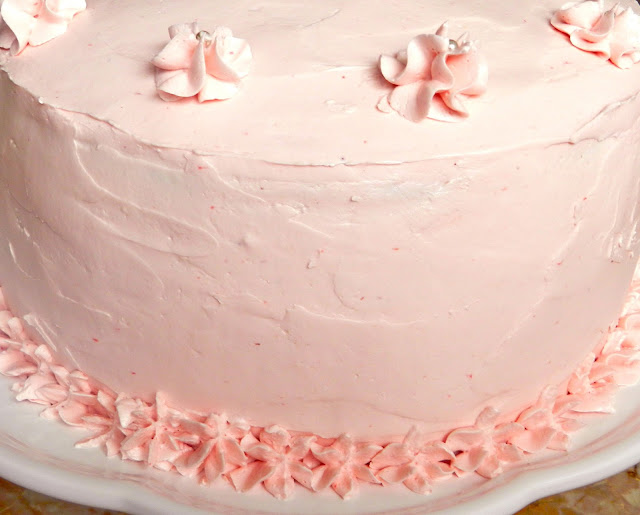
The Cake Slice Bakers May 2013 - The Pink Cake


This year is certainly zipping along, and it is already time once again for the Cake Slice Baker's latest cake. It is hard to believe that this will be the seventh cake we have baked from Vintage Cakes by Julie Richardson.  The votes were tallied and the cake with the most votes this month was The Pink Cake, which according to the author, is the most popular cake at her bakery, Baker & Spice.

Each and every cake we have baked has been a lot of fun, and this one was no exception. However, have you ever felt jinxed when baking a cake?  This cake definitely had me feeling like there was some sort of curse on it.  Before even getting the cakes in the oven I had taken the skin off the top of my hand getting ingredients out of the cupboard, managed to spill flour all over the floor, and whilst separating the eggs I got some of the yolk in the whites, meaning that they could no longer be used for the buttercream. The bad luck continued when I discovered that my cake tins were actually 9-inch, rather than the 8-inch listed in the recipe, so the layers were too thin and I had to make another batch of cakes.  The final straw was when I was taking photos of the cake and my background fell on the cake destroying the top of it.


But baker's are a hardy bunch and they certainly do not give up.  So, despite all of the bad luck with the cake, it actually came out tasting pretty good, and it looked fine once I had repaired my evil backboards damage.  As I mentioned above I ended up with 6 layers because I baked two batches of 9-inch cakes, and it would have been fun to use them all and make a really tall cake, but I was worried that I would not have enough frosting, so I decided to go with four layers. The author mentions in the book that at her bakery they use a sugar syrup to coat the layers.  I decided that since the raspberries were quite expensive I would try and make use of the seeds.  Following the authors suggestion I made a simple syrup, but then went out on my own and added some creme de cacao and the raspberry seeds, and left it overnight to steep.  The next day I simply strained out the seeds leaving a delicious chocolate-raspberry syrup to brush over each of my layers.

This cake has a rich chocolate flavor that I really like and a subtle raspberry taste in the frosting. I loved the chocolate-raspberry taste, and the little bit of moistness that the syrup added to the cake. You can see from my pictures that I did not place too much frosting in-between the layers as I find that the sweetness of the buttercream can overwhelm the cake.  I realize that looking at the preparation list may seem a little intimidating, but this cake is not hard to make.  Sure, there are a few steps, but if you divide them up over a couple of days it will seems like a breeze, and just think how super impressed everyone will be with this cake when you say "I made it myself".

I am including a link here to the blogs of my fellow Cake Slice Baker's so that you can check out all of their beautiful creations.  I am betting that their luck may have been a little better than mine whilst baking this particular cake.  Also, we have launched a Facebook page that features not only our cake's each month, but all sorts of other goodies made by the group.


The Pink Cake

Ingredients
Cake ~
  • 4 ounces unsweetened chocolate, chopped
  • ¼ cup lightly packed premium unsweetened Dutch-processed cocoa
  • ¾ cup boiling water
  • ¾ cup full-fat sour cream
  • 1 tablespoon pure vanilla extract
  • 2 cups all-purpose flour
  • ¾ teaspoon baking soda
  • 1 teaspoon fine sea salt
  • ½ cup unsalted butter, at room temperature
  • 1 cup firmly packed light brown sugar
  • ¾ cup granulated sugar
  • ½ cup canola oil
  • 3 egg yolks, at room temperature
  • 3 eggs, at room temperature
Raspberry Buttercream ~
  • 6 egg whites
  • 1¼ cups sugar
  • ¼ teaspoon cream of tartar
  • 2 cups unsalted butter, at room temperature, cut into small cubes
  • 2 teaspoons pure vanilla extract
  • ⅛ teaspoon fine sea salt
  • 4 cups raspberries, fresh or frozen (if using frozen berries, measure them before thawing) 
Creme de Cacao-Raspberry Simple Syrup ~
  • ½ cup boiling water
  • ½ sugar
  • 1 tablespoon creme de cacao
  • raspberry seeds leftover from the buttercream

Preparation
Cake ~
  1. Center an oven rack and preheat the oven to 350℉.
  2. Put the unsweetened chocolate and the cocoa into a small bowl. 
  3. Pour the boiling water over the chocolate and allow it to steep for 1 minute, then whisk the mixture together. 
  4. Whisk in the sour cream and vanilla and set aside.
  5. Sift together the flour, baking soda, and salt in a bowl, then whisk the mixture by hand to ensure that the ingredients are well mixed.
  6. In the bowl of a stand mixer fitted with the paddle attachment, cream the butter and both sugars together on medium-high speed until light, about 3 minutes, stopping the mixer frequently to scrape the paddle and the sides of the bowl with a rubber spatula. 
  7. On low speed, drizzle the oil into the mixture until blended, then turn the mixer up to medium-high speed and beat until the batter is fluffy, about 3 more minutes. 
  8. Blend in the eggs and egg yolks one at a time, adding the next one as soon as the previous one has disappeared into the batter. 
  9. With the mixer on low speed, add the flour mixture in three parts, alternating with the chocolate mixture in two parts, beginning and ending with the flour. After each addition, mix until just barely blended and stop and scrape the bowl. Stop the mixer before the last of the flour has been incorporated and complete the blending by hand with a rubber spatula to ensure you do not overbeat the batter.
  10. Divide the thick batter equally among the prepared pans (there will be approximately 1 pound 2 ounces per pan). 
  11. Smooth the tops and tap the pans on the counter to settle the batter and eliminate any large air bubbles. Bake in the middle of the oven until the centers spring back when lightly touched, 22 to 25 minutes. Cool the cakes in their pans on a wire rack for 30 minutes. Flip the cakes out of the pans, leaving on the parchment paper until you assemble the cake. Let them continue to cool on the rack, top sides up, until they reach room temperature.
Buttercream ~
  1. Mash and strain 4 cups of raspberries through a fine mesh sieve to catch the seeds.
  2. Discard the seeds and set aside.             
  3. Using a hand whisk, whisk together the egg whites, sugar, and cream of tartar in the clean bowl of a stand mixer. 
  4. Place the bowl over (not in) a saucepan of simmering water. The egg white mixture will be gloppy and thick, but as the mixture begins to warm up, it will become more fluid. Continue to gently whisk the mixture until it is very hot to the touch (130°F on a candy thermometer).
  5. Move the bowl to the stand mixer and, using the whisk attachment, whip the whites on medium-high speed until they have tripled in volume and are thick and glossy and hold stiff peaks (like meringue), 3 to 4 minutes. 
  6. Turn the mixer down to medium-low speed until the mixing bowl is just cool to the touch, 1 to 2 minutes. 
  7. Turn the mixer back up to medium-high speed and add the butter one piece at a time, adding the next piece just as the previous one has been incorporated, stopping the mixer every so often to scrape down the escaping buttercream from the sides of the bowl. At some point, the buttercream will take on a curdled appearance; don't worry, this is normal. Just keep on mixing until it comes together. Once all the butter is incorporated and the frosting is fluffy and creamy, blend in the raspberry puree, vanilla and salt until fully combined.
  8. Covered with plastic wrap, buttercream will last 2 days at room temperature or 7 days in the refrigerator. If refrigerated, the buttercream must be brought to room temperature before you use it. Either way, the buttercream must be rewhipped—either by hand if kept at room temperature or with a mixer if refrigerated—before you frost a cake with it.

Creme de Cacao-Raspberry Simple Syrup ~
  1. Mix all ingredients in a container, cool, and leave in refrigerator overnight.
  2. Strain seeds from mix, and discard.

Assemble the cake ~
  1. Lay one of the cakes top side up on a cake plate. 
  2. Brush with creme de cacao-raspberry simple syrup.
  3. Using a metal spatula, frost the top with 3/4 cup of buttercream, spreading it out to the edge of the cake (the filling will be about 1/4 inch thick). 
  4. Stack the second cake top side up on top of the frosted cake, brush with syrup, and spread another 3/4 cup of buttercream on top of it. 
  5. Stack the last layer of cake top side up on top and brush with the simple syrup. Look for any frosting that may have oozed out beween the layers and spread it along the sides of the cake. Apply a thin layer of frosting all over the cake to create a "crumb coat." 
  6. Place the cake in the refrigerator until the frosting is firm, about 10 minutes. 
  7. Take it out and frost the cake with the remaining buttercream, using your spatula to make decorative swirls.
  8. Store the cake in an airtight container at room temperature for up to 
3 days.             

Recipe by Julie Richardson - Vintage Cakes


May 16, 2013

Milo Cupcakes with Condensed Milk Buttercream Frosting


My mum gives me Milo to go, and go, and go - I remember my daughters returning from a trip to Australia and singing this slogan for a popular Milo commercial upon their return.  I grew up in Australia drinking Milo, so I thought it was kind of cute that my American-raised daughters would be singing along to such and iconic Australian product - Aussie accents and all.

Milo is a chocolate and malt powder that can be mixed into milk or water (either hot or cold) to make a delicious drink, although my favorite use for it as a kid was to sprinkle it over vanilla ice cream. It is quite granular and does not completely dissolve if mixed with a cold liquid, which gives you these little crunchy bits in your drink.  It was developed in Australia in the 1930's to help combat childhood dietary deficiencies during the depression, and remains popular today.


My favorite Milo - with extra malt.

I don't know about your pantry, but mine always seems to be overflowing with items that I purchased for a recipe and either forgot about, or didn't use completely.  Hoarding also became something of a habit whilst living in Guam because I never knew when the next shipment of an item would arrive, so I tended to purchase multiples of everything.  Anyway, I noticed the tin of Milo in the back of a cupboard and thought that it would be great in a cupcake.  Well, actually I made myself a glass of milk and Milo first, and then thought about the cupcakes. A search for a recipe led me to Raspberri Cupcakes, and the idea grew from there. I had a favorite chocolate cake already, but I loved the idea of condensed milk buttercream frosting.

These really are delicious cupcakes and I loved them even without the frosting.  The Milo adds a really nice chocolate-malt flavor to the cupcakes, and I loved the crunch on the top of the frosting.  I realize that Milo is not readily available in the US, although you can buy it on Amazon, so I would suggest Ovaltine as a substitute.


Milo Cupcakes with Condensed Milk Frosting 


Milo Cupcakes with Condensed Milk Buttercream Frosting
(Printer Friendly Recipe)

Ingredients
Cupcakes ~
  • ¾ cup unsweetened Dutch-process cocoa powder
  • ¾ cup hot water
  • 1 teaspoon espresso powder
  • 3 cups all-purpose flour
  • 1 teaspoon baking soda
  • 1 teaspoon baking powder
  • 1¼ teaspoons coarse salt
  • ⅓ cup Milo
  • 1½ cups (3 sticks) unsalted butter
  • 2 cups sugar
  • 4 large eggs, room temperature
  • 1 tablespoon vanilla extract
  • 1 cup sour cream, room temperature
  • ½ cup milo, additional
Frosting ~
  • 1 cup unsalted butter, softened 
  • 4 cups powdered sugar, sifted
  • 5 tablespoon condensed milk
  • ¼ cup Milo

Preparation
Cake ~
  1. Preheat oven to 350℉.
  2. Line standard muffin tins with paper liners. 
  3. Whisk together cocoa, espresso powder, and hot water until smooth. 
  4. In another bowl, whisk together flour, baking soda, baking powder, salt, and ⅓ cup Milo.
  5. Melt butter with sugar in a saucepan over medium-low heat, stirring to combine.
  6. Remove from heat, and pour into a mixing bowl.
  7. With an electric mixer on medium-low speed, beat until mixture is cooled, 4 to 5 minutes.
  8. Add eggs, one at a time, beating until each is incorporated, scraping down sides of bowl as needed. Add vanilla, then cocoa mixture, and beat until combined. 
  9. Reduce speed to low and add flour mixture in two batches, alternating with the sour cream, and beating until just combined after each.
  10. Divide batter evenly among lined cups, filling each three-quarters full. 
  11. Sprinkle the additional ½ cup Milo evenly over the cupcakes.
  12. Bake, rotating tins halfway through, until a cake tester inserted in centers comes out clean, about 20 minutes.
  13. Transfer tins to wire racks to cool 15 minutes; turn out cupcakes onto racks and let cool completely before frosting them. 
Frosting ~
  1. Beat butter for a few minutes with a mixer with the paddle attachment on medium speed.
  2. Add condensed milk and mix to combine.
  3. Reduce speed to low and add powdered sugar one cup at a time, stopping mixer after each addition to scrape down the side of the bowl. Refrigerate for 15 minutes.
  4. After cupcakes are fully cool, frost and sprinkle with Milo.
Recipe adapted from Raspberri Cupcakes.


All That's Left Are The Crumbs


May 14, 2013

Vanilla Twinkie Bundt Cake with Raspberries - #BundtaMonth


Who doesn't love a good bundt?  There are so many different flavors and absolutely beautiful bundt pans to choose from, that it is always exciting to make one.  It would be very easy for me to start a bundt pan collection if only I had the room to store them all.  They can be classic or extremely intricate, but all produce beautiful cakes.

Over the past few months I noticed that Laura from The Spiced Life participates in a blogging event called #Bundt-a-Month, which is the of creation of Baker Street and Cake Duchess. Each month a theme or a particular ingredient(s) is chosen for the month, and then everyone gets to create a beautiful bundt.  I went to check out some of these cakes and I realized two things - I have been seriously missing out by not participating, and gosh some of these bloggers make beautiful cakes.

The theme for the month of May is berries which was perfect.  I have been on a real raspberry kick at the moment, having recently made some Razzleberry Crumbs Bars, and I still had some in the fridge ready for my next baking adventure.  Making a bundt seemed meant-to-be since I had recently borrowed Pure Vanilla from our local library and bookmarked the Vanilla Twinkie Bundt Cake as something I really wanted to try.  Pairing raspberries with it seemed the natural thing to do for this month's Bundt-a-Month theme.


A tunnel of marshmallow cream runs through the middle of the bundt - #BundtaMonth


Whilst I loved the tartness of the raspberries against the sweetness of the cake, I did have a few problems with this cake.  I thought that 2 cups of sugar was quite a lot considering the cake has a marshmallow filling, so I cut it back to 1½, but I honestly think that you could easily remove another ½ cup and it would still be sweet enough. Also, after I added the oil I had a lot of trouble getting the mixture to get to the stage of "light and fluffy".  I finally settled for incorporated and creamy, but this did not seem to have an adverse effect on the cake.  Finally I had problems with filling the cake, part of which was my fault for not waiting for it to fully cool.  I used a cupcake corer to make the holes, but maybe I should have used an apple corer to make smaller holes because there was no way that I had enough filling for the cake.  I quickly made up a second batch of marshmallow filling and this seemed to be perfect - note that I have doubled the quantity in the recipe below. The only other change I made was to use vanilla bean paste, rather than extract, because I really love vanilla and I like the little flecks it gives to baked goods. The first time I ever tried a Twinkie was when they were supposedly disappearing forever, and I thought it was now or never.  If you are a Twinkie fan then this is the bundt for you, as it perfectly mimics the flavor profile - well maybe it did a little better before I added the raspberries - but I really did like the addition of them in the cake.


The best part is that you could be part of the Bundt-a-Month fun too!  Please take a moment to visit The Spiced Life to check out Laura's amazing Lemon Mint Rhubarb Bundt and there you will find more details on how to become part of the group.  There is also a Facebook page that features all of these beautiful cakes, and as if that isn't enough there is also a Pinterest board to further inspire you - I had a quick peek and my first thought was I'll have a slice from of each one.


Vanilla Twinkie Bundt Cake with Raspberries - it is hot here so the filling started to puddle


Vanilla Twinkie Bundt Cake with Raspberries
(Printer Friendly Recipe)

Ingredients 
Cake ~
  • 3 cups cake flour
  • 1 tablespoon baking powder
  • ¾ teaspoon salt
  • 6 tablespoons unsalted butter, at room temperature
  • 1 tablespoon vanilla bean paste
  • 1½ cups granulated sugar
  • ½ cup vegetable oil
  • 3 large eggs plus 4 large egg yolks, at room temperature
  • 1 cup buttermilk, at room temperature
  • 2 cups fresh or frozen raspberries
Filling ~
  • 2 (7.5 ounce) jars marshmallow creme
  • 1 cup (2 sticks) unsalted butter, at room temperature
  • 2 teaspoons pure vanilla bean oaste
  • Confectioners' sugar, for dusting (optional)

Preparation
Cake ~
  1. Position rack in the lower third of the oven and preheat oven to 325°F. 
  2. Coat a 12-cup Bundt pan with nonstick cooking spray and dust it lightly with flour.
  3. Sift together the flour, baking powder, and salt into a large bowl.
  4. In the bowl of a stand mixer fitted with the paddle attachment, beat butter and vanilla extract on medium speed until smooth and creamy. 
  5. Add sugar and beat until evenly mixed, about 1 minute. 
  6. Slowly pour in oil. Beat until light and fluffy, about 2 minutes. 
  7. Add eggs and egg yolks, 1 at a time, beating thoroughly after each addition.
  8. Reduce mixer speed to low and add flour mixture and buttermilk in three alternating additions, ending with the buttermilk, and continue to mix on low speed until the batter is smooth and no lumps remain. 
  9. Turn off mixer and fold batter several times by hand to ensure everything is well incorporated.
  10. Add raspberries and gently fold until incorporated, and then add to prepared pan.
  11. Bake for 60 to 70 minutes, until the cake is golden, the top springs back when lightly pressed, and a cake tester inserted into the center comes out clean. 
  12. Place pan on a wire rack and let cool completely, about 2 hours.

Filling ~
  1. In the bowl of a stand mixer, beat together marshmallow creme, vanilla, and butter until smooth. Transfer to a pastry bag fitted with a large round tip.
  2. With the cake still in the pan, use a paring knife or apple corer to cut 6 or 7 deep holes into the bottom of the cake, each about 3/4 inch in diameter; be careful not to cut through top of cake. Discard (i.e., nibble) cake scraps. With your fingers, gently burrow a horizontal tunnel around the center of the cake, connecting the vertical holes.
  3. Insert the tip of the pastry bag into each hold and squeeze in filling, tilting pastry bag back and forth as you work to encourage filling into the horizontal tunnel through the cake. When cake is filled, use a spatula to scrape away excess filling from the bottom of the cake. Quickly and carefully invert cake onto serving platter. Dust with confectioners' sugar, if desired, and serve.

Recipe adapted from Pure Vanilla by Shauna Sever.


May 13, 2013

Razzleberry Crumb Bars


How fun is the name razzleberry?  Recently, I saw a jar of razzleberry jam sitting on the shelf at my local grocery store.  Having never heard of it before I couldn't resist purchasing it just so I could taste it.  A single berry known as a razzleberry doesn't actually exist, it is just a name that was given to the combination of raspberries and blackberries used in a pie - or in my case, Razzleberry Crumbs Bars.  It was funny that when I was searching online I did find that there are two berries that are an actual cross between a red raspberry and a blackberry- the Tay berry and the loganberry, but they were not given the cool name of razzleberry.

After searching for a good crumb bar recipe, I decided that I would use my newly purchased jam, and a mix of fresh raspberries and blackberries.  I used a blueberry crumb bar recipe that I found on My Baking Addiction (love this blog!) as a basis for my bars, and then made the necessary changes so that I could incorporate the two berries.  I decided to add some almond meal to my base, but I did not want it in the crumb topping too.  To divide the base and the topping I mixed the flour, sugars, salt and baking powder and added the butter to make a crumb mixture and then took out half of the crumbs mixture, reserving it so I could sprinkle it over the berries. Almond meal was then added to the remaining mix in the food processor, along with the other half-cup of flour.  This did make my base a lot wetter than the original recipe, but it wasn't a problem.


Raspberries and blackberries really are a match made in heaven, and these bars were a huge hit with my family.  The crispy shortbread-like base, sweet and sticky jam, tart-sweet berries, and a crumbly topping all combined to make an incredible bite.  These are fantastic on their own but could easily go over the top with a little vanilla ice cream, or some whipped cream to accompany them.  I tried very hard not to nibble on the edges because it was nearly dinner time, but it was hard to stop myself. After dinner all bets are off.


Razzleberry Crumb Bars
(Printer Friendly Recipe)

Ingredients
  • ½ cup white granulated sugar
  • ½ brown sugar
  • 1 teaspoon baking powder
  • 3 cups all-purpose flour, divided
  • ¾ cups almond meal
  • 1 cup cold butter, cut into small cubes
  • 1 egg
  • 1 teaspoon pure vanilla extract
  • ½ teaspoon salt
  • ½ cup razzleberry jam (use raspberry if unable to find razzleberry)
  • 2 cups fresh or frozen raspberries
  • 2 cups fresh or frozen blackberries
  • 1/2 cup white sugar
  • 3 teaspoons cornstarch
  • powdered sugar for sprinkling

Preparation
  1. Preheat the oven to 375℉. 
  2. Line a 9×13 inch pan with parchment paper and spray with nonstick cooking spray. 
  3. In a small bowl, whisk the egg and vanilla together until combined. 
  4. In the bowl of a food processor add ½ cup white sugar, ½ cup brown sugar, 2½ cups flour, salt, and baking powder; pulse to blend. 
  5. Add cold butter; pulse until small crumbs appear. 
  6. Remove half of the crumbs and set aside. 
  7. Add almond meal, remaining ½ cup of flour, and egg/vanilla mixture to the food processor; pulse until mix comes together. 
  8. Press the almond meal-flour mixture evenly into the bottom of prepared pan. 
  9. Using an off-set spatula spread the jam over the base. 
  10. In another bowl, stir together the ½ cup of sugar and cornstarch and gently mix in the berries. 
  11. Spoon the berry mixture evenly over the crust. 
  12. Sprinkle the remaining crumbs over the berry layer. 
  13. Bake in preheated oven for 45 minutes, or until top is slightly brown. 
  14. Cool completely, sprinkle with powdered sugar, and cut into squares.


Recipe by All That's Left Are The Crumbs©


May 09, 2013

Mexican Chocolate Crunch Brownies


I have been a member of the Cooking Light Community for more years than I'd like to remember.  It is sometimes strange to think of a group of strangers as friends, but that is what we are - the same as my blogging friends.  We have shared successes and sorrows, received suggestions and support, and we have laughed until we cried.  I still remember the excitement when we found out that one of the long-time posters was a finalist in the Pillsbury Bake-off.  We could hardly wait to see her recipe and try it out.  The brownies were a huge success and I have been making them ever since, although I call them Val's Brownies.

With Cinco de Mayo fast approaching I pulled out my recipe for these brownies, but somehow did not get around to making them.  I think I was more disappointed than anyone else, so I knew I would have to remedy that this week.  Although, they are made with a box brownie mix, you could use your own recipe to top the crunchy base.  Over time I have eliminated one of the ingredients - corn syrup.  It was omitted the first time because I actually didn't have any, and then I found that it didn't affect the end result, and I have left it out ever since.

This is also one of those recipes that could be adapted into so many different variations:
  
* Additional cinnamon or add a spice such as chili, cayenne pepper, or cardamom
* Use different chips in the batter such as cinnamon, toffee, or butterscotch
* Add dulce de leche to the batter
* Add coconut or nuts to the crunchy base


Mexican Chocolate Crunch Brownies
(Printer Friendly Recipe)

Ingredients
  • 1 box (12.8 oz) Cinnamon Toast Crunch cereal (about 8 cups)
  •  ½ cup butter, melted
  • 1 box Fudge Brownie mix
  • ½ cup vegetable oil
  • ¼ cup water
  • 2 eggs
  • ½ teaspoon ground cinnamon
  • 1⅓ cups semisweet chocolate chips
  • 3 tablespoons tablespoons sugar
  • ½ teaspoon ground cinnamon

Preparation
  1. Heat oven to 350℉. 
  2. Spray 13x9-inch pan with cooking spray.
  3. In a small bowl mix together the sugar and cinnamon, and set aside until needed.
  4. Place cereal in food processor bowl with metal blade (do in 2 batches if necessary). Cover; process until finely crushed (or place cereal in large resealable food-storage plastic bag and crush with rolling pin).
  5. Add butter to food processor and pulse until well blended. Press evenly in pan.
  6. In large bowl, make brownie mix as directed on box, using oil, water and eggs and adding cinnamon. Stir in 2/3 cup of the chocolate chips. Pour brownie batter over cereal mixture. 
  7. Sprinkle remaining 2/3 cup chocolate chips evenly over batter.
  8. Bake 20 minutes, then sprinkle the cinnamon-sugar evenly over brownies.
  9. Bake 14 to 18 minutes longer or until brownies are set when lightly touched in center. 
  10. Cool 10 minutes; loosen edges but do not cut. 
  11. Cool completely, about 2 hours.
Makes: 24 brownies
Recipe by Valerie Schucht via the Pillsbury 2008 Bake-Off® Contest.


May 04, 2013

Tate's Bake Shop Giveaway + Cinnamon Swirl Scones


Have a craving for a cinnamon rolls but not the time to make them?  Then I have the recipe for you - Cinnamon Swirl Scones.  These have all the cinnamon-y goodness of an actual cinnamon roll, and a yummy vanilla glaze, and can be made in a fraction of the time.

The recipe for these scones comes from Tate's Bake Shop Baking for Friend's, which was sent to me last October for review.  I have really been enjoying this book but had not had the chance to make these scones before.  Boy, had I been missing out. Even though there are three components - filling, dough, and icing - they are super quick to make.  I did make the mistake of not rolling the dough quite tight enough, so I put them in the fridge to firm up and all was well.  I also found that when I cut the dough it tended to flatten a little, and I baked the first batch like this.  With the second ones I kind of squished them a little so they were more rounded and found that they baked up much better this way.

Once again I found myself trying very hard not to nibble too much before I could get a decent photo. Warm out of the oven, with a little drizzle of vanilla icing these really hit the spot, perfectly mimicking a cinnamon roll.  They were a little crisp on the outside and then became softer as you got towards the middle of the scone. These did have raisins in them, which I liked, but you could certainly omit these if you wanted.  I made sure that I didn't put the vanilla icing on them all since I plan on warming them a little in the morning for breakfast. I think that they would make the perfect addition to your Mother's Day Celebration.

And speaking of Mother's Day, it is just around the corner and the wonderfully generous people at Tate’s Bake Shop are giving one reader of All That's Left Are The Crumbs a Mother's Day Brunch Basket. The basket includes their sinful sour cream coffee cake, a lemon pound cake loaf, two each of their heavenly raspberry bars and crumb cakes, plus a box of Tate's Bake Shop's famous chocolate chip cookies.  I still dream of their cookies, so I can only imagine how good the rest of the items in the basket are.  One lucky reader won't have to dream about it, they will win it!


Entering the giveaway is easy:


Main Entry
To enter the giveaway all you have to do is leave a comment telling me about your favorite Mother's Day memory.

Additional Entries
Even more chances to win - you can receive up to two additional entries by doing the following:
  1. Following All That's Left Are The Crumbs on Facebook - leave an additional comment to let me know that you are following.
  2. Follow Tate's Bake Shop on Facebook - leave an additional comment to let me know that you are following.
The Fine Print
  • Deadline for entry is May 11, 2013 at 6:00PM HST.
  • Sorry, this giveaway is open only to US addresses.
  • Please leave a valid email address where I can contact you if you choose to publish anonymously.
  • One winner will be chosen at random using Random.org.  I will announce the winner at the top of this post on Mother's Day - May 12, 2013 - and send them an email.  If I do not have a response within 48 hours, another winner will be selected.
  • The winner will receive a Tate's Bake Shop Mother's Day Brunch Basket (prize supplied directly to the winner by Tate's Bake Shop).
  • The prize for this giveaway to one of my readers is being provided by Tate's Bake Shop.  I was not compensated personally for this post.

    Good luck everyone!
Update: Happy Mother's Day and congratulations to Anne @Have a Cookie who is the lucky winner of the Tate's Bake Shop Giveaway.  Anne, please respond to my email with your details so that Tate's can mail you the prize.  Thank you to everyone who visited my blog and entered the giveaway.

Also, if you are still looking for that perfect Mother's Day gift Tate’s Bake Shop is the place to order something amazing for your mom, grandmother, mother-in-law, or that special person who is like a mom to you. There are basketstowerssquares, and cookies - seriously, you cannot go wrong with anything you order.  They are offering everyone a special 20% off discount code that can be redeemed until Mother's Day.  All you have to do us type in mom13 when you are checking out on their website.


Cinnamon Swirl Scones
(Printer Friendly Recipe)

Ingredients
Filling
  • 8 tablespoons (1 stick) salted butter, at room temperature
  • ½ cup firmly packed dark brown sugar
  • 1 tablespoon ground cinnamon
Dough
  • 4 cups unbleached all-purpose flour
  • ⅓ cup granulated sugar
  • 2 tablespoons baking powder
  • 1 tablespoon spiced vanilla sugar
  • ½ teaspoon salt
  • 8 tablespoons (1 stick) cold salted butter, cut into ½ -inch cubes
  • 1 cup dark raisins
  • 1¾ cups half-and-half
Icing
  • ½ cup confectioners' sugar
  • 1 tablespoon water
  • 1 teaspoon vanilla bean paste

Preparation
Filling
  1. In a small bowl, mix the butter, brown sugar, and cinnamon until smooth.
Dough
  1. Position the oven racks in the top third and center of the oven and preheat the oven to 375℉. Line 2 large rimmed baking sheets with parchment paper or silicone baking mats.
  2. In a large bowl, whisk together the flour, sugar, spiced vanilla, sugar, baking powder, and salt. Using a pastry blender or your fingertips, work in the butter until the mixture is crumbly with some pea-sized pieces of butter. Do not overmix. 
  3. Gently mix in the raisins, then add the half-and-half and mix stirring just until the dry ingredients are moistened.
  4. On a lightly floured work surface, roll out the dough into a 17-by-12-inch rectangle about 1/4-inch thick. Spread the cinnamon filling evenly over the top of dough, leaving a 1/2 -inch border on all four sides. 
  5. Starting at a long side, tightly roll the dough up into a log. Cut the dough into 2-inch slices and arrange them, cut sides up, 4 inches apart on the prepared baking sheets.
  6. Bake, switching the positions of the baking sheets from front to back and top to bottom halfway through baking, until the rolls are slightly golden, 20 to 25 minutes. Let cool on the pans for 10 minutes.
Icing
  1. To make the icing: In a small bowl, mix the confectioners' sugar, vanilla bean paste, and water with a fork until smooth. Drizzle over the buns. Serve warm, or let cool to room temperature. 

Makes 12.
Recipe from Tate's Bake Shop Baking for Friend's