March 30, 2011

To Try Tuesday - Lemon-Blueberry Loaf Cake


I apologize that I am a little late with my To Try Tuesday post.  It seems that my To Try for today ended up being to "To Try" and fix my phone.  Here's a little tip for everyone, back up your phone before you do any upgrades.  I did manage to get my contacts back and my apps, but I did lose a lot of other data.

Anyway, I was determined to brighten my day by baking something.  Just the rhythm of creaming the butter and sugar, spooning it into the pan, and then the delicious smell that fills the kitchen as the goodies bake just puts me in a good mood.


I was really in the mood for something lemon-y, so I went through my files and found a recipe for a Lemon Blueberry Loaf Cake I had saved from Anna at Cookie Madness.  It looked quick and easy, and also delicious.  I wanted to make the lemon flavor more pronounced so I followed Anna's recommendation and added more zest, and it was just right.  I also added a whole cup of blueberries. Time was short so instead of making the glaze I just sprinkled some raw sugar over the top to give it some crunch.  Although I did like the crunchy sugar topping I think that next time I will make the glaze.


Lemon-Blueberry Loaf Cake
(Printer Friendly Recipe)

Ingredients
1 cup fresh blueberries
1 stick (4 oz) butter, cool room temperature
½ teaspoon salt
1 cup granulated sugar
3 large eggs, room temperature
1 teaspoon lemon extract
2 ½ teaspoons lemon zest (or more to taste)
1 tablespoon lemon juice
¼ teaspoon baking soda
1 ½ cups all purpose flour
½ cup sour cream, room temperature
2 tablespoons raw sugar (optional)

Glaze -
2 teaspoons butter
½ cup sifted powdered sugar
1-2 tablespoons lemon juice

Preparation
  1. Put the berries in the freezer for about 30 minutes to freeze – this will help keep them from staining the batter.
  2. Preheat oven at 325°F. 
  3. Spray a loaf pan with flour added cooking spray.
  4. In a stand mixer with the paddle attached, cream the butter and salt. 
  5. Slowly add the sugar and continue beating for another 3-4 minutes. 
  6. Add the eggs one at a time letting the mixer go for 30 seconds after each egg. Scrape sides of bowl often. 
  7. Add the lemon extract, lemon zest, and lemon juice. 
  8. Scrape sides of bowl and add baking soda. Stir well. 
  9. Add all but a couple of teaspoons of flour and sour cream alternately to batter, stirring until blended. Remove bowl from the stand, toss the frozen blueberries in the remaining two teaspoons of flour, then stir into the batter.
  10. Spoon the batter into the prepared loaf pan. 
  11. Sprinkle with sugar if desired.
  12. Bake the cake for 70 minutes or until a toothpick inserted into the center of the cake is clean.
  13. Set the cake on a rack to cool for about 10 minutes. 
  14. Turn the cake from the pan and let cool completely. 
  15.  Make the glaze. Melt the butter in a bowl, add the sugar and stir until it looks pasty and moist. Add one tablespoon of the lemon juice and stir until smooth. If you need more lemon juice then add the rest. 
  16. Drizzle over the cake.
Recipe by Cookie Madness 


March 27, 2011

Espresso and Cream Bars


To me, one of the most enjoyable past-times is drinking a great cup of coffee.  I am extremely partial to the coffee produced by Coffees of Hawaii, and in particular their Ka'u.  I didn't really become a coffee drinker until about ten years ago.  Growing up, tea was the drink of choice in my family, and if we did have coffee it was always instant.  That is probably why I didn't like coffee back then.  My taste has definitely changed now and our coffee is always freshly ground before we brew it, and then it is timed to perfection.

Of course I love coffee desserts too - tiramisu, affogato, Kahlua brownies, coffee ice cream are all favorites.  I really wanted to create some type of bar cookie and I thought the flavors of espresso and cream would be perfect.  I did a quick search but didn't find exactly what I was looking for so I used components from a few different recipes to come up with my bars.  I used the base from a berry tart that I recently made, the cheesecake filling is from Bakerella, and the ganache topping is from the LA Times.  The combination was delicious.


Once all of the steps were complete I put the tart in the refrigerator overnight so that the ganache could harden.  After a few photos I cut it into bars.  I have already put it into containers so that my girls can take it to school tomorrow and share with their friends.  Having these in the house is just too dangerous for me - before I knew it I would have eaten way too many.


Espresso and Cream Bars
(Printer Friendly Recipe)

Ingredients
Base -
  • 1 cup (2 sticks), melted and cooled
  • ⅔ cup sugar
  • 2½ cups all-purpose flour
  • 1 teaspoon of salt

Filling - 
  • 2 (8 oz.) packages cream cheese, softened
  • ½ cup sugar
  • 1 Tablespoons flour
  • 2 eggs
  • ¼ cup heavy whipping cream
  • ¼ sour cream
  • 2 teaspoons vanilla
  • 2 teaspoons espresso powder
  • 2 teaspoons hot water

Ganache Topping -  
  • 10 ounces premium-quality white chocolate, finely chopped 
  • 2/3 cup heavy cream
  • 1 1/2 tablespoons unsalted butter, at room temperature

Decoration -
  • 1 cup powdered sugar, sifted
  • 1 teaspoon espresso powder
  • 5 teaspoons hot water

Preparation
Base -
  1. Preheat oven to 350°F
  2. Grease a square tart tin that has a removable base.
  3. Stir together the butter and sugar in a large mixing bowl.
  4. Add the flour and salt and stir to make a soft dough.
  5. Press dough evenly into base and side of square tart tin with fingertips.
  6. Put the tin on a baking tray and bake for 12-15 minutes, until pastry is slightly puffy.
Filling - 
  1. Preheat oven to 325°F.
  2. Cream the sugar, cream cheese, and flour with an electric mixer on medium until light and fluffy.
  3. On medium low, add eggs one at a time, mixing well with each addition.
  4. Add sour cream and vanilla and mix until just combined.
  5. Mix espresso powder and hot water to dissolve, then add to cheesecake mixture, mixing well.
  6. Pour on prepared crust and bake for about 40 minutes.
  7. Remove and cool.

Ganache Topping -   
  1. Put the chopped chocolate in a heatproof bowl.
  2. Bring the heavy cream to a boil, then pour it over the chocolate. Working with a whisk or spatula, gently stir the chocolate and cream together.
  3. When the ganache is smooth, stir in the butter.
  4. Cool the ganache slightly and then pour over the top of the tart.
  5. Place in the refrigerator to harden.

Decoration - 
  1. Place sifted powdered sugar in a bowl.
  2. Place espresso powder in a small cup and add hot water, stirring to dissolve.
  3. Add espresso liquid to powdered sugar and stir until completely smooth.  Add more hot water if needed.  Do not make icing too thin.
  4. Place icing mixture into a piping bag and pipe lines across the top of the tart.
  5. Take a skewer or a toothpick and drag it from one end of the pan to the other. Then go to the other end of the pan and drag back the other way.  Continue doing this until you have completed the design.

Recipe inspired by Bill GrangerBakerella, and the LA Times.


March 23, 2011

Meyer Lemon and Blood Orange Curd


Just when I thought I would never find a Meyer Lemon one of the stalls at the Farmers' Market had a basket of them.  They were quite green and I hesitated buying them, but I was assured that they would ripen up to a beautiful yellow. Once they were ripe I had a decision to make because I only had four lemons and about ten different recipes that I wanted to try. Since I still had a few Blood Oranges left I decided to juice both and make a curd.

The Meyer Lemon was first brought to the United States in 1908 by Frank Meyer, who worked for the Department of Agriculture.  It is native to China and is thought to be a cross between a lemon and either a mandarin orange or an orange. Meyer Lemons tend to be sweeter and less acidic than regular lemons.  The Blood Orange is a variety of a regular orange that has a deep, red-colored flesh, that gives it its name.  The deep red is due to the presence of a red pigment called anthocyanin, a rich antioxidant, that is common in many flowers but not very common in citrus fruits.  It is actually a mutation of a sweet orange, rather than a hybrid.  They can be somewhat tart, but also have a lovely raspberry-like flavor.

The last time I made a lemon curd I used Alton Browns' recipe from the Food Network.  It was quite good but I wanted to try something different this time around.  A quick search brought me to the Fine Cooking website and a recipe by Elinor Klivans.  I was intrigued by this recipe because it involved beating the butter and sugar, then adding the eggs and juice before putting it into a saucepan to cook.  According to Ms. Klivans this was a foolproof method for making a luscious, light lemon curd.  A common problem when making a curd, especially if you are using whole eggs as well as egg yolks, is the little bit of curdled egg that needs to be strained out of the finished product. If a recipe could eliminate this problem then I was definitely willing to give it a try. 


Everything came together quite well and at first I felt as if I was beginning a cake rather than a curd.  Be warned though that once you add the juice it will curdle - seriously curdle.  I had my doubts about this coming back together as a smooth, luscious topping, but I stayed true to the recipe.  I put the mixture in the saucepan on a low heat and kept stirring and stirring, and before I knew it the butter melted and I had the beginnings of a curd.  I increased the heat, making sure it did not boil, and continued stirring as the mixture thickened.  Before long I had a beautiful pale pink-orange curd.


After transferring it to a bowl I pressed some plastic wrap directly on the surface as this stops a skin from forming on the top and then I put it into the refrigerator to cool overnight.   Of course I made sure I did some quality control and it tasted wonderful.  I am looking forward to having it on my English Muffin in the morning, and I think I will use the rest of it to make some Mini Meyer Lemon-Blood Orange Meringue Pies. Stay tuned for the recipe.

This has become my go-to recipe when it comes to making curd.  I love it because you do not have to temper anything, there are no little bits of egg that you have to strain out of the mixture, and you do not need to use a double boiler.  It couldn't be any easier.  Oh, and I also managed to find a Meyer Lemon tree that didn't cost and arm and a leg, so wish me and my black thumb luck in keeping it alive.  I have a lot more recipes that ask for Meyer Lemon so I need that tree to start producing, like yesterday.

Also, sorry for some less than stellar photos.  I included them because I wanted you to see the process, but I made the curd in the late afternoon, so the light was less than perfect.  Yes, there was lots of cursing under my breath as I tried every light in the house to get a good shot.  One day, I will have a proper lighting system, but until then it is what it is.  At least that is what I keep telling myself.   


Meyer Lemon and Blood Orange Curd

Ingredients
  • 3 oz. (6 Tbs.) unsalted butter, softened at room temperature
  • 1 cup sugar
  • 2 large eggs
  • 2 large egg yolks
  • 1/3 cup fresh Meyer Lemon juice
  • 1/3 cup fresh Blood Orange juice
  • 1 teaspoon lemon & orange zest
Preparation
  1. In a large bowl, beat the butter and sugar with an electric mixer for approximately 2 minutes. 
  2. Slowly add the eggs and yolks and beat for 1 minute. 
  3. Mix in the lemon and orange juice. The mixture will look curdled, but it will smooth out as the butter in the mixture melts during cooking.
  4. In a medium, heavy-based saucepan, cook the mixture over low heat until it looks smooth.
  5. Increase the heat to medium and cook, stirring constantly, until the mixture thickens, about 15 minutes. It should leave a path on the back of a spoon and will read 170°F on a thermometer. Do not let the mixture boil.
  6. Remove the curd from the heat and stir in the lemon and orange zest. 
  7. Transfer the curd to a bowl. Press plastic wrap on the surface of the lemon curd to keep a skin from forming and chill the curd in the refrigerator.
  8. The curd will thicken further as it cools. 
  9. Covered tightly, it will keep in the refrigerator for a week and in the freezer for 2 months. 
 Recipe by Elinor Klivans - via her hairdresser.


March 22, 2011

To Try Tuesday - Jam Filled Buttermilk Donut Muffins


Checking through my extensive list of recipes I would like to try one day I wondered which would be the lucky one today?  I was in the mood for muffins and I found something that I thought sounded really good - cinnamon coated donut muffins.

I remember when I saved this recipe it seemed like everyone was making them.  I guess I am a little behind the trend, which quite honestly is nothing new.  I have to face the fact that I am not a trendy person, and for the most part I am OK with that.  I realized that I actually saved two recipes - one from Food Gal, and another from King Arthur Flour.  I honestly can't remember why these recipes stood out more than the abundance of others around at that time. It is hard to figure out who came up with the original idea because there were so many recipes and adaptations floating around.

In my refrigerator sat a lonely carton of buttermilk so I decided that I would make buttermilk donut muffins.  Then I spotted some Fruits of the Forrest jam that I had brought back from Australia, and I decided that I should fill the muffins too.

It was tough to decide which recipe to go with but I chose the King Arthur one, replacing the milk with buttermilk and sandwiching the jam between two layers of batter. The nutmeg in the batter really gives it that donut-like smell. This is quite a thick batter so I found it easier to spread the top layer of batter with my finger to smooth it out and cover all of the jam


I had mixed emotions about the end result.  Some of the jam over-flowed so I think that next time I will just fill them after they have been covered in the cinnamon sugar. Also, I used cupcake liners and I think that the muffins would be better without them.  Even though I greased them they were still hard to remove, and presentation-wise I didn't like the groove marks they created. As Randy Jackson might say, they were just OK for me.  In hindsight I probably should have gone with the other recipe as it was by Beth Hensberger.


Jam Filled Buttermilk Donut Muffins

Ingredients
  • ¼ cup butter
  • ¼ cup vegetable oil
  • ½ cup granulated sugar
  • ⅓ cup brown sugar
  • 2 large eggs
  • 1 ½ teaspoons baking powder
  • ¼ teaspoon baking soda
  • 1 teaspoons ground nutmeg
  • ¾ teaspoon salt
  • 1 teaspoon vanilla
  • 2 ⅔ cups all-purpose flour
  • 1 cup buttermilk 
  • ½ cup jam
  • 3 tablespoons melted butter
  • 3 tablespoons cinnamon sugar
Preparation
  1. Preheat the oven to 425°F. Lightly grease a standard muffin tin, or line with 12 paper or silicone muffin cups, and grease the cups with non-stick vegetable oil spray.
  2. In a medium-sized mixing bowl, cream together the butter, vegetable oil, and sugars till smooth. 
  3. Add the eggs, beating to combine. 
  4. Stir in the baking powder, baking soda, nutmeg, salt, and vanilla. 
  5. Stir the flour into the butter mixture alternately with the buttermilk, beginning and ending with the flour and making sure everything is thoroughly combined. 
  6. Spoon the batter about ½ way into the prepared pan, add about 1 teaspoon jam, and then fill muffin cups almost full with the remaining batter.
  7. Bake the muffins for 15 to 17 minutes, or until they're a pale golden brown.
  8. Remove them from the oven, and let them cool for a couple of minutes.
  9. While they're cooling, melt the butter for the topping.
  10. Brush the top of each muffin with the butter, then sprinkle with the cinnamon-sugar. Or simply dip the tops of muffins into the melted butter, then roll in the cinnamon-sugar.
  11. Serve warm, or cool on a rack and wrap airtight. Store for a day or so at room temperature.


Yield: 16 muffins. 
Recipe adapted from King Arthur Flour.


March 20, 2011

The Cake Slice March 2011 - Chocolate Cream Pound Cake


Wow, the time really flew by quickly and it is Cake Slice Bakers time again. This month the group is baking a Chocolate Cream Pound Cake from Cake Keeper Cakes by Lauren Chattman. It sounds good just saying it, doesn't it?

This really is a very easy cake to put together. I am used to a darker chocolate cake, so it did throw me a little in the beginning as this one has quite a light batter. It is more like a milk chocolate. I loved the chocolaty smell as it was baking.  My cake was done in one hour, so make sure you check to ensure your cake does not over bake.


I must say that this was not the prettiest of cakes when I took it out of the oven. Mine sank a little on top, and it looked a little dry. All of this hides the deliciousness within. I thought the flavor of this cake was divine, and it is quite moist once you cut into it. In the end I decided that the drier, crackly top provided a good foil for the moist interior.

I can't comment on how well this cake keeps because it was gone by late afternoon. Everyone kept going back "for just another little piece", and before I knew it all that was left was an empty plate and a few crumbs. This is one that I will definitely make again, but I think I'll double the recipe because one loaf just wasn't enough. To see what the other members of our group thought about the Chocolate Cream Pound Cake please visit the Cake Slice Blogroll.


Chocolate Cream Pound Cake
  • 6 tbsp unsweetened Dutch process cocoa powder
  • ¼ cup heavy cream
  • 1 cup plus 2 tbsp all purpose flour
  • ¼ tsp baking soda
  • ¼ tsp salt
  • ½ cup (1stick) unsalted butter, softened
  • 1½ cups sugar
  • 3 eggs
  • 1 tsp vanilla extract
Preparation
  1. Heat the oven to 325°F. 
  2. Grease a 9x5 inch loaf pan and dust with flour.
  3. Sift the cocoa powder into a heatproof bowl.
  4. Place the cream in a microwavable bowl and heat for 30-60 seconds until just boiling.
  5. Pour the hot cream over the cocoa and stir and mash with a spoon to make a thick paste. Set aside to cool.
  6. Combine the flour, baking soda and salt in a medium mixing bowl.
  7. Combine the butter and sugar in a large bowl and cream with an electric mixer on medium-high speed until fluffy, about 3 minutes. Scrape down the sides of the bow once or twice as necessary.
  8. Beat in the cocoa powder paste until smooth.
  9. With the mixer on medium-low speed add the eggs, one at a time, scraping down the bowl after each addition.
  10. Stir in the vanilla.
  11. Turn the mixer to low speed and add the flour mixture, ½ cup at a time, scraping down the sides after each addition. Add the last addition, mix for 30 seconds on medium speed.
  12. Scrape the batter into the prepared pan and smooth the top with a rubber spatula.
  13. Bake the cake until it is firm to the touch and a toothpick inserted in the center comes out clean, about 1 hour and 10 minutes.
  14. Let the cake cool in the pan for 5 minutes.
  15. Invert it onto a wire rack and then turn it right side up on the rack to cool completely.
  16. Slice and serve.
  17. Store uneaten cake in a cake keeper or wrap and store at room temperature for up to 3 days.
Recipe from Cake Keeper Cakes by Lauren Chattman.

March 19, 2011

Chunky Scookies


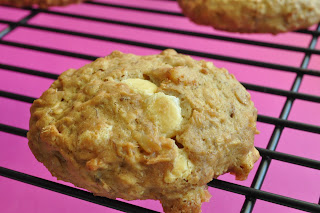
I was at the supermarket a few days ago and I saw some 5-grain cereal in the bulk bins.  I immediately thought about how great it would be as a substitute in an oatmeal cookie.  I quickly grabbed a bag and purchased a few scoops.  I also picked up some golden flax seed and desiccated coconut (the grated, dried, and sweetened - and sometimes unsweetened - fresh meat of a mature coconut).

Next I needed to find a recipe to suit what I had in mind.  I decided to have a quick look in my new favorite cookbook, Flour by Joanne Chang, hoping for a starting point.  Of course I wasn't disappointed and found a recipe called Chunky Lola Cookies (page 110), and this is what I intended to make substituting the 5-grain cereal for the rolled oats, but this is not what I ended up with.  I don't know why but I have trouble sticking with the recipe written in front of me.  My brain tends to go into overdrive and I keep thinking about other ingredients that would make a great addition to the recipe.  The end result is a completely new recipe.


This original Flour recipe had rolled oats, pecans, bittersweet chocolate, and shredded coconut.  The new recipe ended up with 5-grain cereal, banana, macadamia nuts, golden flax seed, desiccated coconut, and white chocolate chips.  Completely different but still delicious.  I did put the dough in the refrigerator for three hours to firm up a bit. I think it would have been even better had I left it there a little longer (or even overnight as the original recipes recommends) because as you are scooping the cookies the dough quickly becomes quite soft and sticks to your hands as you slightly flatten them.

When family and friends tried them there was some debate over whether they tasted more like a cake, a scone, or a cookie.  My daughter said that they tasted like a scookie - a cross between a scone and a cookie - so that is what I called them.  They are delicious on their own, but become decadent when you dip them in ganache.


Chunky Scookies©
(Printer Friendly Recipe)

Ingredients
  • ½ cup plus 3 tablespoons butter, softened
  • ⅔ cup granulated sugar
  • ⅔ cup brown sugar
  • 1 teaspoon vanilla extract
  • 2 eggs
  • 2 bananas, cut into chunks
  • 3 cups all purpose flour
  • 1 cup 5-grain cereal
  • 2 teaspoons baking soda
  • ½ teaspoon salt
  • 1 cup white chocolate chips
  • 1 cup macadamia nuts, roughly chopped
  • 1 cup desiccated coconut
  • 1½ tablespoons golden flax seeds

Preparation
  1. Preheat the oven to 350°F.
  2. Line sheet pans with parchment paper or Silpats.
  3. Using a stand or hand-held mixer, cream together the butter and sugars until light and fluffy.
  4. Add the vanilla and eggs and mix an additional 2 to 3 minutes until well combined.
  5. Add banana and mix until roughly broken up.
  6. In a separate bowl combine the flour, 5-grain cereal, baking soda, salt, white chocolate, macadamias, coconut, and flax seed.
  7. On low speed, slowly add the flour mixture to the butter mixture and mix until the dry ingredients are completely incorporated and the dough is evenly mixed. 
  8. Place the dough in the refrigerator overnight, or at least 3 to 4 hours before baking.
  9. Using an medium cookie scoop drop rounded tablespoons of dough onto the prepared sheets, spacing them about 2 inches apart.
  10. Slightly flatten each cookie with the palm of your hand.
  11. Bake 20-25 minutes or until golden around the edges and slightly soft in the center.
  12. Cool the cookies on the baking sheet for about 20 minutes, before transferring them to a wire wrack to cool completely.
  13. Once cooled dip half of each cookie in ganache, if desired.

Makes about 36 cookies. 


March 16, 2011

Pot O'Gold Cupcakes


Tomorrow is St Patrick's Day and we will have our traditional corned beef, potatoes, and something green - I love cabbage but the rest of the family does not.  Somehow bok choy seems a little strange for an Irish dinner, but I just go with the flow.

Recently there have been some wonderful recipes for  cupcakes with a St. Patick's Day theme -  Irish Coffee Cupcakes by 52 Kitchen Adventures, St. Patrick's Day Cupcakes by Susi's Kochen Und Backen Adventures, and Guinness Cupcakes by My Baking Addiction, to name a few.  All sound so good, and I have bookmarked them so that I can try them soon.  I couldn't decide on one, so I took a little something from all of them and came up with Pot O'Gold Cupcakes.

As much as I love chocolate cupcakes I wanted to make a basic yellow cupcake, so I used a tried and true recipe from Martha Stewart. A good friend of mine brought back a jar of Ladurée Caramel au beurre salé for me when she went to Paris last year, and I have been saving it for a special occasion.  I am always torn when I get gifts like this because on the one hand want to use it, but I also want to save it because I can't replace it.  I decided that this was a good time to break that seal and enjoy the contents.  The caramel is so thick and delicious, so after I made the cupcakes I cut a small portion from the top and filled them with the caramel.  A buttercream frosting seemed to be the perfect topping, so I went with it, and added Bailey's® Irish Cream in a caramel flavor as a little something extra. I may have gone a little overboard with the Bailey's®, so I adjusted it in the recipe below.  


Well, I think that I may have just found the Pot O'Gold at the end of the rainbow. Happy St. Patrick's Day!  And remember, many an opportunity is lost because a man is out looking for four-leaf clovers. 


Pot O'Gold Cupcakes
(Printer Friendly Version)

Ingredients

Cupcakes:
  • 1½ cups all-purpose flour
  • 1½ teaspoons baking powder
  • ½ teaspoon salt
  • ½ cup milk
  • 1 teaspoon vanilla bean paste
  • ½ cup (1 stick) unsalted butter, room temperature
  • ¾ cup sugar
  • 2 large eggs
Frosting:
  • ½ cup (1 stick) unsalted butter, room temperature
  • 3 cups confectioners' sugar
  • 3 tablespoons Bailey's® Irish Cream (I used the caramel flavor) 
  • 1 tablespoon cream
  • ½ teaspoon vanilla extract

Directions
 
Cupcakes:
  1. Preheat oven to 350°.
  2. Line the cups of a standard (12-cup) muffin tin with paper or foil liners.
  3. In a small bowl, whisk together flour, baking powder, and salt; set aside.
  4. In a liquid-measuring cup, mix milk and vanilla; set aside. 
  5. In a large bowl, with an electric mixer, beat butter and sugar until light and fluffy, 3 to 4 minutes.
  6. Add eggs one at a time, beating well after each addition. 
  7. With mixer on low speed, add half of dry ingredients, followed by milk-vanilla mixture, then remaining dry ingredients. Do not overmix. 
  8. Divide batter evenly among prepared muffin cups. 
  9. Place tin on a rimmed baking sheet; bake until a toothpick inserted in center of a cupcake comes out clean, 20 to 25 minutes.
  10. Cool cupcakes 5 minutes in tin, then remove and cool completely on a rack before frosting.
Frosting:
  1. In a medium bowl, with an electric mixer, beat unsalted butter, confectioners' sugar, cream, Bailey's, and vanilla extract until smooth.
  2. Mix in up to 1/2 cup more sugar or a few more teaspoons of milk as necessary to achieve a spreadable consistency. 
  3. Makes enough for 12 cupcakes. 
Recipe adapted from Martha Stewart

March 15, 2011

To Try Tuesday - Bill's Berry Tart


Math never was my strong point so it is no big surprise that I missed Pi Day.  I had this great idea that I would make Bill Granger's Cherry Tart to celebrate Pi Day (even though it is, technically, a tart not a pie) but I ended up having 3.14159265 other things to do, so it became a To Try recipe instead.


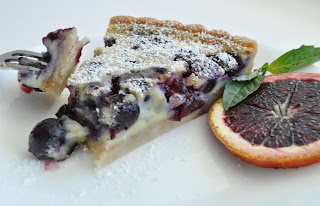
I planned on using cherries but Costco did not have any and I didn't want to be stuck with a big bag of frozen cherries.  So I went with blueberries instead, using about 2 cups of whole berries to make a single layer in the tart shell.  It therefore became Bill's Berry Tart.


There is not one thing about this tart that I would change - it was amazing.  If you are looking for a easy-to-make dessert that will impress your family and friends then this is your dessert.  Cherries, blueberries, blackberries, raspberries, or even a mix of berries would be great in the filling.  I loved that the crust was a cinch to make and it did not have to be rolled out.  You know how the crust can shrink sometimes when you are pre-baking? Not with this one.  Also, those pie weights that you use to stop air pockets forming in the crust? Well, you will not need them for this crust. Simply make crust in less than 5 minutes, pre-bake, fill with fruit, pour custard over the top, and bake once more.  Mine baked for 35 minutes, so realistically you could have this pie ready in about an hour.  I sprinkled mine with a little powdered sugar after it cooled, but this is optional.  Ice cream or whipped cream would be a nice addition too.  Lastly, the original recipe was in metric, so if you prefer these measurements you can find the recipe here.


Bill’s Berry Tart
(Printer Friendly Version)

Ingredients

Pastry
  • ½ cup (1 stick) + 1 tablespoon unsalted butter, melted and cooled 
  • ⅓ cup sugar 
  • 1¼ cups all-purpose flour 
  • a pinch of salt 
  • 2 tablespoons of ground almonds 
Filling 
  • ⅔ cup cream 
  • 2 eggs, lightly beaten 
  • 2 teaspoons vanilla extract 
  • 3 tablespoons sugar 
  • 2 tablespoons all-purpose flour 
  • 16 oz cherries, halved and pitted 
 Preparation
  1. Preheat oven to 350°F.
  2. Grease a 9-inch round loose-bottomed tart tin. 

To make the pastry:
  1. Stir together the butter and sugar in a large mixing bowl.
  2. Add the flour and salt and stir to make a soft dough.
  3. Press dough evenly into base and side of tart tin with fingertips.
  4. Put the tin on a baking tray and bake for 12-15 mins, until pastry is slightly puffy.
  5. Remove from oven and sprinkle almond meal over base.

To make filling:
  1. Whisk together cream, eggs, vanilla, sugar. 
  2. Add flour and whisk until well mixed.
  3. Arrange cherries over pastry base and pour cream filling over cherries.
  4. Bake for 40-50 minutes until filling is firm.
  5. Leave to cool and serve with cream or ice-cream.

Serves 8-10.  Original recipe appears in Holiday by Bill Granger.


March 14, 2011

Caesar Spaghetti


I'll be the first to admit that I find Rachael Ray a little over-the-top perky and I have to be in the right mood to watch her show.  When I saw her latest cookbook, Look + Cook, at the library I hesitated a little before adding it to the stack I was borrowing.  And then I forgot about it.  Well, not enough to earn me a library fine, but enough to give me just one quick look through before it was due.  I have to say that there were a few recipes that peaked my interest.  One recipe that jumped out at me was Caesar Spaghetti, and I quickly noted the recipe before I placed the book in the return basket.

Caesar Salad is a favorite around here, so I figured that these flavors in a spaghetti dish would be popular too, and I was right.  It is very easy to put together and the flavors were good.  I wish the sauce had been a little thicker, so I might play around with that a little.  I also found that the recipe was missing the croutons that you would expect to find on a Caesar Salad.  To fix this problem I cut some Hawaiian Sweet Bread rolls in half and lightly toasted them, and then gave them a nice schmear of garlic butter.  Problem solved.


I did have to make a few adjustments.  I looked everywhere but I could not find escarole.  Suitable substitutions are kale and spinach, so I went with spinach and it seemed to work out well.  Also, my daughters are not fans of little fishies (anchovies) so I omitted them and used the full tablespoon of Worcestershire sauce.  Leftovers were good too.


Caesar Spaghetti
(Printer Friendly Recipe)

Ingredients

  • salt
  • 1 pound spaghetti
  • 1/4 cup extra-virgin olive oil, plus some for drizzling
  • 6 anchovy fillets, drained
  • 4 large cloves garlic, grated or finely chopped
  • 2 teaspoons to 1 tablespoon Worcestershire sauce
  • 2 medium heads escarole, washed
  • 1 lemon, halved
  • Freshly ground black pepper
  • 1/4 teaspoon freshly grated nutmeg, or to taste
  • 2 large egg yolks
  • 1 cup grated Pecorino Romano
Directions
  1. Bring a large pot of water to a boil over high heat. 
  2. Once boiling, salt the water and then add the pasta and cook until just shy of al dente, according to package directions. Before draining reserve 1 cup of the starchy cooking water.
  3. While the pasta is cooking, put a large skillet over medium-high heat and add the extra-virgin olive oil. Add the anchovies and cook until they've melted into the oil, about 2 minutes. 
  4. Reduce the heat to medium-low and add the garlic, stir 1 minute then add in Worcestershire. 
  5. Shred the escarole and add several handfuls at a time, wilting the greens in the garlic oil. 
  6. Dress the greens with lots of pepper and a little nutmeg, then squeeze the juice of 1 lemon over the pan. 
  7. Place egg yolks in a small bowl and gradually add the reserved starchy cooking water to temper them - do this slowly or you will get scrambled eggs.
  8. Turn off the heat and add the drained pasta and the egg mixture. Stir to combine. 
  9. Add half of the cheese and toss vigorously for 1 minute. 
  10. Dress the pasta with a drizzle of extra-virgin olive oil and transfer to a serving dish. 
  11. Pass the remaining cheese at the table.
Recipe by Rachael Ray

March 09, 2011

To Try Tuesday - Portuguese Custard Tarts


I found this recipe for Portuguese Custard Tarts courtesy of the Cooking Channel and Bill Granger.  For those who might not have heard of Bill, he is a very popular Australian self-taught "cook", who was quoted in Food & Wine magazine as saying "I learned how to cook in a domestic kitchen which keeps my food simple and instinctual".   I just love his easy going manner and simple approach to food.  He has eight cookbooks, including his latest, Bill's Basics.  It is no big surprise that I own them all.

Pressing plastic wrap on the surface prevents a skin forming on the custard


Bill's recipe originally calls for puff pastry but I still have quite a few pie crusts left over from Thanksgiving and Christmas.  What can I say, Sam's Club was selling rolled and read-to-use Pillsbury pie crusts in bulk so I stocked up on a bargain.  I decided that two of these crusts would make a good replacement for the puff pastry.  I also wanted to make mini tarts because they are a nice little mouthful, and also because they are so darn cute.  I simply used a fluted biscuit cutter and gently pressed the cut out pastry into a mini muffin tin.  I had enough dough to make 48 mini tarts, although I only had enough custard to fill 30 empty tart shells, so I filled the remaining ones with jam.


My only complaint about these tarts is that the custard is very sweet. Next time I make them I will definitely cut the sugar in half.  I really don't think I will miss it as they are quite rich to begin with. About 12 disappeared before I had even finished taking these photos.  I was surprised because my husband is back in training mode so he is usually very disciplined about eating sweets, but I guess these were hard to resist.


Portuguese Custard Tarts
(Printer Friendly Recipe)

Ingredients
  • 3 egg yolks
  • 1/2 cup superfine sugar (I used regular)
  • 2 tablespoons cornstarch
  • 1/2 cup heavy cream
  • 2/3 cup milk
  • 2 teaspoons pure vanilla extract
  • 2 refrigerated pie crusts, thawed 
  • nutmeg for sprinkling, if desired

Directions
  1. Place the egg yolks, sugar and cornstarch into a saucepan and whisk them together. 
  2. Gradually beat in the cream and milk until smooth. 
  3. Place the pan over medium heat, and stirring constantly, cook until the mixture thickens and comes to a boil. 
  4. Switch off the heat, and stir in the vanilla extract. 
  5. Transfer the custard to a bowl, cover the surface with plastic wrap to prevent a skin from forming, and leave out to cool. 
  6. Preheat the oven to 375°F. Lightly grease 2 x 24 count mini muffin pans. 
  7. Lay the pie crusts on a lightly floured board and, using a biscuit cutter, cut rounds from them.  Gather the left-over pastry scraps and re-roll, cutting more rounds as needed.
  8. Press one round into each mini muffin hole. 
  9. Spoon the cooled custard into the pastry cases, sprinkle with nutmeg if desired, and bake until the pastry and custards are golden, about 20 to 25 minutes. 
  10. Leave the tarts in the pan for 5 minutes, and then remove and transfer to a wire rack to cool completely. 

Recipe adapted from Bill Granger and the Cooking Channel.